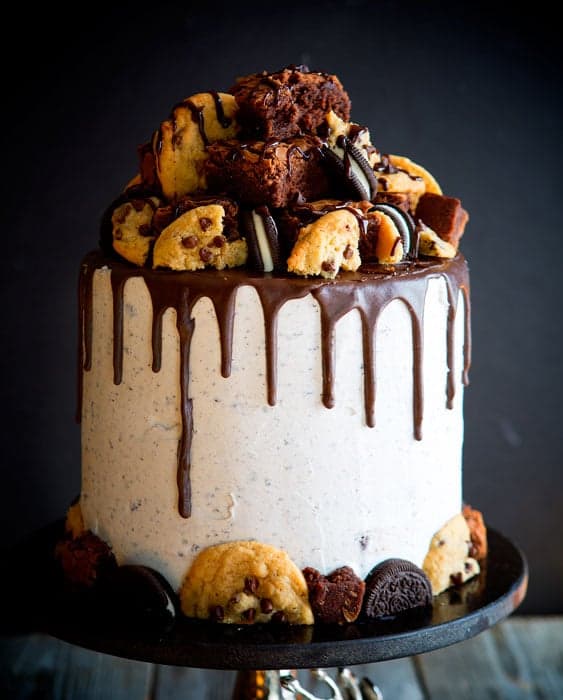
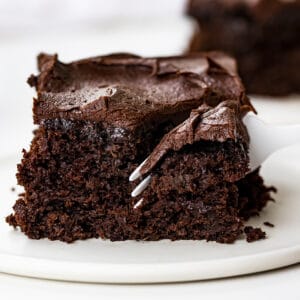
This cake is a mouthful, quite literally. Layers of chocolate and white cake are separated by brownie bits, Oreos, chocolate chip cookies, whipped vanilla buttercream, as well as chocolate buttercream!
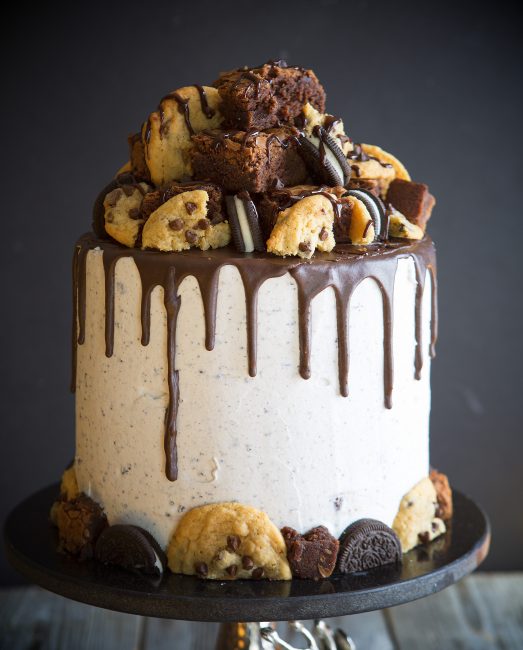
This Brownie Oreo Chocolate Cake is MASSIVE. I made a lot of it ahead of time!
Here are the recipes:
chocolate chip cookie recipe (I dropped rounded tablespoons on the cookie sheet to make MINI cookies for this cake.)
whipped buttercream recipe doubled, one recipe will remain plain, the other will be Oreo Buttercream, recipe below
chocolate buttercream (1/2 recipe)
chocolate drip (melt 1/2 cup chocolate morsels with 1 tablespoon heavy cream)
package Oreo’s (I don’t recommend double stuff)
How to Assemble This Cake
Prepare all the recipes listed above. Here is the Oreo Buttercream recipe:
Place the first layer of chocolate cake on the cake stand or cake plate. Place the cake stand on top of a rotating cake stand.
Cover with 1/2-3/4 cup of chocolate buttercream.
Cut your pan of brownies. Take 2 brownies and cut them into small pieces. Place those pieces on top of the chocolate buttercream. Place remaining brownies in an airtight bag until ready to use.
Place layer of white cake on top. Cover with white buttercream. Add chopped Oreo bits to the top.
Set the next layer of chocolate cake on top. Press down gently with your hand, you want to make sure the cake is as level as possible. Turn it and look at it from all sides.
Cover with chocolate frosting and then cover in roughly crumbled chocolate chip cookies.
And the final layer of white cake on top. Use some of your white buttercream to cover up any spots of chocolate buttercream or areas of cake that need to be smoothed out. CHILL CAKE for at least 30 minutes in the refrigerator.
CHILL CAKE for at least 30 minutes in the refrigerator.
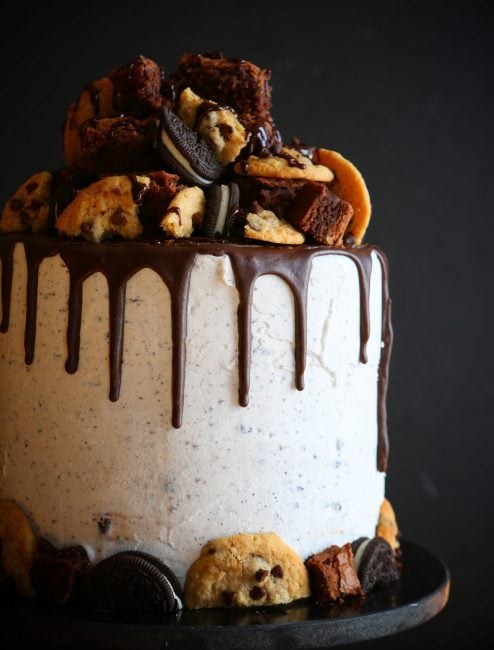
Cover cake in Oreo Buttercream. You can use an offset spatula and a bench scraper for a smooth finish. Chill cake for at least 2 hours before adding chocolate drip. You want the cake very cold.
Prepare chocolate drip and place it in a plastic bag or squeeze bottle. Start slowly and drip chocolate over the side of a very cold cake. Another way to do this is to spoon some glaze onto the center of the cake and gently spread it around. You will need to move quickly as the cold cake will seize up chocolate. (If you are using a sugar+water glaze you have more time to work.)
PRO-TIP: Using room temperature chocolate when dripping on a cold cake will help the drip to SLOW down and not go all the way to the bottom of the cake!! This really works!
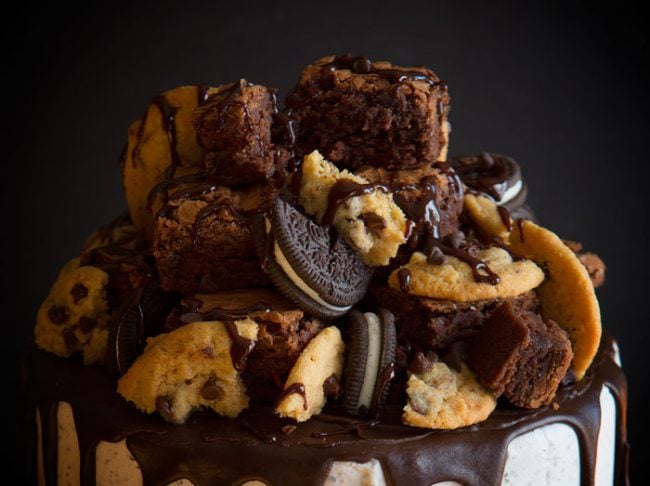
Now get your brownies and make sure they are a good size to place on top of the cake. Start with a layer of brownies.
Start with a layer of brownies. (Be sure to save one brownie that you will use as garnish around the base of the cake) Fill in with Oreo’s. Add more brownies. Add chocolate chip cookie bits. Continue until you have a nice pile of brownie, oreo, and chocolate chip cookie.
Cut up last remaining brownie into small cubes. (If brownie is too tall, cut the cube in half.) Cut some Oreo’s in half.
PRO-TIP: The best way to get a CLEAN cut when trying to cut Oreo’s in half is to use a big butcher’s knife. Set the Oreo on a cutting board and set the knife on top of the Oreo. When you are ready, QUICKLY press down on the knife with your other hand. Hard and fast is best! This will result in a clean-cut cookie!
If you made mini chocolate chip cookies you may not need to cut them in half, but if they are large you will want to cut them.
Place brownie cube at base of the cake, then Oreo half, then half chocolate chip cookie and repeat that pattern around the base of the cake.
When ready to serve, drizzle with chocolate sauce. Chill until ready to serve!
Oreo Buttercream
Ingredients
- 1 c 2 sticks, 226g butter, room temperature
- 2 tsp. vanilla extract
- 1 tsp. almond extract
- 7 c or 8 32 ounces confectioners sugar, sifted*
- 2 tbsp. whole milk or heavy cream
- pinch salt
- 1 c crushed Oreo
- *You can use as little as 4 cups if you want to decrease sugar
Instructions
- Beat butter in bowl of stand mixer with whisk attachment on medium-high speed until light and fluffy. (about 3 minutes)
- Add vanilla and almond extract.
- With the mixer on low, slowly add in confectioners sugar , milk, and salt; frequently scrape sides and bottom of the bowl.
- Once incorporated, whip frosting for at least 3 minutes on medium high to high. (My mixer went for 7 minutes)
- If frosting is too thick to spread, gradually beat in additional milk.
- Remove bowl from mixer and add in Oreo cookie bits. Stir by hand until fully combined. (You can add in more if you want, I just prefer a lighter frosting color so used less Oreo)
- Store in refrigerator up to 2 weeks.
Did you make this recipe?
Thank you for making my recipe! You took pictures, right? Well go ahead and post them on Instagram! Be sure to mention me @iambaker and use the hashtag #YouAreBaker.
See a video on how I assembled this cake here:
You may be wondering why I made this cake. Well, it was for a Charity Auction at my kids’ school. I thought that I should make an indulgent, over-the-top, special cake that you couldn’t buy just anywhere!

Someone bid $200 on this cake and they won! I was shocked but so excited for them! I hope they liked it. 🙂


Oh my goodness…I gained 10 lbs just watching the video. Congratulations on a beautiful cake and the great bid! Amazing work
Thank you! <3
This is just marvelous. One question though: how do you lift this cake off the stand? I mean what if I want to take it somewhere with me?
This is crazy decadent! Yummy!
This is stunning! Where did you find that large bench cutter to smooth frosting? Mine is too small.
Dear Amanda,
I am looking at your white cake and the recipe is very american-friendly. Any chance you making amendments to a more UK-friendly baker? 🙂
Thank you
Just curious why sift the powdered sugar? The cake is amazing and you are as well.
Whoever won this got an amazing deal! Just the cake stand alone goes for over 250$!
I made a towering 6″x7″ version of this for my daughter’s 16th Birthday party – with Devil’s Food cake, the chocolate frosting, and Oreo frosting. SO GOOD!
Thank you for the inspiration!
How tall is this cake? For transporting purposes? Thanks!
I love to get your recipes.
I made this recipe for a group of friends just this weekend…OH.MY.GOD. This cake is just insane! Everyone was impressed 🙂
Took me two evenings to prepare everything, but it was definitely worth all the efforts! We all got an intense sugar rush and passed out right after! But surprisingly, everyone said that it felt light and not as sweet as the cakes you buy from the store.
I just nodded and smiled, thinking about how much sugar and butter I used! Thank for this/these amazing recipe(s)!