This Cauldron Cake is a lot easier than you would think and seriously perfect for Halloween! I will teach you all my tips and tricks on how to get the most AMAZING tasting cake you will ever try as well as how to create fun buttercream skeleton hands gripping the sides of the cauldron.
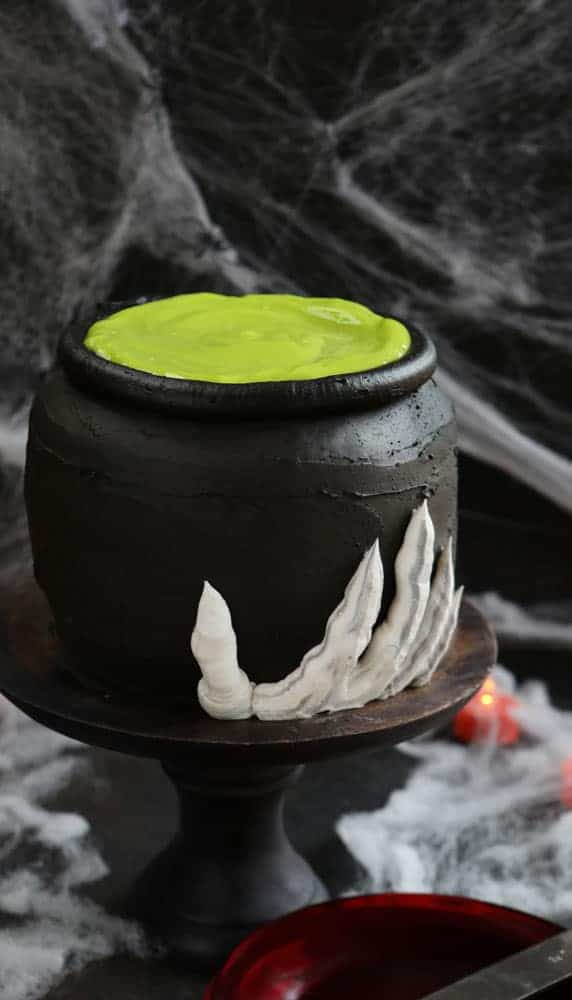
Cauldron Cake with Buttercream Skeleton Hands
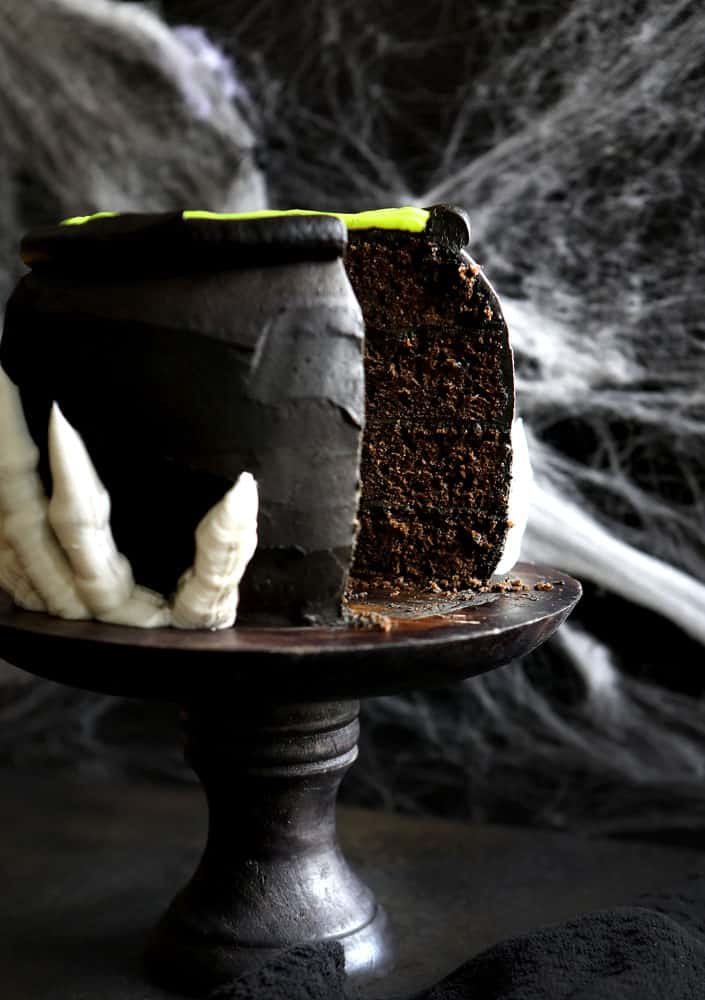
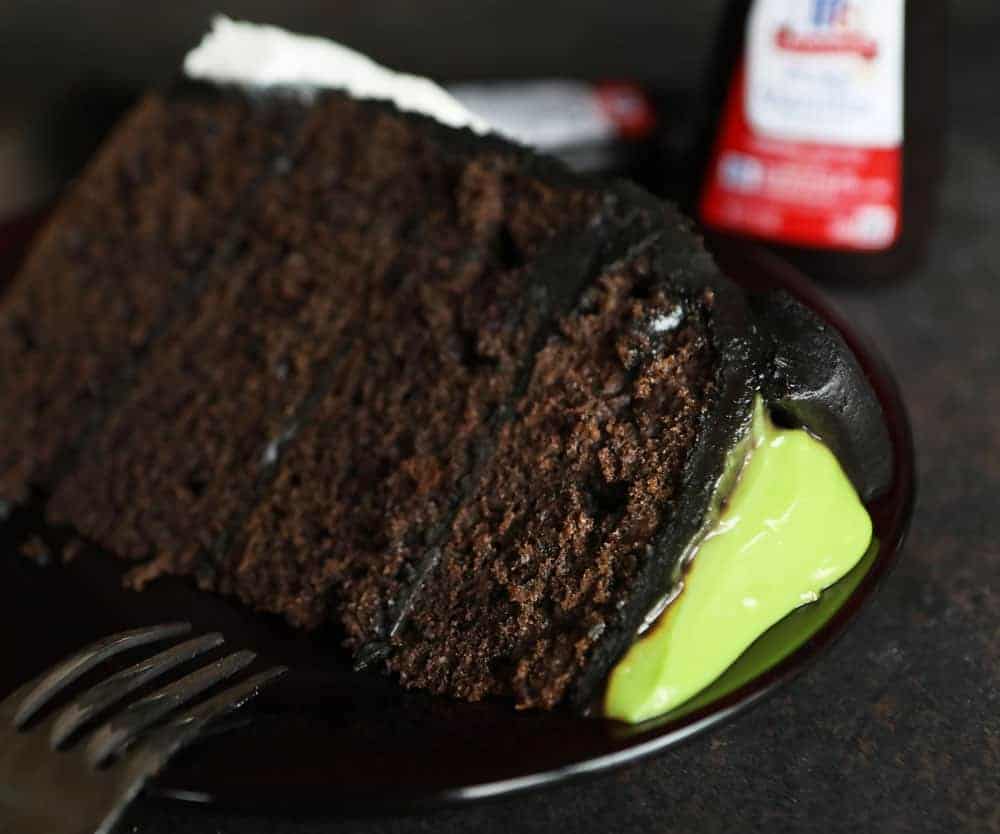
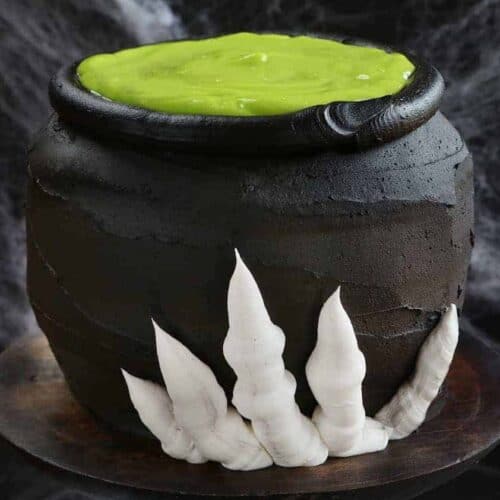
I was a bit shocked at how easy this cake came together. It’s simply a 4 layer cake with chocolate frosting tinted black and some seriously fun neon green vanilla pudding. (I call it green slime!) But the best part? Skeleton hands gripping the sides of the cake. I have to admit I was pretty nervous to make those hands as I have only ever seen them done out of fondant or chocolate, but this could not be easier. Granted, they are an extremely simplified version, but one that any level baker could do! One aspect that makes this cake easy is using good quality products like McCormick extract and food color. I love how these products help me and inspire me to make the best-tasting cakes as well as original cake designs!
How to Create a Cauldron Cake (video below)
To make the cauldron shape I simply carved a bit around the edge of the cake. You can’t screw this up, I promise. Basically, it is just removing the top edge as well as the bottom edge to achieve a bowl shape. If your carving skills aren’t perfect and mine aren’t!) you can always fill in any low spots with extra frosting. Or simply leave as-is… I think a rustic cauldron adds to the charm of this cake!
You can also bake your cake in round pans specially made for round cakes. When testing out this method I found the cake to be too round, so opted for the minimal carving.
Once the cake is carved, cover it with a generous coat of black chocolate buttercream. I opted NOT to do a crumb coat and final coat. The black buttercream will cover up any crumbs and I really loved the rustic look. After covering the cake I applied the skeleton hands (instructions below) and then added the “rim” around the top of the cake.
To do that simply put your remaining black buttercream in a pastry bag fitted with a #808 (large open round tip) and begin to pipe around the edge. This works best when the cake is on a rotating cake stand. Slowly turn the cake as pressure is applied to the pastry bag. Go around the entire cake and then swipe the tip at the end. If you don’t like how it looks or have any air bubbles, just remove the frosting and start again. Your final step is to fill in the top with the green slime! (instructions below)
Buttercream Skeleton Hands
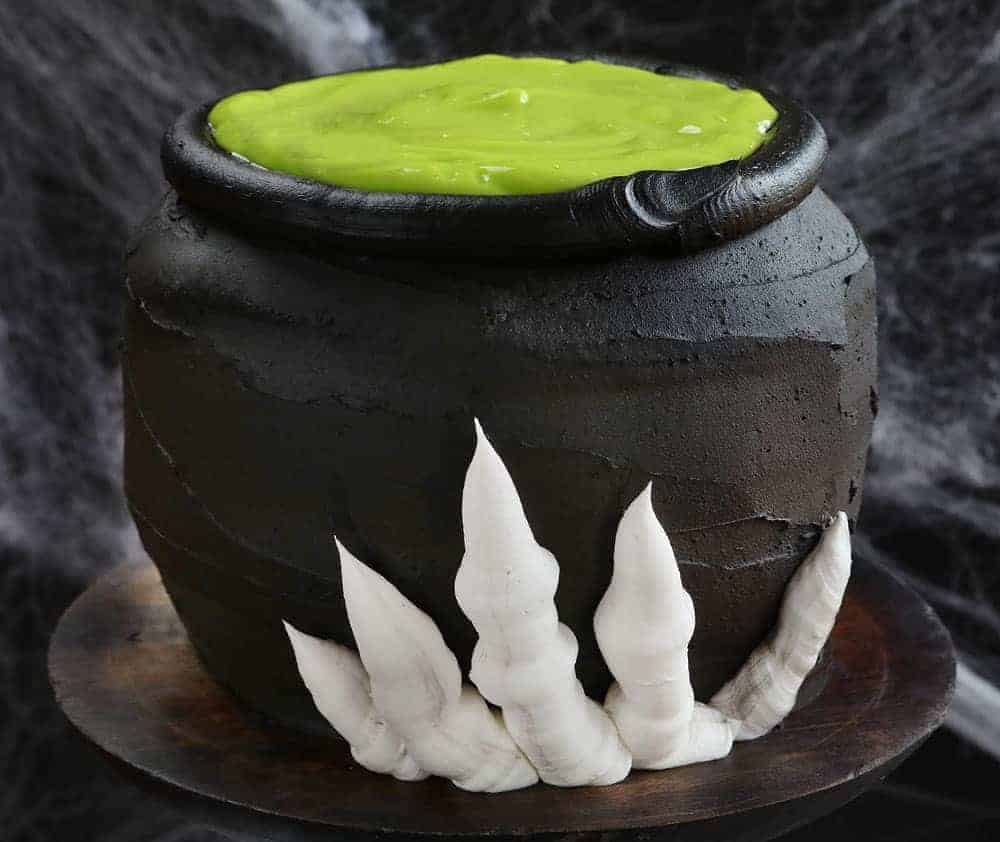
Making these boney fingers is pretty darn easy. You need about 2 cups of white buttercream. I decided to add a little black frosting to the outside of my piping bag for a grey effect on the fingers, but that is totally optional. You can see some of the fingers are completely white and some have more prominent black lines, and both seem to work.
I added the frosting to a pastry bag fitted with an #808 large open round tip from Ateco. (I used that same tip for the rim of the cauldron.) After the cake is covered with the black chocolate buttercream, I began piping. For the thumb, start at the bottom of the cake and apply pressure to the piping bag. Slowly move up and release some of the pressure, then pause and apply more pressure again, then move up and release. The moments when I applied pressure is when I was creating the “knuckle” portion of the hand. The same premise applies to all of the fingers, you just want to be mindful of the length of each finger. The middle finger being the longest and the pinky being the shortest.
A few tips for buttercream skeleton hands:
Practice first! I grabbed a large bowl and piped on the side until I was comfortable with the “pressure and release” method. Scrape all the frosting off and reuse it when you are ready to pipe directly on the cake.
Use a toothpick to trace out a guideline for the hand placement. The frosting can be piped right over the top so no one will ever know!
Don’t worry about perfection! These are not meant to look exactly like a skeleton hand, they are meant to give the impression. If you wanted to change things up, feel free to add almond fingernails or make the hands green to match the slime in the cauldron!
How to Make Edible Slime
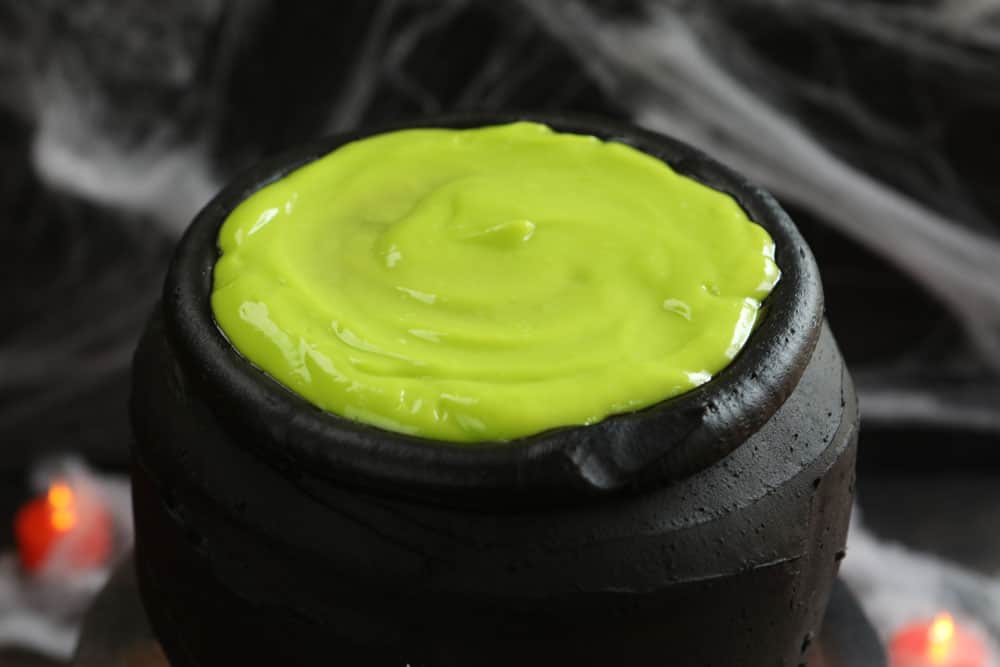
This is probably my favorite part of this cake! The neon green slime is only two components; vanilla pudding and McCormick Neon food color. (Which you can find at most grocery stores or on Amazon.) How simple is that? And SO FUN! You can use as much or as little food color as you would like, but I ended up adding about 1 teaspoon. All I could think as I was making it was “double, double, toil and trouble”. 😂
I added roughly 1 cup of pudding to the top as I wanted to make sure it didn’t all spill down when I cut into the cake. However, you can easily add more! If you want more green slime pudding, I recommend carving out a bit of the top so there is a little ‘cake bowl’ that can hold it all in. My kids loved getting to eat the extra neon green pudding I had left over. You can also save the extra green slime and serve more with each individual piece.
To add the pudding to the cake (this is your final step!) just take spoonfuls of the pudding and starting filling in around the outer rim of the cauldron. Continue until the top is covered.
How and When to Serve a Cauldron Cake
I highly recommend serving it soon after assembling. I did notice that the black food color bleeds slightly into the pudding the longer it sits. My friend that it was a really cool effect, but if you want to avoid it try to serve immediately.
The first time I made this cake I chilled for about 12 hours before serving. The cake holds up beautifully but there is that slight bleeding into the pudding. The second time we cut into it immediately after assembly and I could not have been more thrilled with how beautifully it all holds together. The trick to that perfection? Make sure your cake layers are VERY chilled when assembling the cake!
Tips for Black Buttercream
My favorite secret tip for black buttercream is starting with a chocolate frosting base. Everyone loves chocolate frosting!
My next favorite tip is to let your frosting sit (covered) for about an hour after you make it. After adding a teaspoon of McCormick black food color the frosting will appear to be a dark grey. But an hour later it was a glorious deep black! (To make things easier on cake assembly day, you can even make the frosting a day in advance.)
How Does a Cauldron Cake Taste?
OH MY WORD it’s SO GOOD!!! After we tried the first bite my friend and I immediately said to each other… “we need to make more cakes with pudding!” The creamy vanilla pudding paired with rich chocolate cake and perfect chocolate frosting is one of the best cake combinations I have ever had. It’s almost beyond words how delicious this cake is!!!
I DOUBLED the above chocolate cake recipe to make the 4 layers for this cake.
Cauldron Cake
Ingredients
CHOCOLATE CAKE
- 1 ¾ cups (210 g) all-purpose flour
- 2 teaspoons McCormick Pure Vanilla Extract
- 2 extra-large eggs, room temperature
- ½ cup (112 g) vegetable oil
- 1 cup (240 g) buttermilk, room temperature
- 1 teaspoon kosher salt
- 1 teaspoon baking powder
- 2 teaspoons baking soda
- ¾ cup (90 g) unsweetened cocoa powder
- 2 cups (400 g) granulated sugar
- 1 cup (237 g) freshly brewed coffee
Black Magic Buttercream
- 1 ½ cups (340 g) butter, at room temperature
- 4 cups (500g) confectioners sugar
- ¾ cup (94 g) cocoa powder, can also use DARK cocoa
- 4 tablespoon (60 ml) heavy whipping cream
- 2 teaspoon (10 ml) McCormick Pure Vanilla Extract
- 1 pinch table salt
- 1 teaspoon (5-10ml) McCormick Black Food Color
Green Slime Pudding
- 1 package vanilla instant pudding, prepare according to package instructions
- 4 drops McCormick Neon Food Color
Skeleton Hands
- 2 cups vanilla buttercream
Instructions
CHOCOLATE CAKE
- Sift the flour, sugar, cocoa, baking soda, baking powder, and salt into the bowl and mix until combined.
- In another bowl, combine the buttermilk, oil, eggs, and vanilla.
- With the mixer on low speed, slowly add the wet ingredients to the dry. With mixer still on low, add the coffee and stir just to combine, scraping the bottom of the bowl with a rubber spatula.
- Pour the batter into two 8-inch round prepared pans and bake for 30 to 40 minutes at 350°F, until a cake tester or toothpick comes out mostly clean (not wet).
- Cool in the pans for 30 minutes, then turn them out onto a cooling rack and cool completely.
Black Magic Buttercream
- In the bowl of an electric stand mixer fitted with whisk attachment, whisk butter and sugar on medium-high speed until very pale and fluffy or about five minutes.
- Be sure to stop at least once and scrape the bowl.
- With the mixer off, add in dark cocoa powder, vanilla and salt.
- Turn mixer on low and blend for about 30 seconds.
- One tablespoon at a time add in heavy cream.
- Once all cream has been added and mixture is mostly combined, turn off the mixer and scrape down the sides of the bowl.
- Add in 1 teaspoon of black food color.
- Now turn the mixer onto medium-high to high and whisk for 3-5 minutes or until mixture is lighter and fluffier.
Green Slime Pudding
- Follow the instructions on the pudding box, adding the lime extract and food color to the mixture as you blend ingredients.
- Cover the mixture and place it in the refrigerator for at least an hour, or until you are ready to use it.
Video
Did you make this recipe?
Thank you for making my recipe! You took pictures, right? Well go ahead and post them on Instagram! Be sure to mention me @iambaker and use the hashtag #YouAreBaker.
I loved creating this Cauldron Cake with McCormick. Thank you so, so much for supporting the brands that support this blog. I only work with the best, and am thankful that McCormick is willing to partner with me!


Nice to see you this morning.
can you use this in a fondant covered cake?