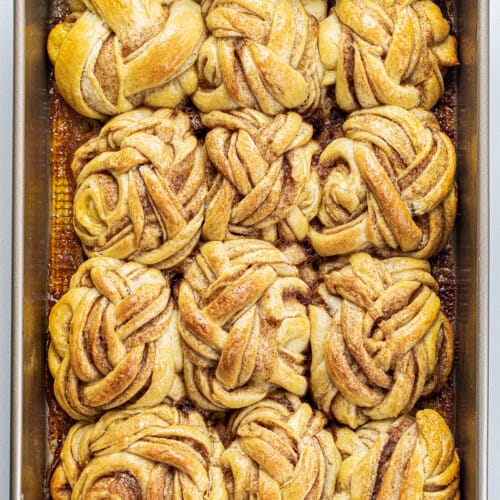
Braided Cinnamon Rolls are a delightful variation of the classic sweet rolls with a beautifully woven braided appearance, topped with a cream cheese frosting. They are so soft and the combination of cinnamon, brown sugar, and butter in each layer makes them so irresistible! They are wonderful without the glaze, too. You can also make these in an air fryer! Once you fall in love with these, be sure to also make my more traditional Cinnamon Rolls, too.

Ingredients & Substitutions
Milk: When warming up the milk, be sure it reaches a temperature of between 100°F and 110°F. This is the perfect temperature to activate the yeast used in the recipe. If the milk is too hot, it will kill the yeast, and if it is too cold, it will not activate.
Yeast: Use active dry yeast, which needs to be activated with warm milk.
Butter: You will use unsalted butter in all three parts of the recipe from the dough to the filling to the frosting. In total, you will need about 2 sticks of butter (plus an extra tablespoon for greasing the bowl).
Filling: The filling is layers of butter and a brown sugar and cinnamon mixture.
Frosting: The whipped cream cheese frosting is spread over the warm rolls for an even more indulgent treat! But, the rolls are delicious without the frosting, too.

Can I Make Braided Cinnamon Rolls Ahead Of Time?
Yes! Once you have the rolls assembled and braided, cover the pan with greased plastic wrap. Place it in the refrigerator. Do this before letting them rise at room temperature. They can be stored in the refrigerator for up to 24 hours. When ready to bake, remove the rolls from the refrigerator and let them come to room temperature (2-3 hours) before baking.

Can I Use Store Bought Dough?
Sure! Besides homemade dough, we tested the rolls with store-bought pizza crust dough. If using store-bought dough, there is no need for any proofing. First, roll out the dough to a 12×16-inch rectangle. Then, follow the same filling and cutting instructions before baking in the oven for 25 minutes. Don’t forget about the glaze! If you are short on time but still want a delicious treat to share, this is the perfect solution!

How To Store Braided Cinnamon Rolls
If you are not going to serve or enjoy the braided cinnamon rolls within a day or two, store them in the refrigerator. Keep them in a covered container for up to 3-4 days. When ready to enjoy, let the rolls come to room temperature.

How To Freeze Cinnamon Rolls
There are a few options if you plan on freezing the braided cinnamon rolls.
- Before Baking: If you want to freeze cinnamon rolls before baking, it’s best to do so before the final rise. Once the rolls are assembled and shaped, cover them tightly with plastic wrap and aluminum foil to prevent freezer burn. When you’re ready to bake them, remove them from the freezer, thaw them in the refrigerator overnight, and allow them to come to room temperature for the final rise. You may need to adjust the rising time as the frozen dough may take longer to rise.
- Freeze After Baking: You can also freeze the rolls after baking them, but before adding the frosting. Allow them to cool completely, then wrap them tightly in plastic wrap or place them in a freezer-safe container. When ready to enjoy, thaw the frozen rolls at room temperature. Warm them in the oven for a few minutes before adding the frosting.
- Partial Baking: A third way to freeze the rolls would be to cook them for only 10-15 minutes. Then, remove them from the oven and let the rolls cool completely. After the partially baked rolls have cooled, cover them (in the pan) with at least two layers of plastic wrap. Freeze for up to 2 weeks. When you are ready to bake them, let them thaw in the refrigerator overnight. Then, pop them in the oven for about 15 minutes. That would be the perfect time to make the frosting.
Whenever you store food in the freezer, always remember to label and date the storage containers or wrappings where the food is held. I sometimes like to add instructions to remind me how to reheat or cook the food when I am ready to do that.

Braided Cinnamon Rolls
Ingredients
- ⅔ cup (163 g) whole milk, warmed in the microwave for about 30 seconds (or until the temperature reaches 100-110°F)
- 5 tablespoons granulated sugar, divided
- 1 packet (2 ¼ teaspoons) active dry yeast
- 2 large eggs, room temperature
- 2 ¾ cups (344 g) all-purpose flour
- ½ cup (1 stick / 113 g) unsalted butter, cut into 1-inch pieces, room temperature
- 1 tablespoon unsalted butter, melted
- 1 teaspoon kosher salt
Filling
- 6 tablespoons unsalted butter, softened, divided
- ½ cup (100 g) light brown sugar, packed
- 2 teaspoons cinnamon
- ¼ teaspoon kosher salt
- 1 large egg, room temperature, beaten
Whipped Cream Cheese Frosting
- 2 ounces cream cheese, room temperature
- 2 tablespoons unsalted butter, room temperature
- ¾ cup (94 g) confectioners' sugar
- 1 teaspoon vanilla extract
- 1 pinch kosher salt
Instructions
Dough
- In a medium bowl, combine warm milk and 1 tablespoon sugar. Sprinkle yeast over milk and whisk to blend. Let sit until yeast is foamy, about 5 minutes. Add eggs; whisk until smooth.
- In the bowl of a stand mixer fitted with a dough hook, combine the remaining 4 tablespoons of sugar, flour, and salt. Add the milk mixture. With the mixer running on low speed, add butter, 1 piece at a time, blending well between additions.
- Knead on medium speed for 1 minute. Knead on medium-high speed until the dough is smooth, about 5 minutes.
- Brush a medium bowl with melted butter. Place the dough in the bowl, rolling it in the butter. Cover with plastic wrap.
- Let dough rise in a warm, draft-free area until doubled in size, about 1 hour.
- Punch down the risen dough and turn it out onto a floured surface. Roll it into a rectangle that measures approximately 12×20 inches (about ¼-inch thick).
Filling
- In a small bowl, combine the brown sugar, cinnamon, and salt with a fork.
- Spread 3 tablespoons of the butter over the dough so that it covers the entire surface.
- Spread ¼ cup of the brown sugar mixture over the butter, gently pressing it into the dough, making sure it covers the entire surface.
Folding, Cutting, and Baking
- Spray a 9×13-inch baking dish with nonstick cooking spray.
- Starting from one long edge of the dough, fold it over itself about ⅔ of the way across. Spread the remaining butter and brown sugar mixture over the fold.
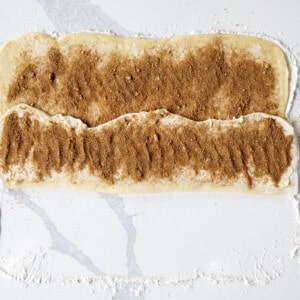
- Then, fold the remaining third of the dough over the top, completely enclosing the filling.
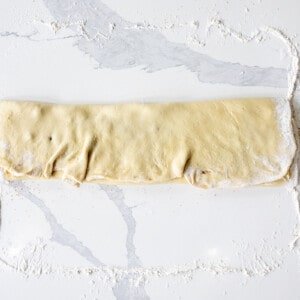
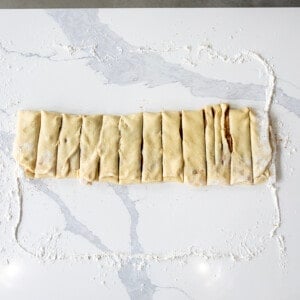
- Cut the folded dough into 12 strips that are each approximately 1 ½ inches wide.
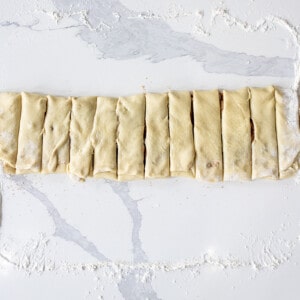
- Working with one strip at a time, make two cuts in the strip, almost reaching the top but leaving the end intact.
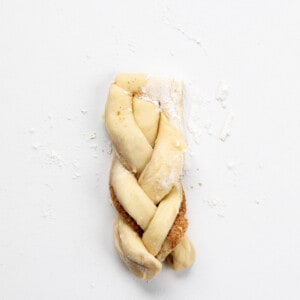
- Braid the three sections together by crossing the right strand over the middle strand, then crossing the left strand over the middle strand. Continue braiding until you reach the end of the dough.
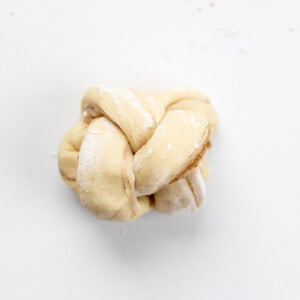
- Starting with the uncut edge, roll the braided dough into a circle and place it into the baking dish. Repeat this process for the remaining strips.
- Cover and let rise in a warm place until doubled, about 45 minutes.
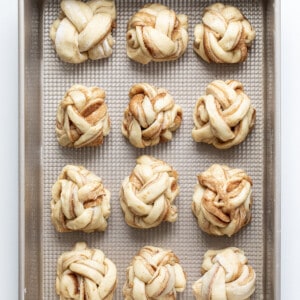
- When ready, preheat oven to 350°F.*
- Brush the risen rolls with the beaten egg. Bake for 20-25 minutes.
Whipped Cream Cheese Frosting
- When the rolls are almost done baking, put cream cheese, butter, confectioners' sugar, vanilla, and salt in a medium bowl and mix well.
- Spread the frosting onto the warm rolls.
Video
Notes
- After the rolls have been braided and doubled in size, place the rolls into the basket of your air fryer. (Depending on the size of your air fryer, you may have to work in batches.)
- Air fry the rolls for 11 minutes at 325°F.
- Drizzle with glaze.
Did you make this recipe?
Thank you for making my recipe! You took pictures, right? Well go ahead and post them on Instagram! Be sure to mention me @iambaker and use the hashtag #YouAreBaker.
What the Test Kitchen had to say about this recipe:
This was such a fun take on cinnamon rolls. The braids are gorgeous and the cinnamon sugar mixture was perfectly balanced throughout the whole roll. I love that you can also use pizza dough for a quick version! So yummy!

Elizabeth
I could not stop eating this cinnamon roll, to be honest! I loved the super soft texture with an abundance of buttery cinnamon-sugar flavor in each bite. The cream cheese frosting was yummy, but I even loved the rolls without it.

Bella
This has the classic flavor of a cinnamon roll but the only difference is that it looks even cooler. I adore the braiding method. The filling is nicely twisted inside, so you get that lovely cinnamon flavor with every bite!

Annabelle
The pizza dough version is yummy and so simple! These are very tasty and super cute!

Rachael
So yummy! These are a perfect twist (pun intended) on a regular cinnamon roll, the amount of sweetness was just perfect. They are so cute too!


Best cinnamon rolls I have ever made. I’ve tried lots of recipes looking for the “perfect” one, and this is the best for me. I used Kerrygold butter.