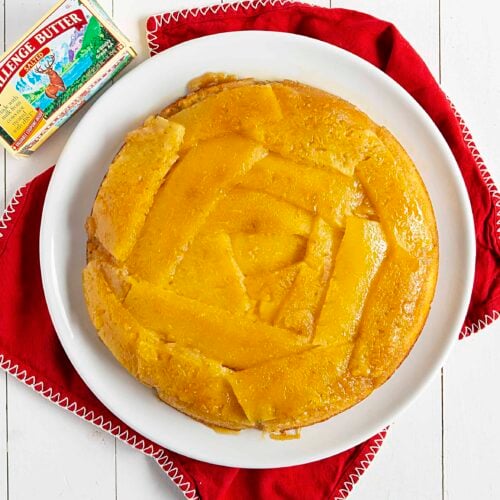
This Pineapple Upside Down Cake doesn’t look like your average cake. I used a fun method to create a pretty design that always gets oohhs and aahhh’s! Completely from-scratch and using the best ingredients mean that not only will this cake look beautiful, but it will taste amazing!

Pineapple Upside Down Cake
This is not your average Pineapple Upside Down Cake! There are two main factors that set it apart.
- Ingredients – I opted for a completely from-scratch cake using the best ingredients I could find. Real pineapple and of course, real butter! Challenge Butter is made the right way, using the freshest milk from the happiest cows. (You know this homesteader loves that!) Challenge butter is the only major U.S. dairy product company that controls the whole process when it comes to making butter and I love buying the very best when it comes to my baking.
- Design – I opted to cut my pineapple in long strips and layer it instead of the traditional circle-cut design. I also left out the maraschino cherries. After testing this recipe over and over again, I found that the cherries were not necessary for the taste (they actually added an overly sweet – artificial – flavor) and definitely not necessary for presentation purposes.

How to Make the Pineapple Design
Let’s talk about that crisscross pattern that almost looks like a pretty flower! It is very easy to do. Cut your pineapple (as directed below) and then layer the long slices in your prepared skillet. I used a 12-inch cast-iron skillet for this recipe which means using about 1 1/2 pineapples.
After making this pineapple dessert several times I found that while the cleaner slices you get when you are closer to the core of the pineapple look best, you don’t have enough of them to have a consistent design. I opted to use the biggest outer slices of the pineapple on the edges of the pan and then work in towards the center of the pan with the smaller pieces. There is a video below showing how to do that!

How to Cut Pineapple for Pineapple Upside Down Cake
- Start with a cutting board and a very sharp knife.
- Place the pineapple on its side and cut off the bottom. When you set the pineapple upright, this will help it to sit flat on your cutting board. I opted to leave the top on for the first few cuts to make it easier to hold.
- Stand the pineapple up on the cutting board and start on the side and press your knife down through the outer layer.
- Turn the pineapple a little and make another cut. Continue this around the pineapple until the outer layer is completely removed. If there are any imperfections cut those off. The pineapple should resemble a hexagon.
- Now start cutting the slices for the cake. I like mine about 1/4 inch thick. Make a cut, starting from the top and moving to the bottom of the pineapple. Set the long piece aside. Turn the pineapple and make your next cut, going completely around the pineapple until you reach the core. The outside slices will be wider and the slices near the core will be thinner.
- Set the cutting board aside and prepare the topping.

Easy Pineapple Upside Down Cake Topping
Two ingredients make up the beautifully caramelized topping for this cake: brown sugar and butter. First, melt the butter and pour it into the 12-inch skillet. Measure out 1 cup of packed brown sugar, then sprinkle that over the butter.

How to Make the Pineapple “Flower” Design
Starting around the outside of the skillet, place your first pineapple slice. I used the widest slices here. Lay the slice down and feel free to cheat up the sides of the pan a bit. Press down gently and then lay the next slice, making sure to overlap a bit. Continue this around the pan until you get to the center. Be sure there is no brown sugar topping peaking through. (Video below)
If you want to add maraschino cherries to this cake, now is the time. I tried adding the cherries around the edge of the pan in a large circle as well as sprinkling them randomly over the pineapple. We liked how the circle design looked best. I used 1 entire jar of maraschino cherries, about 1/2 cup. (As I mentioned above, we didn’t like the added flavor of the cherries and opted to leave them out of the final design.)

Prepare the cake batter and then pour it over the pineapple slices. Use a spatula and smooth out the batter making sure it covers all the pineapple slices. Place the cake in the oven for 38-42 minutes, or until the center doesn’t jiggle and the bottom is nicely golden brown. If you happen to notice that the cake is browning too fast, you can carefully place foil over the cake for the last 10 minutes.

When the cake is done baking, carefully remove it from the oven and let it sit for five minutes. After five minutes, place the serving platter over the cake face-down. Make sure to use a platter that is bigger than the skillet! With one hand flat on the bottom of the platter and the other gripping the handle of the skillet (make sure you have a sturdy oven mitt on!) flip the cake over so that the platter is now on the table and the skillet is upside down. Carefully lift the skillet being sure to let all of the glorious brown sugar glaze drip onto the cake.

How Do You Serve Pineapple Upside Down Cake?
This cake is best served warm in my opinion, but my kids did enjoy it chilled. If you want, you can drizzle a little maraschino juice over the cake. We have also served it with vanilla bean ice cream! (When the cake is completely from scratch and the ingredients are so pure, it’s best to complement it with homemade no-churn vanilla ice cream.) Cut a slice and get ready for gasps of delight. Just look at the crumb! The topping and the natural juices from the pineapple ensure that every last bite this cake will be moist and loaded with pure flavor.

How to Store Pineapple Upside Down Cake
If you plan on storing the cake for longer than a day or two, it’s best to store it in the refrigerator. This will help keep it fresh and prevent spoilage. To store the cake in the refrigerator, place it in an airtight container or wrap it tightly with plastic wrap or aluminum foil. It will last up to 3-4 days.
Pineapple Upside Down Cake
Ingredients
YELLOW CAKE
- 2 ¼ cups (281 g) all-purpose flour
- 1 ½ cups (300 g) granulated sugar
- 3 ½ teaspoons baking powder
- 1 teaspoon kosher salt, (if using table salt, use ½ teaspoon)
- 1 ¼ cups (306 g) whole milk
- 2 tablespoons vegetable oil
- ½ cup (1 stick / 113 g) Challenge Butter, softened
- 1 tablespoon vanilla extract
- 3 large eggs, room temperature
TOPPING
- ½ cup (1 stick / 113 g) Challenge Butter, melted
- 1 cup (200 g) brown sugar, packed
PINEAPPLE
- 2 pineapples, cut into long slices
Instructions
YELLOW CAKE
- Preheat oven to 350°F. Get out a 12-inch cast-iron skillet.
- In a medium bowl, sift together flour, sugar, baking powder, and salt. Set aside.
- Place softened butter into a stand mixer and mix on medium for 1-2 minutes.
- Place dry ingredients into the stand mixer and combine with butter for 30 seconds.
- Add milk, oil, vanilla, and eggs and mix on medium-high until ingredients are combined.
TOPPING
- Pour melted butter into an ungreased skillet. Sprinkle the brown sugar evenly over the butter.
ASSEMBLE THE CAKE
- Take the long slices of pineapple and start layering them around the edge of the pan, directly over the butter and brown sugar. It is fine to sneak them up the sides a bit. Continue layering pineapple around the pan working towards the center, making sure there is no brown sugar coming through.
- Pour prepared cake batter over the pineapple.
- Place skillet in the oven for 38-42 minutes, or until the bottom is browned and the center does not jiggle. You can test the cake with a toothpick; just insert it and if you remove it with any wet batter, the cake is not done.
- When the cake is done, remove from the oven and let sit for a couple of minutes. Take a large serving platter and place it face-down on the hot skillet. With one hand-held flat on the bottom of the platter and the other holding the handle of the skillet (using a hot pad! The skillet will be hot!), flip the cake over. Once the platter is firmly on the counter, use both hands to gently lift the skillet away.
- Serve immediately.
Video
Notes
Did you make this recipe?
Thank you for making my recipe! You took pictures, right? Well go ahead and post them on Instagram! Be sure to mention me @iambaker and use the hashtag #YouAreBaker.
Thank you for supporting the brands that support us here at iambaker! It has been a dream of mine to partner with Challenge Butter and I am just thrilled to be able to share a product that I love and use!


I did. I used Duncan Hines Pineapple flavored cake mix and a 10-inch cast iron skillet instead of a 12-inch. I thought it was great.
I made this for a potluck and everyone loved it. I love using fresh pineapple instead of canned. The texture of the cake is moist, but not dense. I will definitely add this to my recipe book. Delicious!!!
@Karen Scott
You could use a scale instead. Also, this cake calls for one stick of butter, so no need to figure out the measurement with the paper wrapping.
Cake was delicious. I learned the hard way to cut out the core, though. Wasn’t thinking.