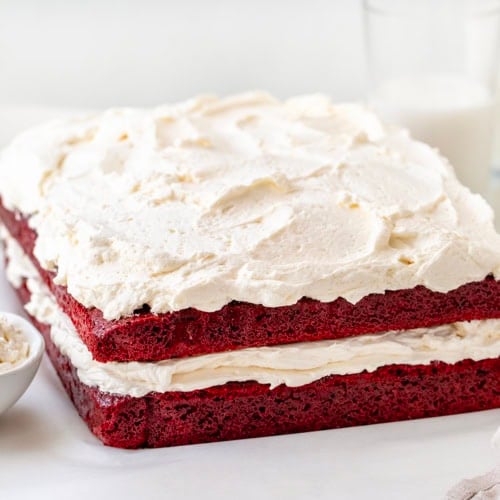
If you love red velvet, this Sheet Pan Red Velvet Cake is the easy, crowd-friendly dessert you’ve been looking for. It’s soft, moist, and full of that classic cocoa-vanilla flavor. After baking in a jelly roll pan, the cake is cut in half and layered with silky ermine frosting (aka $300 frosting) for a beautiful stacked presentation that feels extra special, without the stress of baking two separate layers!

Key Ingredients & Substitutions
- Mayonnaise: The mayonnaise may surprise you, but it is the secret to this cake’s soft and moist texture. If you don’t have any on hand, make your own! Or, use plain Greek yogurt.
- Buttermilk: Buttermilk activates the baking soda and gives the cake its red velvet tang it is known for. If you don’t have buttermilk, use 1 cup milk + 1 tablespoon vinegar or lemon juice (let sit 5–10 minutes).
- Red Food Coloring: I like to use gel food coloring so it adds color to the cake without thinning the batter. You can adjust the amount to achieve the exact shade of red you want.
- Unsweetened Cocoa Powder: Just enough cocoa powder brings out that classic red velvet flavor without overwhelming the cake. For a smoother, slightly darker taste, you could use Dutch-processed cocoa powder.
- Ermine Frosting: I used ermine frosting for this cake. It is smooth and buttery, perfect for this layered cake.

What Is Ermine Frosting and Can I Use Cream Cheese Frosting Instead?
Ermine frosting is a light, fluffy, and buttery frosting made by cooking flour and milk, then whipping it with sugar and butter once cooled. It’s the traditional pairing for red velvet cake and has a silky texture that’s not too sweet. However, if you prefer cream cheese frosting, go for it! I use cream cheese frosting in my Red Velvet Pound Cake, which I love!
Can I Make Red Velvet Cake Without Food Coloring?
Yes, you can make red velvet cake without food coloring! The cake will still have that classic cocoa and buttermilk flavor, but it won’t have the bright red color you usually expect. Either way, the cake will be delicious!

Can I Make Sheet Pan Red Velvet Cake Ahead Of Time?
Yes! You can bake the cake a day or two in advance. Just let it cool completely, wrap it tightly in plastic wrap, and store it in the refrigerator. You can also make the ermine frosting ahead of time. Store it in an airtight container in the refrigerator, then let it come to room temperature and re-whip before assembling.

How To Store Sheet Pan Red Velvet Cake with Ermine Frosting?
Once frosted, store the cake covered in the refrigerator for up to 3 days. Because ermine frosting is made with milk and butter, it’s best kept chilled. Let the cake sit at room temperature for about 20–30 minutes before serving so the frosting softens up nicely.
Can I Freeze Sheet Pan Red Velvet Cake {With or Without Frosting}?
Yes! For best results, freeze the unfrosted cake. Let the cake cool completely, then wrap it tightly in plastic wrap and aluminum foil. It will keep for up to 2 months. Thaw the cake overnight in the refrigerator before frosting. You can also freeze it with ermine frosting, though the texture of the frosting may change a bit. Freeze the frosted cake, uncovered, for an hour to firm up, then wrap and store. Thaw in the refrigerator and bring to room temperature before serving.
Sheet Pan Red Velvet Cake
Ingredients
Cake
- 2 cups (250 g) all-purpose flour
- 2 cups (400 g) granulated sugar
- 1 teaspoon baking soda
- 1 teaspoon baking powder
- ⅓ cup (39 g) unsweetened cocoa powder
- 1 teaspoon kosher salt
- 1 cup (232 g) mayonnaise, room temperature
- 2 large eggs, room temperature
- 1 cup (245 g) buttermilk, room temperature
- 2 teaspoons vanilla extract
- 4 tablespoons red gel food coloring, more or less, depending on how deep you want the color
- ½ cup hot water
- 1 teaspoon distilled white vinegar
Ermine Frosting
- 2 cups (490 g) whole milk
- 10 tablespoons all-purpose flour
- 2 cups (4 sticks / 454 g) unsalted butter, room temperature
- 2 cups (400 g) granulated sugar
- 2 teaspoons vanilla extract
Instructions
- Preheat oven to 325°F. Line a 10×15-inch jelly roll pan (a rimmed baking sheet with 1-inch sides) with parchment paper, making sure the paper comes up the sides. Spray the parchment with nonstick cooking spray and set aside.
- In a large bowl, whisk together the flour, sugar, baking soda, baking powder, cocoa powder, and kosher salt.
- In a medium bowl, whisk together the mayonnaise, eggs, buttermilk, vanilla extract, red gel food coloring, hot water, and vinegar until smooth.
- Slowly add the wet ingredients to the dry ingredients, stirring with a spatula or spoon until just combined and no dry streaks remain. Do not overmix.
- Pour the batter into the prepared pan, smoothing the top. Bake for 35-40 minutes, or until a toothpick inserted in the center comes out with a few moist crumbs, but no wet batter.
- Place the pan on a wire rack and let the cake cool to room temperature.
- Transfer the cooled cake to the freezer for 10–15 minutes until firm, or refrigerate (covered) for at least 1 hour or up to overnight. Chilling the cake makes it easier to move.
- While the cake chills, prepare the ermine frosting.
Frosting
- In a medium saucepan over medium heat, whisk together the whole milk and flour. Cook, whisking constantly, for 3–5 minutes until thick and smooth, resembling a very thick pudding and coating the back of a spoon.
- Remove from heat and let cool completely to room temperature.
- In the bowl of a stand mixer fitted with the paddle attachment, cream together the butter and sugar on medium speed until light and fluffy, about 2–3 minutes. Scrape down the sides of the bowl with a rubber spatula.
- Add the cooled milk-flour mixture to the mixer bowl. Beat on medium-high speed until light and fluffy, about 2–3 minutes, scraping down the bowl as needed.
- Switch to the whisk attachment. Add the vanilla extract and whisk on high speed for 7–8 minutes, or until the frosting is smooth and creamy.
Assembly
- Remove the chilled cake from the freezer or refrigerator. Using the parchment edges, lift the cake from the pan and place it on a work surface.
- Cut the cake in half (widthwise) to make two equal rectangles.
- Carefully place one rectangle onto a serving platter. Spread half of the ermine frosting over the cake layer.
- Top with the second cake rectangle. Spread the remaining frosting over the top.
- Slice and serve immediately.
Did you make this recipe?
Thank you for making my recipe! You took pictures, right? Well go ahead and post them on Instagram! Be sure to mention me @iambaker and use the hashtag #YouAreBaker.
What the Test Kitchen had to say about this recipe:

Autumn
This cake is perfect for a crowd! It holds up well and the frosting isn't too sweet. Plus, it looks so pretty!

Elizabeth
This cake is delicious, but I would prefer it with cream cheese frosting. Ermine isn't my favorite, but don't fight me on that. Use what you like!

Bella
This is a really moist and delicious cake! I liked the buttery frosting with it.

Stephanie
This cake looks fancy, but it is really simple to make! I loved the red color in there.


Finally a recipe with the proper frosting. Guess you can call me a purist.
I love red velvet cake!!!! Thanks 🙏🏻
Do you have to layer the cake or can it be left in the pan and frosted as is?
you can leave it in the pan
Have to try this red velvet cake recipe….its my grandson’s favorite cake. You make baking seem easy …& I’m sure it’s delicious. Enjoy your recipes…thanks for sharing.
Making a two layer half sheet cake, each being 13×18) for wedding and want to use Ermine Frosting. Using a filling so only need to frost outer cake. Should I double the recipe?
I baked this cake for an office birthday (I have always been nervous about baking red velvet desserts). Everyone loved it! I couldn’t find the red gel coloring so I used regular red food coloring. Thank you for sharing your recipe! Looking forward to trying more.