With Valentines Day quickly approaching, I wanted to share with you three super easy, super fun, and totally do-able techniques.
Seriously, even my hubby can do these.
And you can too! These are very basic, very simple designs that have a wow factor. It looks like you have spent lots and lots of time but in reality, it takes less than 15 minutes!

Want to learn how?
All you need is a few tools. These are readily available at your local craft store.

I used a disposable pastry bag with a #5 tip and a nine-inch offset spatula. You can certainly improvise and use a plastic baggy and knife if you want too!

We will start with our cake. This is a white cake with the BEST BUTTERCREAM FROSTING EVER tinted a fun sweetheart lovey-dovey shade of pink. (will post the recipe at the end)
I did a crumb coat (or dirty iced it) then did another coat of frosting and smoothed it out. You don’t have to worry about perfection here… if there are wholes or bumps, we can cover them with our design!

When making a dot cake you can make very precise uniform dots that have a very specific pattern. Or, if you are anything like me, you want to hurry up and decorate this thing so you can catch the end of your favorite TV show.
Hence, random dots. Just place them any-old-where.

I got a little crazy with my dots. If you want perfectly uniform dots you can do that too… just takes a few seconds more of your time and concentration.

I also added some smaller dots to fill in the space. Then a little border around the bottom.
You could re-create this cake in many ways if you wanted to personalize your Valentines Day treat. How about white with red dots? Or chocolate with white and red dots?
I might have to make one like that next year!

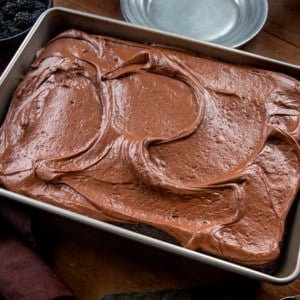
Next up is the very technical and absolute term of “squiggly lines”.
For this, we will also be using the disposable pastry bag and #5 tip.

Start out with any random ole pattern. Then just build around it! I made one solid shape here, then sorta just squiggled my frosting all around it.

Can you see the original shape? Fun huh? Now just keep going around the whole cake!

And now for our last design!

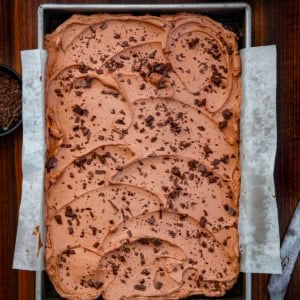
Start out with a cake that has been crumb coated. You can see that this is a rough stage and shows lots of crumbs and cake through the frosting. That’s ok!

Create a generous layer of frosting around the cake.

Once you get a nice thick layer on, gently smooth the frosting so you have a flat surface. You will be removing the excess frosting, but not too much!

Place your spatula flat against the cake, then gently move up, applying even pressure.
For the next row, place the spatula on the line you have created making sure to overlap.

Do this all the way around the cake.

Until you have this. Pretty cool huh?

And remember that super amazing buttercream frosting recipe? Be warned… this is the sweet stuff. Like, ridiculously sweet. I just happen to be a fan of that.
THE BEST BUTTERCREAM


Your cake decorations is making me tempt. I really want to eat that now.
Does this buttercream frosting need to be refrigerated/ could it be used for a tiered cake that wouldn’t be refrigerated?
Love your videos. Beautifully done
Tried some things you have shown. Unfortunately they haven’t turned out so pretty.
Very helpful, inspiring, handy, ideas easy to implement besides what’s available around