This colorful Bunny Cake is easy to do and perfect for celebrating Easter! For another Easter treat, try my Easy Easter Cupcakes.

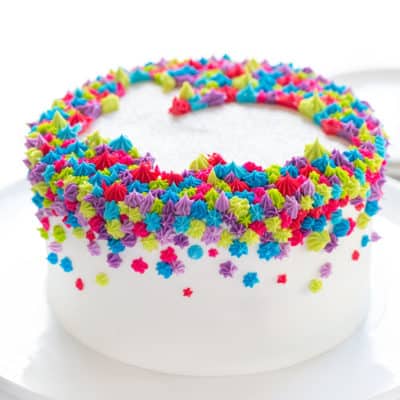
Bunny Cake
Easter is right around the corner, so there is no better time to add some color to your favorite sweet treats. And, who doesn’t love a cute little cutout bunny shape on a delicious and colorful cake? I absolutely love vibrant colors and adding splashes of color to my baking projects. Best of all, I am always able to achieve with the wonderful shades of pink, purple, green, blue, and countless others with McCormick® Neon Food Color.

How to Make a Bunny Cake
You will need:
- White Cake Recipe (can also use 2 boxes white cake mix)
- Buttercream Recipe (below)
- McCormick® Neon Food Color
- White Sanding Sugar (can use granulated sugar)
- Parchment Paper
- Toothpick
- Pastry Bags
- Decorating Tips #32, #18, #13 (or similar shapes like #21 or #16)

Start by baking your cake.
Prepare 2 boxes of cake mix and then divide between three bowls. I add 10 drops of neon purple, 10 drops of neon blue, and 20 drops of neon green to each bowl. Stir well (make sure there are no lumps!) and then pour into three 8-inch round cake pans. Bake according to directions.
After baking, allow cakes to cool and then level the cakes if necessary.

Prepare the frosting.
Make up two batches of Whipped Vanilla Buttercream. The first batch will remain white for frosting the cake and then the next batch was divided equally between 4 bowls. Add 10 drops of purple to one bowl, 10 drops of blue to the next, 10 drops of pink to the next, and 20 drops of green.
Now take your bowl of purple and remove half of the frosting and place into a pastry bag fitted with a #18 tip. Add more purple food color to the remaining frosting (about 5 drops) so that you will have a darker purple. Place that frosting in a pastry bag fitted with a #32 tip. You now have two colors in the same tone and two different tip sizes!
Repeat this with the remaining frostings. Set aside until ready to decorate the cake.

Start to assemble the cake.
Place the purple layer of cake on serving platter or a cake stand. Cover with about 1/2 cup of whipped vanilla buttercream. Add the neon layer of cake. Cover with about 1/2 cup of buttercream. Place the blue layer of cake on top. Now cover the cake with a thin coat of whipped vanilla buttercream. This is called a crumb coat and will seal in all the crumbs. Set cake in the fridge to chill for about 15-minutes.
Cut Out the Bunny
While the crumb coated cake is chilling, cut out the bunny. You can use this bunny template. You may need to size it on your computer so that the size of the template is smaller than the size of the cake. I printed out the bunny then placed a piece of parchment paper over the top and traced it with a permanent marker. Cut it out. This is the bunny template that you will place directly on the cake.
Sprinkle sanding sugar on top of the cake, just barely covering the area that the bunny will be placed on. This will help you to remove the parchment cutout easily. Place the bunny cutout on top of the sugar and press down slightly.
Begin to pipe dollops on the cake. To pipe a dollop simply pick up your bag of frosting, barely touch the tip to the cake and apply pressure. Release pressure and quickly pull up and away from the cake.
PRO TIP: I start with one color then apply that around the bunny cutout, making sure to pipe directly on the edges of the cutout. I repeat this with all of the colors, making sure every edge of the cutout is covered and then slightly beyond. You will NOT finish piping the cake here, just enough dollops to cover the edges of the bunny cutout and a bit beyond. You want to remove the bunny cutout while the frosting is still soft and not starting to harden.

Remove the bunny cutout. Once you have dollops all around the cutout you can remove it. To do this, I use a toothpick to find the end of the parchment and pull it up slightly. Set down the toothpick and then, using both hands, start to pull the parchment up and away from the cake. Move slowly. You want the bunny cutout to pull away any of the frostings that were piped on top of it and leave a nice clean edge on the frosting remaining on the cake.
Go as slowly as you need to.
Once removed you can discard the bunny. Use the toothpick and carefully clean up any edges or spots that may have been messed up on the cake. If any frosting gets on the sanding sugar area, you can easily remove it with the toothpick and add a bit more sanding sugar to make it pretty again.

Continue piping around the top of the cake and down over the sides. I chose to go about 1/2 way down the side of the cake and used the smallest tips (or applied very little pressure to a larger tip) towards the bottom edge.
You will have frosting left over! You can either decorate some cupcakes to accompany this bunny cake or you can store your frosting right in the pastry bag in the refrigerator for up to 2 weeks.

Looking for more Easter dessert ideas? I’ve got you covered!
Easter Egg Surprise Inside Cake

Whipped Vanilla Buttercream
Ingredients
- 1 cup (2 sticks / 227 g) unsalted butter, softened
- 2 teaspoons McCormick® Pure Vanilla Extract
- 1 teaspoon McCormick® Pure Almond Extract
- 8 cups confectioners' sugar, sifted*
- 2 tablespoons whole milk, you can use up to 1/2 cup if you need a loose, creamy consistency
- 1 pinch salt
Instructions
- Beat butter in the bowl of stand mixer with whisk attachment on medium-high speed until light and fluffy. (about 3 minutes)
- Add vanilla and almond extract.
- With the mixer on low, slowly add in confectioners sugar, milk, and salt; frequently scrape sides and bottom of the bowl.
- Once incorporated, whip frosting for at least 3 minutes on medium-high to high. (My mixer went for 7 minutes)
- If frosting is too thick to spread, gradually beat in additional milk.
- Store in refrigerator up to 2 weeks. Rewhip before using.
Video
Notes
Did you make this recipe?
Thank you for making my recipe! You took pictures, right? Well go ahead and post them on Instagram! Be sure to mention me @iambaker and use the hashtag #YouAreBaker.
If you want to make this from scratch I recommend this White Cake recipe. I would double it and equally divide the batter between three 8-inch round pans.
I loved creating this cake with my friends at McCormick! Thank you for supporting the brands that support me here. I adore McCormick products and am so grateful for the ability to share them with the world. Creating this Bunny Cake was absolutely delightful!


Thanks for the decorating idea. It turned out great!