Finally!! Is that what you are thinking? Its ok. You can admit it. We are all friends here.
Do you remember this little thing?
Well it turns out some of you daring bakers want to make this yourselves. Yeah you! I cant wait to see and read all about it… send me links girls! (and boys… if there are any boys)
Well. In order for me to do a tutorial I had to make another one. So, forgive the less then stellar decorations, but here is our 'tutorial' heart cake.
But you didnt come to see the outside right?
Here goes.
Start out by making four eight inch pans of white cake. (If you want the actual recipe, just click here)
Make one 9×13 (you can do whatever shape and size you want) pan of red velvet cake. (recipe here)
First I need to level each cake.
I use this handy dandy leveling cake thingy I got at Walmart for a few bucks.
Remember to do this for all four white cakes.
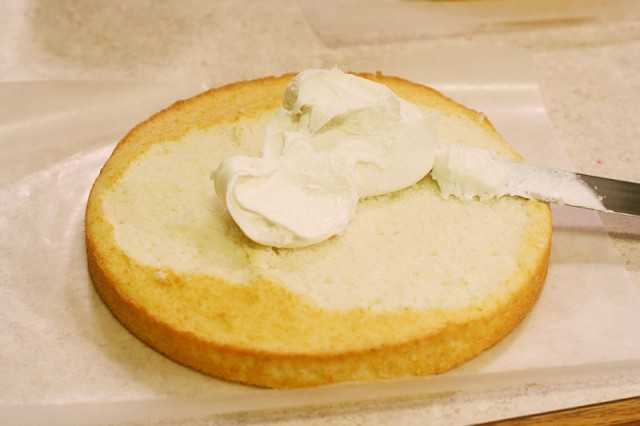
Add about 1/2 cup to 1 cup frosting and then put one layer on top. You want two separate two layer cakes at this point.
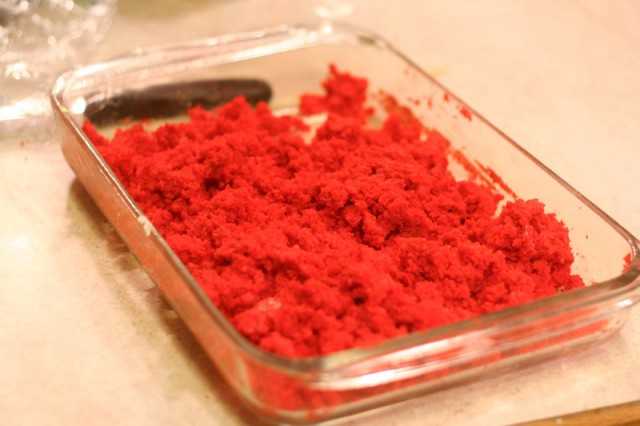
For the red velvet cake I just ran my fork through it to break it up. Then I added about a cup of frosting and combined well.
NOW! I usually like to freeze the cakes for at least a couple hours. If you cant freeze them, at least try and pop them in the fridge for a bit!
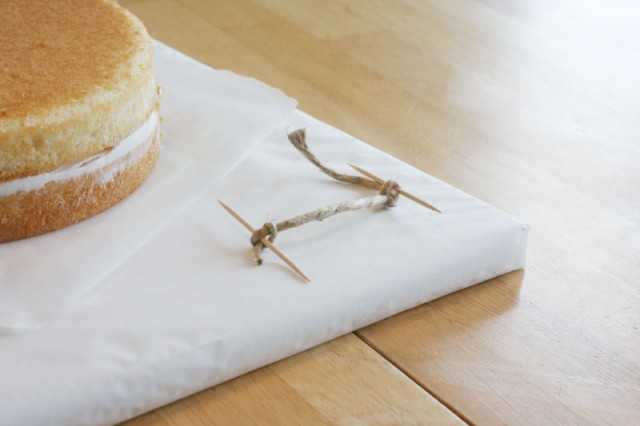
I know this looks pretty weird (maybe cause it is) but this is what I am going to use to make sure I have some uniformity in the heart design. Its just two toothpicks and a piece of twine.
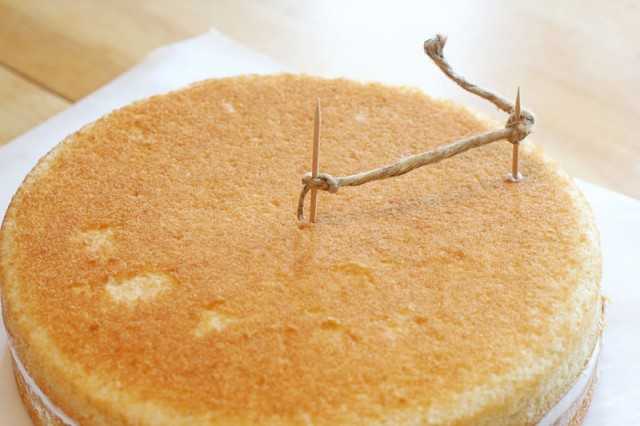
Place one toothpick in the center of the cake, then (holding firmly) drag the outside toothpick around the cake and make a circle.
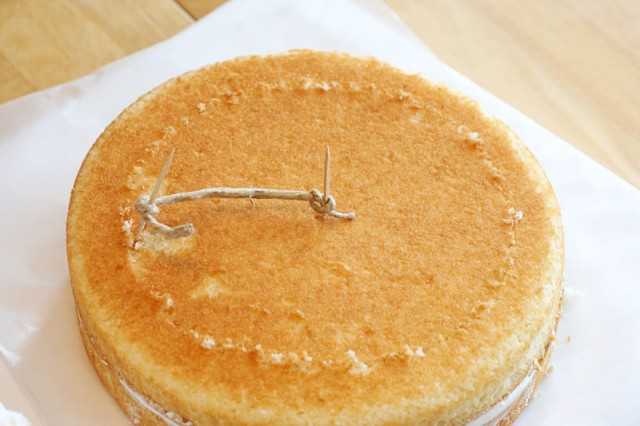
Like this! Now I have a rough guide line of where I am going to being carving. Do this to both cakes. (or, if you are a good drawer, just take a knife and cut a shallow line around the perimeter.)
Carve out a V shape in the cake.
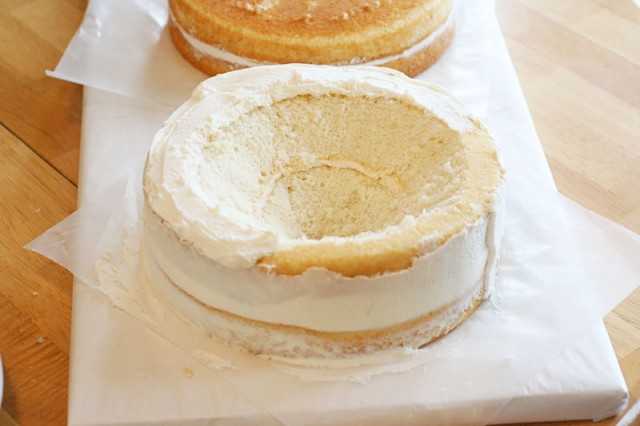
The top half of the heart is a little trickier. This time, I started with my knife in the center of the cake and created this little island.
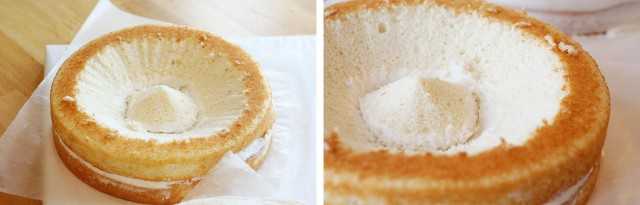
I then moved back out to my "guide line" and started cutting. I ended up creating this channel. Once this has been created, you can go back in a do some more carving to create more detail.
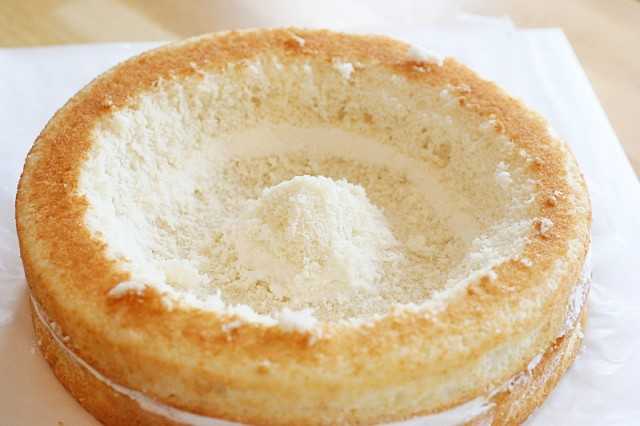
Here is after I went in with a spoon and carved out a bit more.
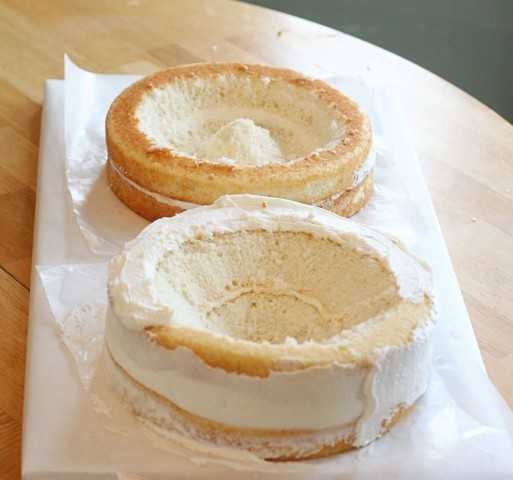
The two cakes carved out. The hard part is pretty much done now!
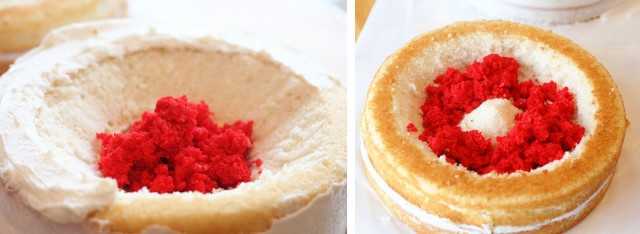
Now I can start filling in the cakes with the red velvet cake.
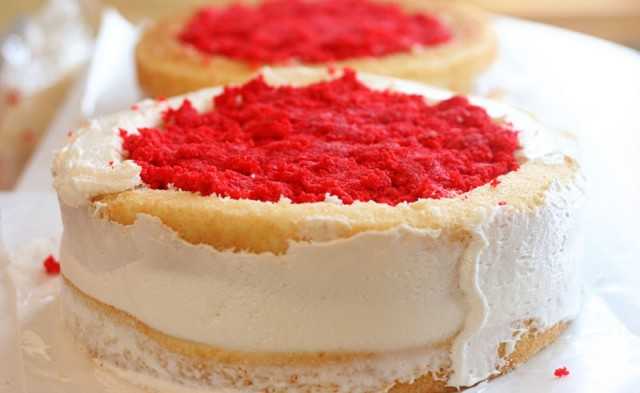
All filled! At this point I put it in my freezer for about 15 minutes. Just to let them set.
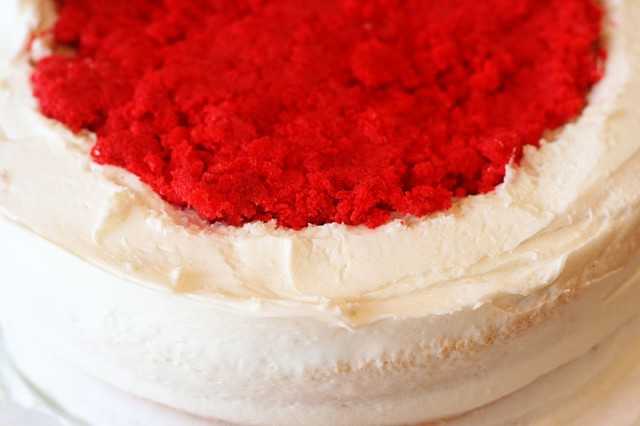
I added some frosting the the edge of the bottom cake. Make sure you know which is which! You are going to want to add the cake with the hallowed out 'channel' to the top of the V cake.
Here goes nothin! I have found the easiest way to do this is to just use your hand. Place it flat over the top of the 'channel' cake and flip it over. Then gently place it one the bottom cake.
Add some more frosting and do a rough crumb coat over the whole cake.
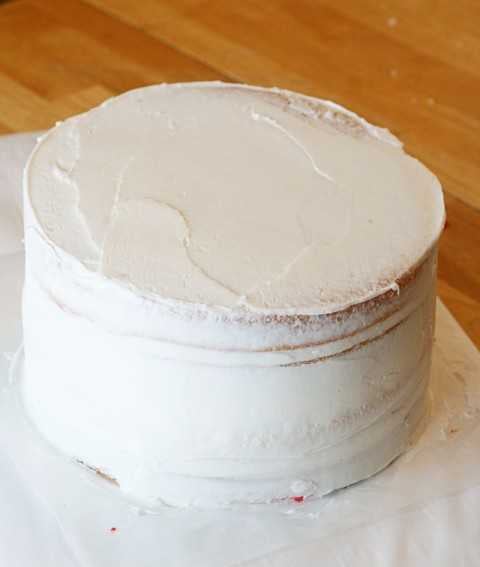
And here is our thin layer of icing for the crumb coat. Put this in the fridge about at least a half hour, or as long as overnight.
Now. Go eat an apple. Seriously. Cause if you are anything like me you have been snacking on the cake scraps this whole time and you need a healthy energy boost.
There. Feel better? Lets get back to work.
I ended up using all my red velvet cake so I didnt have any left over for decoration. So white it is!
Ready to see what all this work was for?
I thought it turned out pretty good! Granted, this is my third time making it in a month so I had better be able to at least make it presentable by now.
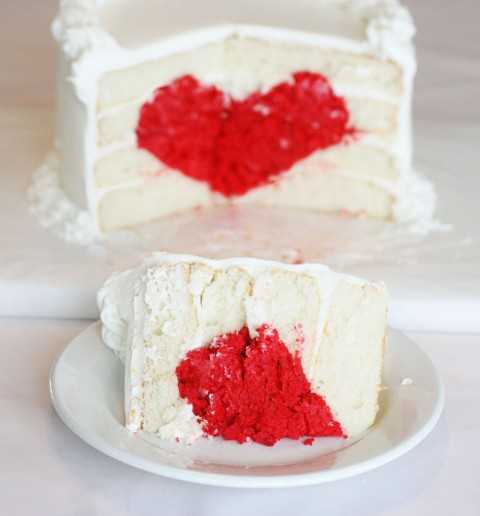
And it tastes as good as it looks! (I might be biased)
So I hope you are brave enough to try a heart cake for your loved one this Valentines Day. Be sure to let me know how it works out.. and take lots and lots of pictures!
Recipes:
Red Velvet Cake
For the red velvet cake I messed around with a recipe from Magnolia Bakery.
*This is how I modified this recipe: I used 2 sticks of butter, 2 eggs and 2 egg yolks, 2 tablespoons of food color, and apple cider vinegar. I wanted a more dense cake because I knew I was using it in the center of the heart cake and I needed to make sure it was sturdy enough.
3 1/3 cups cake flour (not self-rising)
3/4 cup (1 1/2 sticks) unsalted butter, softened
2 1/4 cups sugar
3 large eggs, at room temperature
6 tablespoons red food coloring
3 tablespoons unsweetened cocoa
1 1/2 teaspoons vanilla extract
1 1/2 teaspoons salt
1 1/2 cups buttermilk
1 1/2 teaspoons cider vinegar
1 1/2 teaspoons baking soda
Directions
Preheat oven to 350 degrees.
Grease and lightly flour three 9 x 2-inch round cake pans, then line the bottoms with waxed paper.
To make the cake:
In a small bowl, sift the cake flour and set aside. In a large bowl, on the medium speed of an electric mixer, cream the butter and sugar until very light and fluffy, about 5 minutes. Add the eggs, one at a time, beating well after each addition.
In a small bowl, whisk together the red food coloring, cocoa, and vanilla. Add to the batter and beat well.
In a measuring cup, stir the salt into the buttermilk. Add to the batter in three parts, alternating with the flour. With each addition, beat until the ingredients are incorporated, but do not overheat.
In a small bowl, stir together the cider vinegar and baking soda. Add to the batter and mix well. Using a rubber spatula, scrape down the batter in the bowl, making sure the ingredients are well blended and the batter is smooth.
Divide the batter among the prepared pans. Bake for 30-40 minutes, or until a cake tester inserted in the center of the cake comes out clean. Let the layers cool in the pans for 1 hour. Remove from the pans and cool completely on a wire rack.
*****
*I used only all-purpose flour and then added 1 tsp baking powder. I am going to play around with this a bit more next time and maybe even add some baking soda. I found this recipe on Food Network.
White Cake
- 1 1/2 cups self-rising flour
- 1 1/4 cups all-purpose flour
- 1 cup (2 sticks) unsalted butter, softened
- 2 cups sugar
- 4 large eggs, at room temperature
- 1 cup milk
- 1 teaspoon vanilla extract
Directions
Preheat oven to 350 degrees F.
In a small bowl, combine the flours. Set aside.
In a large bowl, on the medium speed of an electric mixer, cream the butter until smooth. Add the sugar gradually and beat until fluffy, about 3 minutes. Add the eggs, 1 at a time, beating well after each addition. Add the dry ingredients in 3 parts, alternating with the milk and vanilla. With each addition, beat until the ingredients are incorporated but do not over beat. Using a rubber spatula, scrape down the batter in the bowl to make sure the ingredients are well blended. Carefully spoon the batter into cake pan. Bake for 20 to 25 minutes (for round cake), or until a cake tester inserted into the center of the cake comes out clean.
*****
And I am loving Magnolia's Vanilla Buttercream frosting.
*My only modification to the recipe is I like to add a little almond extract, and it seems that 1 tsp. is the perfect amount! And be sure to use CLEAR vanilla extract to get a white frosting.
Makes enough for one 2-layer 9-inch cake or 2 dozen cupcakes*
-
1 cup (2 sticks) unsalted butter, softened
-
6 to 8 cups confectioners’ sugar
-
1/2 cup milk
-
2 teaspoons vanilla extract
Place the butter in a large mixing bowl. Add 4 cups of the sugar and then the milk and vanilla. On the medium speed of an electric mixer, beat until smooth and creamy, about 3-5 minutes. Gradually add the remaining sugar, 1 cup at a time, beating well after each addition (about 2 minutes), until the icing is thick enough to be of good spreading consistency. You may not need to add all of the sugar. If desired, add a few drops of food coloring and mix thoroughly. (Use and store the icing at room temperature because icing will set if chilled.) Icing can be stored in an airtight container for up to 3 days.


Oh my goodness! You.Did.Not.Just.Do.This!!! YOU ROCK! I had given up thinking about this cake this year, after I lost about 3 hours of sleep trying to figure out how to make it the other night…I thought I’d have to wait until next year! Oh I could just squeal…I might’ve just done that, but I’ll never tell…I can’t wait to try this! (((HUGS!!))) Did I say You Rock yet…I did didn’t I…well, just so ya know!;)
You are one great teacher! The apple instruction cracked me up, as if you have a window into my kitchen!
I would love to try this…someday! I’m building the courage!
Amazing!
Fantastic!
lol, how did you know I’d be snacking on scraps the whole time?
Super tutorial, and the cake is adorable!
Wow!!! That doesn’t even begin to cover it. And thank you for doing this – three times would make me crazy, and not to mention the expense. So – thank you!
I never, ever would’ve thought to do it this way. I’m a but slow that way! Can’t wait to try this next week. Thank you!!!
Holy yum! This is so not good for my dieting. I want cake so bad now I can’t stand it!
I can see there is going to be cake for Valentine’s Day. Love your creativity, Amanda!
Have a wonderful day,
Wendy
That is so awesome! I think I may try this for my daughters birthday next week! Thanks for sharing this with us!!
Love it. I can’t even begin to think of how I’d have the energy and ambition to MAKE it but I sure do love looking at it.
Impressed doesn’t even begin to describe how I feel about this!!!
FABULOUS!!! Fantastic tutorial!!…….I bet it tastes amazing too!!
Oh soooooo awesome! I’m completely inspired to try this now!! Thank youuuu for an easy to follow tutorial!
BRILLIANT!!!!!
This was brilliant!!! It was impressive results so it was worth the effort!!! -Tien
Girl, you come up with the most brilliant ideas! It might take me 10 years to work up the desire to actually make it myself, but I really enjoyed the tutorial and the pictures. I hope to use it some day.
P.S. Are those homemade bake-even strips around your pans and if so, what material are they? They work really well–much better than the ones I bought. And it doesn’t look as though you did but I thought I’d ask if you freeze your cakes before carving.
Just brilliant! This STILL just boggles my mind! A. How did you come up with that idea? B. Are you an engineer?
Even with the instructions, I know I couldn’t do it.
Thanks a lot for sharing the recipe. This heart cake is genius idea. To come up with something like this, you really have to think 3D. I bet your heart was beating like hell when you did the first cut after finishing the cake, haha.
My favorite part of this entire tutorial is the ‘compass’ you made with the toothpicks and string. Genius. Truly genius.
you are A-MAZING!!! it turned out beautiful and looks scrumptious!!!
Oh my god that is the most beautiful cake I’ve ever seen. I love hearts.
Umm.. would you get a restraining order if I said that I was in love with you?! Because I might be.
My daughter’s birthday is Valentine’s Day. You just made my whole month with this tutorial! Not to mention the oreo goodies you made… this is amazing and I am making the cake for her birthday party next Sunday!
Thank you!
Wow- amazing! I’ll see if I can build up some confidence to give that a try! Wow!
Wow, this is such a cute idea! Just discovered your blog today, I loved looking at all your creative ideas for cake & cookie decorating!
SO AWESOME!! I’d have never figured out how you did that one!
The idea is simply great!!! Thank you for your effort (I linked this post for my readers on my blog!).
This intimidates the world out of me, but I am tempted to try it for V-day
I am so thankful you are so detailed in your tutorials!
I know I say this a lot but You are so talented!
I love this cake even more decorated pure white. So pretty.
I’m still waiting for a cake with two people holding hands inside. You know you want to do it.
And I want to know if you use bake even strips or whatever they’re called. When take my cakes out of the oven they have a hard crusty rim on one side only and they are lopsided. Which doesn’t matter so much when I flip them and match the lopsided parts together to make one cake. But I want pure flatness like yours.
Oh for the love of pete just come live with me so you can bake for me forevah.
YOU. ARE. SO. AWESOME!!!! Thanks for posting this very-easy-to-follow tutorial. I’m not the creative type, but I may try this out one day. Who knows?
Soo impressive!!! And thanks for sharing step by step instructions!!!!
i’d say you’ve reached master heart-cake-maker status now–it looks perfect. thanks for the step-by-step–it’ll be good to have if i ever feel truly ambitious and romantic at the same time.
and that toothpick tool is awesome!
i love this! your blog is wonderful!
Wow. That is spectacular.
This cake is the cutest thing I’ve seen in quite some time. thanks for the tutorial — I think I’m going to have to try this some time.
We did it!!! I posted pix on my blog, come check it out- http://holly-nowmorethanever.blogspot.com/
Oh, honest to Pete! You are one talented lady.
Amazing. I wish I could do this…oh, i know I could give it the old college shot, but I’d send myself to the loony bin if I tried.
And, if I completed it…I’d never let anyone touch it…you know, hard work and all…
Awesome!!!!
Thank you! Now I have to add this to my ever-growing baking to-do list, LOL! I feel nervous about doing this – like I won’t be able to carve it well at all, but I will TRY! I think. LOL. I was wondering if you have tried this type of thing on mini cakes?
LOVE IT! You explained it so well that even I (a very clumsy non-baker) may actually be able to make this! I am EXCITED! My family will love it!
LOVE.THIS. So adorable and unexpected! Well done!
This is extremely awesome!
I really want to try it!
o.m.g. I’m totally trying this. GREAT idea and amazing tutorial! : )
Wow! What a great idea, and love the picture tutorial!
Wow! this amazing thank you so much for the tutorial and specially for the ingredients,i will try this soon.
vee
wow that is really impressive.
I am going to have to try that at home. I added your post to my list of valentines tips
Absolutely beautiful.
THE BEST Valentine’s Day Cake EEEEVVVERRRRRRrrrrr!
Wow.
xo
I am in awe of your cake-making abilities!
I’m so tempted to try this now!!! It’s amazing
Gorgeous. Gorgeous. Gorgeous.
I’m speechless. And now I’m wishing I had a bit more time to plan a V-day feast. Cuz I’d totally tackle this cake.
I have made my best attempt at this beautiful cake, I haven’t cut into yet so I don’t know what it looks like but I wanted to ask, is it supposed to be super super heavy? I tried not to use too much frosting, but mine weighs a TON? Think I did something wrong?
i had a go and it did take me a few hours as i had to run out and get more sugar!!! this is my result. not as impressive as yours obviously.
http://hackface.wordpress.com/2010/02/13/i-am-mommybaker-heart-cake/
also how do you get your frosting so smooth?
Maybe someday I will give this a try. It is soooo very sweet. Thanks for sharing your knowledge and talent with us.
I’ve done a number of rainbow cakes for friends, but this is a whole new game. I absolutely have to try it! Thank you for such wonderful directions. This is beyond beautiful. And as a side note, I’m also desperately in love with all your beautiful sugar cookies.
I did it!! I made your beautiful cake for V-day, and my family was over the top impressed! Thank you for the tutorial!
far out- this cake is AMAZING!
i love all of your creations especially that butterfly dotted cookie its beautiful
so great im going to link u, hope ud ont mind
Thanks for making this cake! I was so happy I found it and was even more glad to share it!
Great blog!
My mind = blown.
Bookmarking this for next year, in case I’m feeling adventurous!
This is a great post…I`m bookmarking this already.
I stumbled this one!!! Super cute!
Beautifully and apparently tasty. Thank you.
Super cute. It will be posted tomorrow!
Just brilliant! This STILL just boggles my mind! A. How did you come up with that idea? B. Are you an engineer?
Even with the instructions, I know I couldn’t do it.
Do you have a suggestion for substitution for the inner cake? I’m allergic to chocolate, so I can’t do red velvet. Will it hold up without the cocoa? Is it possible to use white cake and dye it?
This is amazing! I cannot wait to try this out.
Eyeglass lenses are commonly made from plastic, including CR-39 and polycarbonate. These materials reduce the danger of breakage and weigh less than glass lenses. Some plastics also have more advantageous optical properties than glass, such as better transmission of visible light and greater absorption of ultraviolet light.[1] Some plastics have a greater index of refraction than most types of glass; this is useful in the making of corrective lenses shaped to correct various vision abnormalities such as myopia, allowing thinner lenses for a given prescription.
I prefer the chocolate cake because you can eat it with coffee or milk and the flavor is better than the other one. the ingredients are simple so the preparation is really fast.
I prefer the chocolate cake
thanks for this idea!!
Your tutorial is really a great idea. But instead of ironing the label to twill tape I just cut them apart and iron them to my sewing project, saves time and sewing and it still looks the same.
Thanks!
What a great idea you made! You have such a artistic mind for making this kind of cake. I would really love to bake this up for a coming family get together. I can imagine how would they react as soon as I cut up the cake and they see the heart inside! This would really go well with a hot cup of coffee made from one of my filter coffee machines Kudos!
I’m speechless. And now I’m wishing I had a bit more time to plan a V-day feast. Cuz I’d totally tackle this cake.
Really It’s Awesome….
I like it very much!
What a color combination…. Fantastic…
Just stumbled upon this – it’s fantastic!
I’m bookmarking this – what a fantastic idea. Great tutorial!!!
ButterYum
I bought an Amstron replacement battery for my Dell Inspiron 5150 and it takes three days to charge. Is this typical of new laptop batteries? Do off-brand batteries not work well with Dells? What should I do?
Hey I just want to eat it! Really it’s fantastic….
Thanks for sharing it.
I really like. I cant wait to eat it………
Such a fabulously fun idea – thanks for sharing!
I want taste this heart cake.
This cake is the cutest thing I’ve seen in quite some time. thanks for the tutorial
Thank you so much for this tutorial! Red velvet is my husband’s favorite, so he LOVED the heart surprise in the middle when he cut into his birthday cake last week
Health is the best treasure (which) a man can possess. Money can do many things, but it cannot buy happiness. However, so long as man has good health, he can enjoy the pleasures of human life.
When you want success as badly as you wanted the air, then you will get it. That is the secret to success.
There is currently quite a lot of information around this subject on the net and some are most defintely better than others.
added pureed raspberries, butter cream frosting (as you instructed) & a touch of red food coloring for the center heart.
Such a fabulously fun idea – thanks for sharing!
Health is the best treasure (which) a man can possess.
Wow, this is really cool. Just imagine the attention that you will get when you have those things around with you. Both are really awesome combination if you were to ask me.
I don’t think you really read your comments on old posts …ever. That’s sad, because making people feel involved in a blog is what helps entice people to keep coming back.
So, I guess this comment is more for people who are looking to make the frosting. This is linked for the buttercream recipe specifically under “recipes” on this sight, so I grabbed the buttercream recipe off of here for a different cake. That was a mistake. Maybe it’s because it’s so humid here, but the 1/2 cup of milk listed for the buttercream was WAY too much. I couldn’t get it to the right consistency at all. I had to use a different recipe that I found in order to be able to finish my cake. When you’ve spent hours working on a cake, it’s a bit frustrating.
I do read every comment Catherine… sounds like you were right on in your deduction, the humidity has played a huge factor in baking for me all year. I have modified many recipes these last few months that I have never had to alter before. I would have been happy to share that with you. Also, if you felt that consistency was too runny, adding a bit more sugar can help.
Hope you find a recipe that works the best for you!
Be blessed-
Amanda
Whoops. My sincere apologies. I was completely wrong, then; I’m sorry.
I did end up finding a recipe that worked. I have the spare from it sitting next to a container of this buttercream bound for cupcakes tomorrow. This recipe still tastes delicious, so it’ll work for that quite nicely.
Wow! I love this… and I can’t believe how simple it is! Very awesome, I will be trying this SOON!
HI Amanda,
I’m just starting out decorating cakes this year. And just very recent started selling my cakes. But I must confess I use…. (it hurts to say it) boxed cake. I know, I know it’s horrible. But just recently a friend asked me if I wanted her to get the word out on my cakes. Even though I tell my very few customers it’s boxed I don’t feel right calling it my own. So I’m taking the plunged to try a bake from scratch! I feel that using your recipes I could try my very best. I have the decorating down, but now it’s time for the baking. Wish me luck!
Is there any advice you could give me? Check out my blog @ http://imaginationcakes.blogspot.com
Again a BIG thank you,
Jennie
This is the most coolest and lovely recipe I ever saw. You’re really incredible and one of a kind!
Hello, thank you for such a wonderful post. Written very informative. I have read with great pleasure. Good luck!
My boyfriend did this and it came out looking pretty great. I didn’t know he could cook!