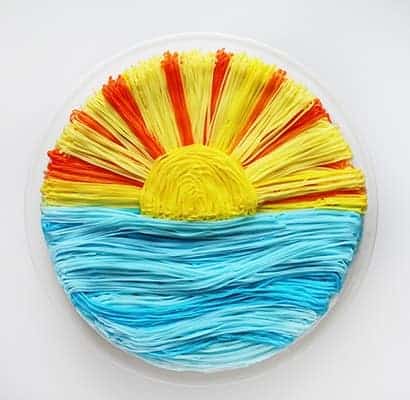
This sweet little sunset cake is easy to do and has a big impact!
A few years ago I did a “challenge” on my blog. Readers could vote on a specific decorators tip and I would make three different cakes using one tip. Wouldn’t you know they voted on the #233 grass tip? Well, I was stumped forever on how to make three different designs, but it ended up being one of my favorite challenges ever!
I made this cake for the first time back then, but thought it would be fun to do a little tutorial today.
To make this cake you will need:
A round cake covered in a crumb coat. (I love the idea of a pineapple cake for this! But vanilla cake works great too.) The sides are the only thing that will show, so make sure the sides are smooth and clean. My cake is an 8-in round and I wouldn’t recommend going much smaller than that.
I like a creamy and smooth crusting buttercream for this cake.
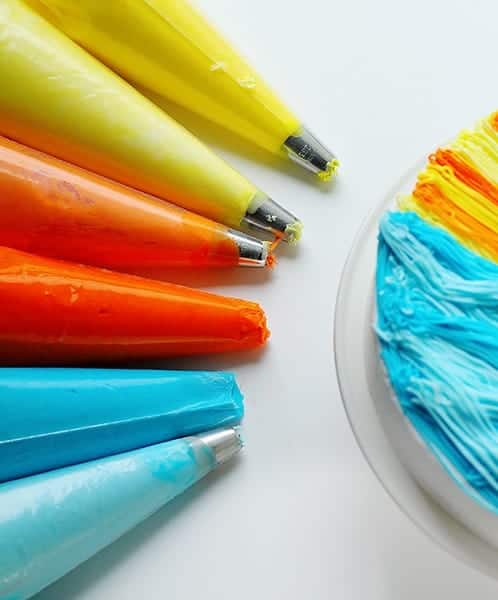
I used six colors for my cake; 2 shades of blue, 2 shades of yellow and 2 shades of orange. Since I only had 4 grass tips, I chose to put my frosting into a plastic disposable pastry bag and then change out the bag. For instance. I placed a grass tip in a bag and set it aside. I filled a pastry bag with blue. I filled another bag with light blue. I cut off the tip of the blue bag and placed it INSIDE the pastry bag with the grass tip. I piped. I then REMOVED the blue frosting bag and place the light blue pastry bag into the bag with the grass tip. If you want to avoid all that, simply get six grass tips or use less colors.
I start on the edge and moved in to try and make it a bit neater.
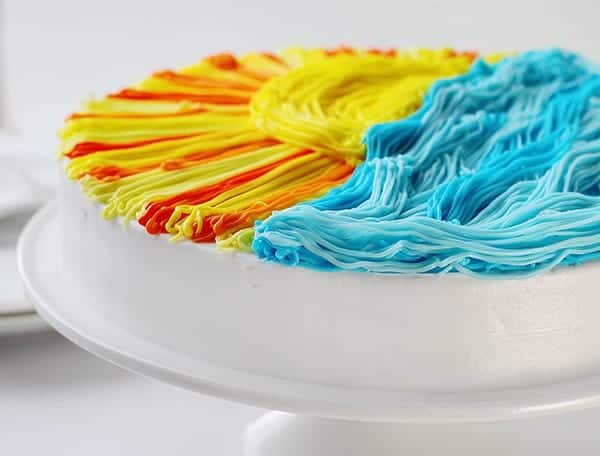
If you want to make this cake you can be even more precise than I was and really get a smooth edge. You can also go around the edge with the grass tip when you are all done.
Here is a little video I made of the cake!
You can see just how quickly it goes. Five minutes tops!
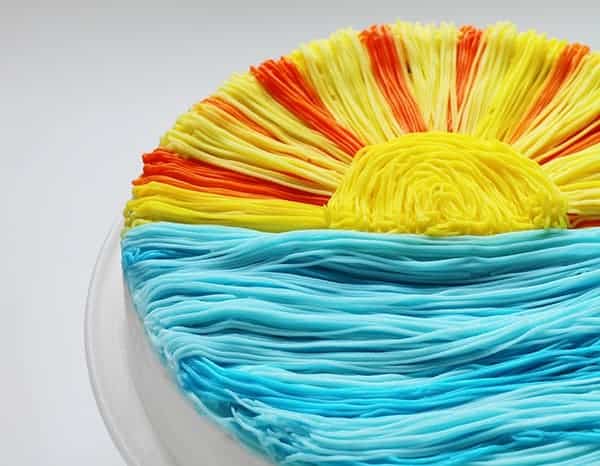
This is one of those designs that you can’t mess up. In fact, the messier, the better. The more texture you give the buttercream the more movement it seems to have, which is perfect when trying to capture water!
What other fun designs should I try with this technique??


You have me convinced even I could do this:)
Laura
http://www.24-7style.com
This is absolutely fantastic. Great cake 🙂
1. Do you think it’s a good idea to put some sugar flour figures? They would look nice.
2. Do you bake the main bit of the cake on your own or you buy it and only decorate it? Is this the recipe for it – https://iambaker.net/the-perfect-white-cake/ ?
P.S. I cannot miss to mention the way you apply the buttercream on top. Very precise hand. I guess you do that quite often. I wish i could do that too, one day 🙂
Have a great day!
I LOVE what you do with cakes. so fun!
This just makes me happy Amanda!!!! LOVE IT!
I love this cake, it’s so cheerful. Thanks for the idea 🙂
You are one talented decorator, Amanda! Love it.
What a fun cake – perfect for summer!
This is so pretty! And it reminds me of my vacation. 🙂
This is such a beautiful cake, It’s like a Van Gough. You so talented….
Beautiful! Gorgeous! Absolutely stunning.