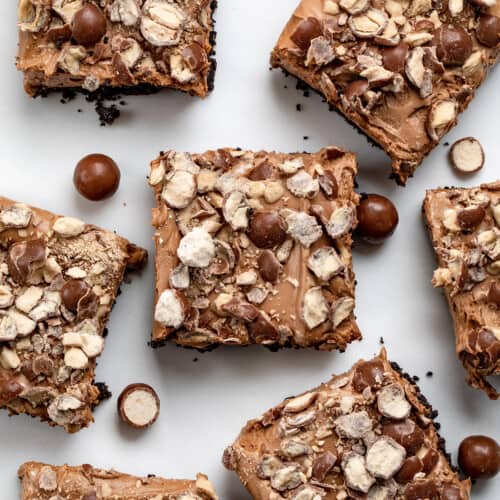
Chocolate Malt Shoppe Bars are creamy chocolatey bars with added chocolate malt powder over an Oreo cookie crust and topped with crushed malted milk ball (whopper) candies. This no-bake treat is like enjoying your favorite chocolate malted milkshake but in a dessert bar without any ice cream. Let each bite take you back to the nostalgic charm of your favorite malt shop! For another decadent chocolate bar, check out my Chocolate Mud Bars, too.
 candies. This no-bake treat is like enjoying your favorite chocolate malted milkshake but in a dessert bar without any ice cream. Let each bite take you back to the nostalgic charm of your favorite malt shop!")
Ingredients & Substitutions
Crust: It’s all about the crushed Oreo cookies and butter for the crust. The consistency of the cookie crumbles is important, so I would recommend using a food processor or blender to ensure that you can get the finest grain. If you don’t have a food processor, place the cookies in a sealed plastic bag. Use a rolling pin or wine bottle to crush the cookies. You could also use a store-bought crust.
Marshmallows: You will need about 2 cups of marshmallows or 16-18 regular-sized marshmallows. If using miniature marshmallows, just measure out 2 cups.
Chocolate Chips: I prefer semi-sweet chocolate chips in this dessert. Milk chocolate chips would also work.
Cream Cheese: Be sure the cream cheese is at room temperature before mixing it with the other ingredients.
Chocolate Malt Powder: Chocolate malt powder is a chocolatey version of malt powder. It is commonly added to desserts and sweets. Look for the powder in both the baking and dry mix beverage aisles at your local grocery store.
Malted Milk Balls: To give these bars even more of the malt flavor, top the dessert with crushed malted milk balls, like Whoppers candy.
 candies. This no-bake treat is like enjoying your favorite chocolate malted milkshake but in a dessert bar without any ice cream. Let each bite take you back to the nostalgic charm of your favorite malt shop!")
Can I Make These Bars Without Chocolate Malt Powder?
Sure! If you prefer a decadent chocolate dessert without the malt flavor, simply leave it out of the recipe. The bars will still be delicious! Instead of topping the bars with crushed malted milk balls, add a few dollops of whipped cream instead.
 candies. This no-bake treat is like enjoying your favorite chocolate malted milkshake but in a dessert bar without any ice cream. Let each bite take you back to the nostalgic charm of your favorite malt shop!")
How To Store & Freeze Chocolate Malt Shoppe Bars
Store the chocolate malt shoppe bars in the refrigerator, covered, for up to 3-4 days. If you are not going to enjoy the bars within a few days, freeze them. First, wrap them in plastic wrap. Then, freeze the bars for up to a month. When ready to indulge, let the bars thaw in the refrigerator overnight.
Chocolate Malt Shoppe Bars
Ingredients
Crust
- 1 ½ cups crushed Oreo Cookies, about 20 cookies
- 4 tablespoons unsalted butter, melted
Filling
- 2 tablespoons unsalted butter
- 18 regular marshmallows, about 2 cups
- ½ cup semi-sweet chocolate chips
- ¼ teaspoon kosher salt
- 8 ounces cream cheese, room temperature
- ¾ cup confectioners' sugar
- ¾ cup chocolate malt powder
- 1 teaspoon vanilla
- 1 cup heavy whipping cream
Garnish
- 1 cup crushed malted milk balls, like Whoppers
Instructions
Crust
- Line an 8×8-inch baking dish with parchment paper, including up the sides.
- In a small bowl, combine cookie crumbs and melted butter. Make sure to get every crumb coated with butter. Firmly press into the bottom of the baking dish. Transfer the crust to the refrigerator to chill as you prepare the filling.
Filling
- In a medium saucepan over medium-low heat, melt butter. Add the marshmallows, chocolate chips, and salt. Stir until the marshmallows are just melted. (Be careful not to overcook the mixture; cooking at too high of heat or for too long will cause the marshmallows to harden.) Remove from heat and set aside to cool (5-8 minutes). As the mixture cools, it will become thick and sticky.
- In the bowl of a stand mixer with the paddle attachment, beat the cream cheese, confectioners' sugar, malt powder, and vanilla until smooth.
- Switch to the whisk attachment. With the mixer on low speed, slowly pour in the heavy cream. Continue to whisk until fully combined.
- Add the marshmallow mixture to the whipped cream, mixing until fully combined.
- Pour the mixture over the prepared crust, spreading it into an even layer.
- Top with crushed malted candy.
- Chill the bars in the refrigerator for 3-4 hours, or until set, before cutting and serving.
Video
Did you make this recipe?
Thank you for making my recipe! You took pictures, right? Well go ahead and post them on Instagram! Be sure to mention me @iambaker and use the hashtag #YouAreBaker.
What the Test Kitchen had to say about this recipe:
I really liked these bars. The creamy chocolate malt filling totally captures that milkshake essence. Also, the Whopper topping and the Oreo crust, just bring it all together.

Elizabeth
I am not a huge fan of malts or malted milk balls, so this review is a little skewed. BUT, the texture of the bars was incredibly smooth and silky. And, you can't go wrong with an Oreo cookie crust! If I make the bars, I will simply leave out the malt powder.

Rachael
I love malted milk balls and I love malted powder for malts! This was a delicious combination and the malt flavor really came through which I LOVE. Plus Oreo crust……do I need to say more?

Bella
There are multiple layers of flavors and textures going on! You get that classic Oreo crust. It adds a nice crunch to the whole thing alongside the malted milk balls. The filling is very smooth. Overall, it is sweet, chocolaty, and rich!

Annabelle
So chocolatey, it's crazy! These bars were rich and decadent, with a great malt flavor!


I really enjoy your recipes and these sounds so yummy! I was wondering if I will need to scrape the icing from the Oreo cookies before crushing them????? I would like to make these soon, so would appreciate your answer ASAP. Thanks, Fran
Hi Fran! No, you don’t need to scrape the filling before making these. 🙂
I haven’t even baked them yet but my mouth watered just looking at them and I actually believe I can do this one!!! My husband is a malt freak and I just love it all. ( unfortunately! But I’ve been a pretty good girl ) Anyway, Amanda I will let you know how I do!!! 🙂
I made these and I tried TWO TIMES To get the marshmallow and chocolate chip part to work but it turned hard when it cooled and I had to throw it out. The first time I us Low heat on my stove and it was like a rock. The second time I used low-medium heat and it looked really good but when it cooled for 10 minutes it turned hard. I don’t know why.
I tried the marshmallow and chocolate chip,butter and salt part two times and it turned hard both times. I tried it on low heat and medium heat and the second time it looked really good when it was done but when it cooled it was still rock hard. I don’t know what to do because I have never had a problem like this before.
I have the same problem Phyllis mentioned above. The chocolate chip marshmallow mixture turns hard when it cools and mixing it into the cream cheese mixture leaves it chunky. Really frustrated since I was really looking forward to this recipe. Maybe it needs to be cooked shorter/longer? I hope the author can adjust the directions to help bakers get the right consistency.
This recipe was tested extensively before publishing. However, I will test it again to make sure there are no details missing.
I had a similar experience to the others who reported that they could not get the marshmallow/chocolate mixture to blend in smoothly with the cream cheese mixture. I read all of the reviews, as well as your comments, stirred my marshmallows in order to melt them as quickly as possible, and removed them from the heat when that had occurred. I still ended up with little chewy bits of marshmallow throughout. The flavor is good, but I doubt I’ll make this again.