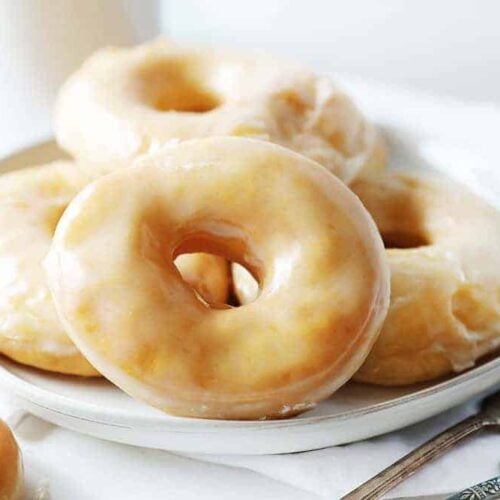
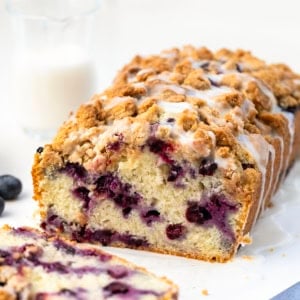
These donuts are absolutely going to melt in your mouth! Homemade donuts covered in a smooth glaze make up one of our favorite breakfast treats. If you love from-scratch recipes that have been perfected over many generations, don’t miss my Glazed Cake Donuts and Apple Fritters!
Amish Glazed Donuts
There is nothing I like more than working with dough and creating beautiful and delicious baked goods for my family. This recipe is a labor of love, truly, and one that will most likely be saved for the most special of occasions!

How to Make Amish Glazed Donuts
The original recipe I am sharing is called “Amish Glazed Donuts” and I found it in an old cookbook from a church in Pennsylvania. However, after extensive research on the topic, the Amish recipe doesn’t seem to vary greatly from traditional recipes. The main difference is the method, as most recipes seem to have the same basic ingredients.
This recipe was interesting to me as it utilizes two separated “wet” ingredients. You start by creating the milk mixture; milk, sugar, salt, and butter. You set that aside to cool a bit. Then the water mixture is started. That consists of the water, sugar, yeast. This needs to rise and bubble, indicating an active yeast. After those two are done, the dough can be made.
So while the steps seem daunting at first, they really are easy to do and the dough will come together quickly!
The other aspect to this method was the rising times. Yes, most recipes call for the dough to rise so that in itself is not unique. But one thing I had never done before was let the dough rise a bit after I have cut out the individual donuts, and I really appreciate that extra step! These donuts puffed up SO beautifully in the hot oil and stayed that way. Donut skip that part! 😉

How to Fry Donuts
Dropping beautiful dough into a too-hot oil or a too-cold oil can do bad stuff to the beautiful dough that you have spent hours with. I found that the best way to ensure your oil stayed at a consistent 350°F was to have a thermometer right in the oil at all times. If you happen to have a pan large enough for frying 3-4 donuts at once, the addition of the dough can decrease the temperature significantly. If you see the temperature lower, you can immediately add heat and get it back up to temp. Requested info by a reader: I used a dutch oven with enough oil to reach 2inch deep. I don’t recommend adding more than that. If you have any leftover oil, don’t throw it out; first, check out How to Clarify Used Cooking Oil so it doesn’t go to waste.
Be prepared!
I found that when making glazed donuts it helped to have two people. One for frying and one for the glaze. To best prepare for this make sure you have these tools out and ready:
- thermometer safe for hot liquids
- a hand-held strainer or forks to easily rotate the donuts in the hot oil
- plate lined with paper towel to set hot donuts on
- several cookie sheets fitted with cooling racks for setting glazed donuts
- a bowl for the glaze that is large enough to drop an entire donut in
- fork/spoon/tongs for easy transferring of donuts
- a table lined with parchment paper to set donuts on to dry

How to Glaze Donuts
I prefer to glaze the donuts when they are still warm, yet cool enough to handle. To make the glazing easier, I used a bowl that was bigger than needed just to make sure I could easily drop and remove the hot donuts. Then, when I was ready to glaze, I set my bowl right next to a pan with a cooling rack in it. Drop an entire donut into the glaze and then flip it over. Using a fork or the handle of a wooden spoon, lift the donut out by the center hole and let the excess glaze drip off. Place the donut on the cooling rack and allow it to harden.
Double Glaze
Who doesn’t love a donut with double the glaze? But, as much as I love doing that, I don’t recommend it with a recipe this big. You will double your process time and will also need to double your glaze recipe. If you happen to cut this donut recipe in half, that would be a great time to try out double glazing! After the first coat of glaze has hardened for a bit, just re-dip the donut and then allow to set.

Donut Glaze Recipe
Making the glaze is easy as it’s just a few ingredients. Sugar, corn syrup, vanilla, salt, and milk. I don’t know about you, but whenever I see corn syrup added to a recipe I tend to want to leave it out. But for these donuts, it really does add something of value. I can say that because I made two versions of glaze, one with corn syrup and one without. We found that the donuts with corn syrup glaze were coated better, stayed soft and moist longer, and even tasted better. If you are adamant that you want to leave it out, I recommend using milk, confectioners sugar, salt, and a tiny bit of vanilla. The vanilla can be overpowering if you use too much and take away from the light-as-air taste of this donut recipe. If you use good quality vanilla like McCormick, you will not run into any issues.

Chocolate Glazed Donut
I tried out several different version of chocolate donut glaze and was disappointed by them all. It was a LONG day in the kitchen! Finally, after an hour of frustration with gloppy, lumpy, greasy, and gross tasting glazes, I added some cocoa powder to the glaze recipe below. It worked AMAZING!
Simply add 1/2 cup of cocoa powder to the recipe below and add any milk as needed. I added about 1 tablespoon more of milk (maybe 2 depending on the humidity in your area) and not only was the glaze shiny and beautiful, but it tasted great!
When dipping the donut into the chocolate glaze I opted for only dipping the top. The donuts that were 100% coated in chocolate glaze seemed to only taste like chocolate and not any of that glorious donut inside. Feel free to test this out and see which you prefer!

Can You Make the Dough Ahead of Time?
Yes! Simply make the dough through step 8 the night before and then chill in the refrigerator until the morning. When you are ready to begin, remove the dough from the refrigerator, allow it to come to room temperature and then start with “Preparing the Donuts” in the recipe instructions.
Glazed Donuts
Ingredients
Milk Mixture
- 1½ cups (367g) whole milk, heated
- ½ cup (100g) sugar
- 1 teaspoon salt
- ½ cup (113g) unsalted butter
Water Mixture
- 1½ cups (355g) warm water
- 2 teaspoons sugar
- 2 packages of active yeast, about 4 1/2 teaspoons
Dough Base
- 2 large eggs, room temperature
- 9 cups (1,125g) all-purpose flour
Glaze
- 4 cups (500g) confectioners' sugar
- 2 teaspoons corn syrup
- ½ teaspoon McCormick vanilla extract
- ¼ teaspoon kosher salt
- ¼-½ cup milk
Instructions
Donut Dough
- In a medium saucepan over medium-high heat, pour milk. When the milk is hot but not boiling, add in the sugar, salt, and butter.
- Set aside to cool down. (about 5-10 minutes)
- Add yeast packets and 2 teaspoons sugar to warm water. (I used hot water out of the faucet)
- Let sit for 5 minutes, allowing mixture to grow and bubble. If your yeast does not bubble, it may be bad and this is a good time to start again.
- In the bowl of a stand mixer fitted with the dough hook attachment, add in the milk mixture and water mixture. To this add the eggs and mix for a couple of minutes to combine.
- Add in the flour 1 cup at a time with the mixer on low. (You can also turn the mixer off, add flour, turn mixer on 2, knead a bit, then mixer off again and repeat for all the flour.) After last flour has been added knead for 10 minutes.
- Drop the dough into a greased bowl and let rise 1 hour. It should double in size.
- After an hour, punch down the dough. Allow dough to rise for 1 more hour.
Glaze
- On the last rise, prepare the glaze. Mix all ingredients in a medium to large bowl. Whisk until they are smooth and you have reached the desired consistency. (I think the perfect consistency is the same as the corn syrup, not too runny but loose enough for it to fall beautifully over all the nooks and crannies of the donut.)
Preparing The Donuts
- Roll out the dough to 1/2 inch or up to 3/4 inches thick. It is important to make sure the dough is at least 1/2 thick or your donuts will be too flat.
- Once rolled out, use a donut cutter to cut out shapes. If you do not have a donut cutter, use a round tool like a kitchen glass or a jar lid that is about 3-inches across. You can use a bottle cap or small shot glass for the smaller hole.
- Set cut-out donuts on a baking sheet. I filled up 4 baking sheets with donuts and donut holes.
- Starting with the first pan of donuts you cutout (meaning that those donuts have been allowed to rise a bit more while you cut out the rest) drop one donut at a time into vegetable oil that has been heated to 350°F.
- Allow each donut to brown for 45seconds to 1 minute on one side, and then flip over so that the other side may brown.
- Carefully remove donut from oil (I prefer and hand-held strainer) and set on a plate lined with paper towels.
- While donuts are warm, submerge into the glaze. Using a wooden spoon handle or a fork, rotate the donut so that both sides are covered. Lift and let drain into the bowl, then move the donut to a baking sheet with a cooling rack in it. (You can also place on parchment or wax paper but the glaze might pool.)
- Donuts can be enjoyed immediately or you can double dip them depending on how much glaze you like.
- Store donuts in between parchment paper in an airtight container for up to two days.
Notes
Did you make this recipe?
Thank you for making my recipe! You took pictures, right? Well go ahead and post them on Instagram! Be sure to mention me @iambaker and use the hashtag #YouAreBaker.


If refrigerating before finishing…do you punch the dough down before putting it in the fridge?
So far so good. Im hoping I’ll get a response to my query ASAP. Im on the kneading stage in the kitchenmaid and its been about 4 mins. The dough is still very, very sticky, should I add more flour or is it just 9 cups, no questions asked?
You definitely don’t want an overly sticky dough, so yes, you can add more flour (about 1/4 cup at a time) until you reach the consistency specified.
I made these, and they are delicious. The dough was soft and so easy to work with. I halved the recipe and it made 16 donuts. Thanks for sharing the recipe!
Do these work to not cut out the holes and after cooking, fill with custard?
Nothing about this recipe turned out for us. Firstly, and it’s partially my fault, I should have realized this was going to make nearly 100 donut holes. This isn’t some small family recipe but probably one you’d use for a giant pot luck or to feed a small army. The dough was more of a batter. I ended up having to use nearly 11 cups of flour just so it wasn’t a consistency that could be poured and even then it was a very very wet batter. Humidity wasn’t high today so I’m not sure what happened. The recipe says half inch thickness to 3/4 inch thickness at most. When I used that thickness the donuts literally swelled to be the size of softballs. So we opted to do donut holes instead. Found myself really cranky that after two and a half hours of work and an entire bag of flour that these just weren’t turning out. And after nearly 45 minutes of frying and more than half of our donut holes left to fry were just going to attempt to freeze the dough. Also want to note that I reread the recipe and other than deviating because of the flour everything else was spot on.
Sorry this has happened! I would, as you stated, be very upset with poor results after 2 1/2 hours of work. Unfortunately, the addition of 2 cups of flour would lead to drastic changes in the consistency and final product. If you ever wanted to try again and make less, you can access the recipe on your desktop. Let your mouse hover over the “SERVINGS” and a sliding scale will pop up allow you to choose the servings which will then change the ingredients needed. Hope that helps.
I made these this morning and they turned out amazing!! I ended up halving the recipe and making a chocolate glaze following the instructions listed here. The whole family loved them!
People would be surprised how often the older recipes are just as good or even better than some today. I suppose its always the same, the new generations always believes they know better than those before them, its not until they themselves get a bit older they realize AMAZINGLY how much wiser that older generation suddenly became. It wasn’t all that long ago any dish older then 10 years was out of the question, full of fat, carbohydrates, sugar and ALL the wrong thing. Everything in the market was low fat, low carbohydrates, low sugar, sugar free and on and on. Notice how now people are beginning to realize altering foods, EVEN for so called “health benefits” is wrong. It’s just better to eat the real thing in a sensible manner. For one reason, the folks years ago used to do something that got rid of all those problems in the body, they WORKED. My great-grandfather was one of them. Born and raised an Mennonite farm boy. Even though he married a beautiful Lutheran schoolmistress he still farmed for others and ran a dairy from their home. (the one where I now live) I never saw a man who actually LOVED working hard in this world as much as he did. His favorite pleasure, sawing wood. It’s one reason I had to replant trees on every property, he had cut them all down. In my dad’s day and even my youngest there was always a very large silver can in the pantry full of lard. I personally don’t like lard, it leaves a film in the roof in my mouth. My Memaw, my great-grandmother (these two were my babysitters from when I was 8 months until she died suddenly when I was 13, one of the greatest devastations in my life) could commiserate with you and doughnuts. EVERY Fasnacht Day she was up at 3 am to begin her fasnachts. While many of the recipes she made were from her Mennonite mother-in-law and numerous sister-in-laws (Nanny was youngest of 14 children) just as many were from her side. To this day, 47 years later I have not had any I thought as good as hers. It’s one of the few family recipes I haven’t attempted on my own yet. She began those fasnachts in the middle of the night and when my mom dropped me off about 6 am the first were just ready, still warm and dusted in a brown paper bag with powdered sugar. I remember thinking I had never tasted anything so good in my life. She’d have a bag for my mom to eat on the way to work on her 30 minute drive and guess what I ate for breakfast that day. And she made them ONLY once a year. When I arrived back from school about 3:30, she was just finishing the last of them. Anytime I see Amish Doughnuts it brings back all the memories of her on that day.
Just wondering what kind of oil should be used for frying
I work with iambaker and am happy to help out with questions!
Hi, Nat! I would recommend vegetable oil for this recipe. Enjoy the donuts!
Made these donuts today and they were amazing!! I have an egg allergy and used 1/4 cup of unsweetened applesauce per egg as a substitute and they still turned out wonderful! 🙂
They are so good; everything I want in a doughnut: light and fluffy with an amazing glaze. I didn’t have corn syrup but I think they turned out lovely regardless. I have never made donuts before but I already feel like it’ll be too soon for my waist line when I make these again because they are so good!