Stabilized Whipped Cream is a versatile ingredient that can be used in many types of desserts from frosting to filling to a topping. In this recipe, I used a little bit of softened cream cheese as the stabilizer to help hold the shape. (I had not ever seen that done before and actually did it by accident!) It was a wonderful way to whip up the creamy topping! I also have a soft and creamy homemade whipped cream, too!
, it holds its shape beautifully, and it lasts for days! This just might be my new favorite addition to all my favorite desserts!")
Stabilized Whipped Cream Ingredients & Smart Substitutions
- Cream Cheese: Softened cream cheese is used as the ‘stabilizer’ in this recipe. It adds some structure to the whipped cream without using a stabilizing agent like gelatin or cornstarch.
- Sugar: Granulated sugar is an important ingredient in stabilized whipped cream. It adds sweetness, helps to stabilize the cream, and affects the texture of the final product.
- Heavy Cream: Heavy cream, also known as heavy whipping cream, contains a higher percentage of milkfat compared to other types of cream like light cream and half-and-half. Typically, it has a fat content of 36% or more. If you don’t have heavy cream on hand, you can use half-and-half as a substitute. However, keep in mind that half-and-half has a lower fat content than heavy cream and may not give you the same rich, creamy texture in this recipe.
- Vanilla: Vanilla extract enhances the flavor of the whipped cream. However, you could leave it if preferred. Or, substitute other flavor extracts like almond, peppermint, or lemon for a different flavor profile.
- Salt: Adding salt to the whipped cream brings out the sweetness of the whipped cream. It also acts as a stabilizer.
, it holds its shape beautifully, and it lasts for days! This just might be my new favorite addition to all my favorite desserts")
What is the Difference Between Stabilized and Regular Whipped Cream?
Stabilized whipped cream has a stabilizing ingredient, like cream cheese or gelatin, that helps it hold its shape and prevents it from breaking down or deflating over time. This makes it ideal for use in multi-layered desserts and for piping decorative designs. Regular whipped cream, on the other hand, is made by whipping heavy cream until it forms soft peaks. While it’s perfect for topping pies, cakes, and other desserts, it lacks stabilizing ingredients, so it can quickly lose its texture and deflate. This makes it unsuitable for decorative or multi-layered desserts.
, it holds its shape beautifully, and it lasts for days! This just might be my new favorite addition to all my favorite desserts")
How to Store & Freeze Stabilized Whipped Cream
Once made, store the whipped cream in an airtight container in the refrigerator. It will last 2-3 days.
For longer storage, freeze it. To freeze stabilized whipped cream, store it in a freezer-safe container for up to a couple of months. When ready to use, transfer the frozen whipped cream to the refrigerator to thaw. Once the whipped cream has thawed completely, give it a good stir or whip it again to restore its texture before using it.
Stabilized Whipped Cream
Ingredients
- 2 ounces cream cheese, softened
- ½ cup (100 g) granulated sugar
- 2 cups (476 g) heavy cream
- ½ teaspoon vanilla extract
- 1 pinch kosher salt
Instructions
- Before starting, place the bowl and whisk attachment from your stand mixer* into the freezer to chill for about 15 minutes. Starting with a cold bowl will help the cream whip up faster and with more volume.
- Once chilled, add the cream cheese and sugar to the bowl. Mix on medium-high speed until fully combined and no lumps remain.
- With the mixer off, pour in the heavy cream. Resume mixing on medium speed until soft peaks have formed (peaks droop slightly). Stop the mixer.
- Using a rubber spatula, scrape the bottom of the bowl to incorporate all of the cream cheese.
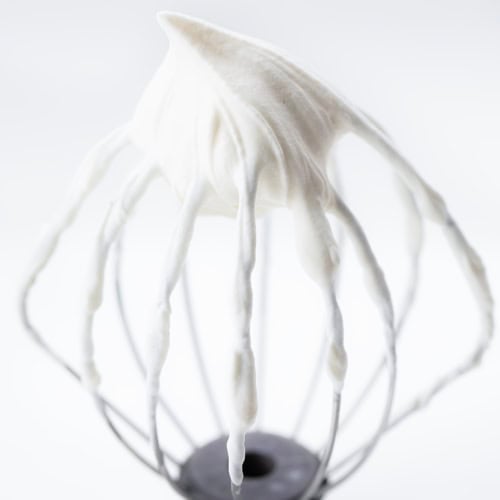
- With the mixer back on medium speed, mix until stiff peaks have formed. (Stiff peaks refer to the whipped cream peaks that stand straight up and hold their shape firmly.)
- Finally, add in the vanilla and a pinch of salt, being careful not to overmix.
- Serve it with your favorite desserts!
Video
Notes
Did you make this recipe?
Thank you for making my recipe! You took pictures, right? Well go ahead and post them on Instagram! Be sure to mention me @iambaker and use the hashtag #YouAreBaker.


can u use a hand mixer?
Yes
Thank you for sharing.
Hi, how long will this be stable at room temperature as a filling in a covered cake?
I love and follow you on many platforms! In this recipe what do you mean after adding salt and vanilla “being careful not to overmix”? Do you mean don’t whip for a ling time?
Thanks
Lindsay
Love this recipe. Does it hold up better then using whip it?
Yes!
How do I softer the cream cheese ?
Just had a cake ruined because my “stabilized” whipped cream with gelatin deflated. Will definitely try this version next.
Easy & so delicious
Hi Amanda. I want to try this but need more than 3 cups. Can it be doubled or should I just make extra batches? Thank you.
You can double it. 🙂
Can I add food coloring without messing up the consistency?
You can add gel food coloring!