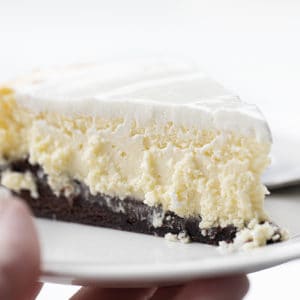
Chocolate Cheesecake is a chocolate lover’s delight with an Oreo cookie crust filled in and baked with a rich and creamy chocolate cheesecake and topped with a chocolate ganache. This is the richest, most chocolatey cheesecake you will ever taste! For another rich and chocolatey dessert, try my Chocolate Raspberry Cheesecake or even the Perfect Cheesecake Recipe for a classic dessert!
Chocolate Cheesecake
Get ready to indulge in a rich and moist chocolate cheesecake that will satisfy even the sweetest tooth. This dense and creamy treat is full of chocolate flavor in both the crust and the filling. As if it wasn’t chocolatey enough, I even added a chocolate ganache to put this chocolate cheesecake over the top!

What is a Springform Pan?
A springform pan is a good choice for any cheesecake recipe because it has removable sides. You won’t have to mess up your dessert by trying to get the cheesecake out of the pan! If you do not have a springform pan, I recommend using a disposable pan that you can cut off after your cheesecake is done.
A second option if you don’t have a springform pan would be to line a pan with parchment paper, leaving plenty of the paper hanging over the side. With some help, you and your extra set of hands can carefully lift the cheesecake out of the pan.

How to Make the Chocolate Ganache
After you have allowed the cheesecake to chill for at least four hours (up to overnight), prepare the ganache to pour over the cheesecake.
- Combine chocolate chips and heavy cream in a microwave-safe bowl.
- Heat up the chocolate and cream in 20-second intervals until it is melted and creamy.
- Pour this over the chocolate cheesecake, let it sit for about 15 minutes, and serve. Enjoy!

Can I Use Regular Unsweetened Cocoa?
Although I used Dutch-processed cocoa, you could use regular unsweetened cocoa for both the cake and the frosting instead. The difference would be that each would be a lighter color and will not be quite as rich tasting.

How to Tell if Cheesecake is Done
You will know the cheesecake is done when the sides are set, but the middle is still a bit jiggly. You can check the internal temperature of the cheesecake to check for doneness (150°F)
The other option to check for doneness would be to take a wooden spoon and tap the outside of the pan. If there is a slight jiggle, it’s done!

How to Store Chocolate Cheesecake
Cheesecakes are rich and filling, so even though you may want to eat the entire cheesecake in one sitting, it’s not always (if ever) possible. So, how do you store it to eat when you are craving a bite later? One easy way is to cover the cheesecake and store it in the refrigerator for a day or two. If you tightly wrap the cheesecake in plastic wrap or store it in an airtight container, it will last up to 3 days in the fridge.
To freeze a cheesecake:
- Let the cheesecake cool completely.
- Place the cheesecake (uncovered) in the freezer for about an hour. I suggest that if you are keeping the cheesecake pie in the springform pan, remove the sides of the pan.
- After the hour in the freezer, take the cheesecake off the pan, and wrap it tightly in plastic wrap.
- Place the wrapped cheesecake into a zipped freezer bag or wrap it in aluminum foil. Be sure to label and date the cheesecake.
More Cheesecake Recipes

Chocolate Cheesecake
Ingredients
Crust
- 24 Oreo cookies
- ¼ cup (½ stick / 57 g) unsalted butter, melted
Filling
- 2 cups (336 g) semisweet chocolate chips
- ¾ cup (178.5 g) heavy cream, room temperature and divided
- 3 packages (24 ounces) cream cheese, room temperature
- 1 ½ cups (300 g) granulated sugar
- ¼ cup (29.5 g) Dutch process cocoa powder
- 5 large eggs, room temperature
- 1 teaspoon vanilla extract
Chocolate Ganache
- 1 ½ cups (252 g) semi-sweet chocolate chips
- ¾ cups (178.5 g) heavy cream
Instructions
- Preheat the oven to 325°F.
- Lightly grease a 9-inch springform pan (or use parchment paper to prevent sticking).
Crust
- Add Oreo cookies to a food processor and crush until you have a fine crumb and very few larger pieces.
- In a medium mixing bowl, combine the Oreo cookies and melted butter and stir until evenly distributed.
- Press the crumbs into the bottom of the springform pan and up the sides.
- Bake the crust for 10 minutes. Set aside to cool. NOTE: Sometimes the butter can drip out of the springform pan if it is not sealed properly. You can either wrap the bottom edge of the pan in aluminum foil or place a cookie sheet on the bottom rack to collect any drippings.
Filling
- In a microwave-safe bowl, add 1/4 cup of heavy cream and the chocolate chips. Heat for 20-second intervals until the chips have melted and the mixture is smooth with no lumps. Set aside.
- In a large mixing bowl, beat the cream cheese with a hand-held mixer until creamy and smooth.
- Beat in the sugar and dutch process cocoa powder until smooth.
- Add the eggs, one at a time, and the REMAINING 1/2 cup of heavy cream, mixing until combined.
- Fold in the chocolate mixture.
- Add the vanilla and stir to combine.
- Pour the batter on top of the cooled cookie crust.
- Bake for 70 minutes, placing a separate pan underneath the cheesecake to catch any drippings. The cheesecake is done when the sides are set but the center is still a little bit jiggly.
- Remove the cheesecake from the oven and let it rest until the pan is cooled.
- Refrigerate for 4 hours or until completely chilled.
Chocolate Ganache
- Combine the chocolate chips and heavy cream into a microwave-safe bowl. Heat in the microwave in 20-second intervals until melted and creamy. Pour over the chilled cheesecake and let it sit for about 15 minutes before serving.
Did you make this recipe?
Thank you for making my recipe! You took pictures, right? Well go ahead and post them on Instagram! Be sure to mention me @iambaker and use the hashtag #YouAreBaker.
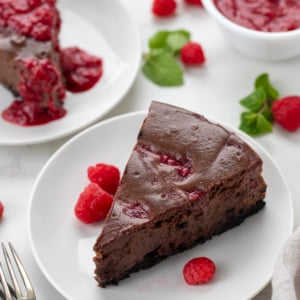


I made this cheesecake for my husband’s birthday dinner at a local restaurant, and it was a huge hit. I added chocolate dipped strawberries to the top because he loves them. We gave our server a slice, and she came back with the owner of the restaurant to tell me it was the best chocolate cheesecake he’d ever had!
I LOVE that you had that moment Linda!! I’m sure it looked gorgeous in addition to being delish. Happy belated birthday to your husband!
You didn’t use a water bath? You removed from oven immediately after baking, didn’t prop door open and let cool in oven for an hour and then cool on counter, then into refrigerator? Just making sure. And it didn’t crack?
I have a question: if I wanted to add amaretto to this, what kind of dry element would I have to add to counteract the moisture? Or would I want to reduce the cream?
Delicious
YOU are the bomb. I’ve yet to make one of your recipes, only because we are rebuilding the house. But…I can not wait to start! Main course appetizers, desserts, etc. YOU do it all and I’m glad I found you ! Peace.
Erma Gerd. Just made this for my sweetie’s b-day. Yikes! Might be closer to 16 servings. So Rich & delicious. Going to cut, wrap & freeze pieces of it
Individually, and give half away!
I made this for company. They kept saying “fancy restaurant dessert!” I took what was left to a friend the next day. She kept repeating – this is so decadent!
I forgot to add. I grated orange zest into the batter. Love orange chocolate.
It’s my first comment here.
I did try the recipe and unfortunatelly the crut came out extremely hard, burnt… I followed the recipe entirely, baking instructions included. No water bath.
Should the cheesecake be baked with the induction function (fan)? I baked it on up and down heat and then only with heat from under.
The cake cracked too…
Hi Marius-
Thanks for trying the recipe! Sorry you ran into issues. I had to do a lot of research on this answer because I’ve not ever heard of any of my cheesecakes having extremely hard, burnt crusts.
Here’s a potential reason why your cheesecake could have gone wrong:
Overbaking: You mentioned that the crust came out extremely hard and burnt. This could indicate that the cheesecake was overbaked. The recipe calls for baking the cheesecake for 70 minutes, but oven temperatures can vary, and cheesecakes can sometimes bake faster than expected. Additionally, if the cheesecake was baked without a water bath, the direct heat from the oven could have caused the crust to burn. To prevent overbaking and burning, it’s essential to monitor the cheesecake closely towards the end of the baking time and check for doneness by observing the jiggle in the center and the firmness of the edges.
Baking Method: You mentioned baking the cheesecake with the induction function (fan), but the recipe does not specify this. Using the convection (fan) setting in an oven can sometimes cause baked goods to cook faster and more evenly, but it may also affect the baking time and temperature. It’s best to follow the recipe instructions as written and avoid using additional functions unless specified.
Cracking: You also noted that the cheesecake cracked. Cracking can occur due to various factors, including overmixing the batter, rapid temperature changes during baking or cooling, or baking at too high a temperature. To minimize cracking, ensure that the ingredients are mixed just until combined, avoid overbaking, and allow the cheesecake to cool gradually in the turned-off oven with the door cracked open before refrigerating.
Hope that helps!
Hi Amanda and first of all thank you for your elaborate reply.
Please post this because it may be very useful for other ppl too.
Just for the sake of precision:
1. I did not bake it for 70 minutes, otherwise it would have been completely burnt… From now on I will bake it at 150 degrees Celsius. I baked it at around 160. I am in Europe, ovens are different here. I’ve seen your American ovens tend to be bigger in size, meaning the baking chamber is also larger. Maybe because of this the heat tends to be dispensed in a different manner. The cake is closer to the heating source. Maybe this plays a role…
2. This is the main point: the recipe did not specify to use a water bath. And this was the problem most probably. I paid special attention to this detail and moreover it says like this: “Bake for 70 minutes, placing a separate pan underneath the cheesecake to catch any drippings.” So I concluded a water bath was not needed for this recipe. I was surprised too, but went on with the instructions. I will redo it with a wb.
3. About the baking function of the oven, again, it did not specify which one to be used: heating from up and down, only from underneath, with or without a fan. So I used the up and down heating and after a while only from under because I was afraid not to burn surface of the cake. This is important, actually I did not use the convection function. I only said I didn’t know if I should have used it because it was not specified in the recipe.
4. About the cracking, yes, it might have been the high temperature again. I’ll try it on lower temperature from now on.
Thank you once more for the reply and I will not stop, I consider all these mishaps as steps towards better and better results. 🙂
Thank you!