We were gifted some beautiful Harry & David treats over Christmas, and the box just so happened to include six fabulous pears. Seeing as we live in Minnesota and its the middle of the winter, that was a fabulous gift indeed!


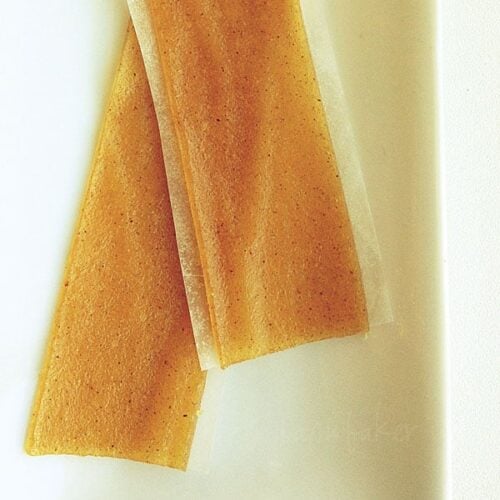
Try as we might though, we couldn’t eat them all before they went very soft. I immediately knew that those succulent pears could not go to waste, so I decided to make them into a fun and easy treat. Fruit roll-ups! We actually call them ‘fruit leather’ around here, but unless you are familiar with the term it can bring some not so sweet images to mind. So roll-up it is.

My hubby makes a lot of wonderful venison jerky, so he treated himself to a nice new dehydrator this year. And it rocks! These Homemade Cinnamon and Pear Roll-Ups took only about an hour and a half!
This was my very first attempt at making any time of fruit leather and I am officially hooked. It really is as easy as everyone has said, and I love being able to trust what my kids are eating. Its an added bonus that no fruit has to go to waste!

Now, you may have wondered why all these pictures look a bit funny. They were actually taken with my phone.
I had to bring my Canon 7D into the shop for repairs and they quoted me 4-6 weeks. FOUR TO SIX WEEKS?!??? I tried not to faint on the spot, but it was a shock indeed. So things might be looking a bit more… relaxed around here for a month or two.
I hope you can bear with me!
Now go make some fruit leather. And if you dont have a dehydrator be sure to just use the oven method. (link above) I am removing all potential for excuses here. 😉
Homemade Pear Fruit Rollups
Ingredients
- 4 very ripe pears
- 1/4 cup water
- 2 tablespoons granulated sugar
- 1/4 teaspoon ground cinnamon
- 1 pinch fine salt
- 2 teaspoons freshly squeezed lemon juice
Instructions
- Peel the pears, remove the cores and stem, and cut into small pieces.
- Place pear pieces into a saucepan and carefully add the water, sugar, cinnamon, and salt.
- Bring the mixture to a low boil, over medium to medium-high heat.
- Once you reach a slow boil, reduce the heat to medium-low and simmer, stirring occasionally, until the pears are knife tender. This took about five minutes since my pears were so ripe. If your pears are less ripe, just make sure you can easily pierce them with a fork and increase your cook time to about 15 minutes before moving on to the next step.
- Very slowly and carefully pour the mixture into a blender. I held a thick towel over the top instead of the lid to help any steam escape. Blend on high until the mixture is very smooth. (In my ancient blender this was about 3 minutes)
DEHYDRATOR METHOD
- Place piece of parchment on your dehydrator tray. Carefully pour mixture from blender and spread out with a rubber spatula or offset spatula. Careful to not get pear mixture to close to the edge. I started with about half the mixture and then added the remaining. We have a large dehydrator, so I could easily fit this on one tray, but you can also divide it into two.
- Following your machines directions, dry fruit until slightly tacky. Place in airtight container and enjoy!
OVEN METHOD
- Preheat the oven to your lowest oven temperature.
- Slowly pour the purée onto the baking mat, letting it spill into the middle and then slowly pushing it out to the sides using a small offset spatula.
- Gently tap the pan on the counter to get of any bubbles and make the puree as even as possible.
- Place in the oven and bake until the surface of the fruit leather is slightly sticky to the touch but, when pressed in several different places, a finger does not leave an indentation, about 6 to 7 hours.
- Remove the baking sheet from the oven, place on a wire rack, and let cool completely.8Set aside a 16-inch-long sheet of waxed or parchment paper. Starting at one short edge of the cooled fruit leather, pull it up from the baking mat and transfer it to the paper. Using clean kitchen scissors, cut through the fruit leather and paper to form desired-sized strips, shapes, or pieces and roll up, paper and all. .
- Store in an airtight container for up to 3 weeks
Did you make this recipe?
Thank you for making my recipe! You took pictures, right? Well go ahead and post them on Instagram! Be sure to mention me @iambaker and use the hashtag #YouAreBaker.


Yum! Can’t believe you took those awesome pictures with your iPhone! ‘Tis truly a gifted eye you have, my friend!
You are too sweet girl! Thank you. It been almost a week not since I havent had my camera and I was going nuts, so I figured I would just use my phone and quit sulking. How are you by the way? Enjoying your new year? 🙂
Hey Amanda,
I was copying your recipe down and realized you forgot to include when and where to add the 2t of fresh lemon juice. However I did look up the link you posted and found that I was supposed to add it to the pears when I puree them in the blender.
Just thought someone who is making this might mention it to you for the rest of the readers.
Thank you! Sorry about that.
I’m so glad you included oven instructions! As much as I want a dehydrator, I’m holding out until I can afford the Cadillac version!
These look delicious!
Thats what we did… its worth the wait! 🙂
Yummm… these looks delish!
Thank you!
Oh my gosh, that totally stinks about your camera…so sorry to hear that! 🙁 But on the happy side, your pear fruit leather (and your husband’s venison jerky!!) sounds wonderful. 🙂
I have never made homemade fruit leather ~ but I must. Thanks for the recipe and inspiration!
I simply adore homemade fruit leather – it’s amaaaaazing and probably more addicting than sour patch kids ha! And that’s saying a lot 😉
lol I would have to agree! I cant wait to try new flavors… 🙂
Wait, these fabulous photos are from your phone? I can’t believe it! They look so pro 🙂
To be honest I was too busy salivating to notice the more “relaxed” photos. I was also reading from my phone. Absolutely no harm done. Hope you get a good repair though!
The recipe looks lovely and simple. I’m surprised there is only 2 Tbsp sugar too. I presume that can even be adjusted to taste if even less is desired. I will pin this for the unlikely event that there is a fruit glut soon. I can imagine all sorts of fun things to do with this for summer though. Thanks 🙂
lol Thanks my dear! 🙂
still it looks yum
wish to have the dehydrator…instead have crook-pot
These are gorgeous, Amanda!
Thanks so much!