This Kiwi Bars recipe starts with a buttery shortbread crust topped with a smooth, sweet-tart kiwi that sets up perfectly. I like to serve the kiwi bars straight from the refrigerator, nice and chilled. The cool, creamy texture and bright flavor are extra refreshing that way! If you love these kiwi bars, you have got to try my classic lemon bars next, bright, buttery, and always a crowd favorite.

Ingredients & Substitutions
- Crust: The buttery shortbread crust is the perfect base for these bars, soft, sturdy, and just lightly sweet. You’ll bake it until lightly golden, then let it cool slightly before pouring on the kiwi filling.
- Kiwi: The star of this recipe is kiwi! Kiwi is a bright green fruit with a sweet-tart flavor and tiny edible seeds. It’s juicy, refreshing, and adds a tropical twist to desserts. When fully ripe, kiwis are soft and easy to blend, making them perfect for fruity bars like these.
- Lemon Juice: A little lemon juice brightens up the kiwi flavor and adds a tangy balance to the sweetness. If you don’t have fresh lemon juice, you can swap in lime juice for a similar flavor or orange juice for something a bit sweeter.
- Cornstarch: Cornstarch is what thickens the kiwi filling into a smooth, glossy layer that holds together nicely once chilled. If you don’t have cornstarch, you could use tapioca starch or even all-purpose flour (but it could make the filling a little less clear).

How To Pick The Perfect Ripe Kiwis For Your Kiwi Bars
Look for kiwis that are slightly soft to the touch but not mushy, kind of like a ripe avocado. They should have a fragrant, fruity aroma and no bruises or wrinkles. Ripe kiwis are easier to peel and blend smoothly, making your kiwi bars extra flavorful and silky.

How to Peel and Prepare Kiwi for Baking
Peeling kiwis is easy once you know the trick! I use a small paring knife to cut off both ends of the kiwi. Then, either slide a spoon between the skin and the flesh and rotate it around to separate them, or carefully peel the skin off with a vegetable peeler. After peeling, chop the kiwi into small chunks before blending for a smooth filling.

Can I Make Kiwi Bars Ahead of Time?
Yes! Kiwi bars actually taste great when made ahead, making them a wonderful make-ahead treat! After baking the crust and preparing the filling, chill the assembled bars in the refrigerator for at least 3 hours or overnight to let them fully set. You can store them covered in the refrigerator for up to 3-4 days. Just cut into squares and serve chilled whenever you’re ready! You can also get the kiwi puree made up to 24 hours in advance, just store it in the refrigerator.

How to Store Kiwi Bars
Store kiwi bars in an airtight container in the refrigerator. They stay fresh and delicious for up to 3-4 days. Keep them chilled until ready to serve for the best texture and flavor.
Can I Freeze Kiwi Bars?
Yes, you can freeze kiwi bars! Wrap individual bars tightly in plastic wrap, then place them in a freezer-safe container or bag. Freeze for up to 2 months. To enjoy, thaw the bars overnight in the refrigerator before serving. Note that freezing may slightly change the texture of the filling, but they will still taste great!
Kiwi Bars
Ingredients
Crust
- 1 cup (2 sticks / 227 g) unsalted butter, melted
- ½ cup (100 g) granulated sugar
- 2 teaspoons vanilla extract
- 2 cups all-purpose flour
- ¼ teaspoon kosher salt
Kiwi Filling
- 5-6 ripe kiwis, peeled and cut into small chunks
- ½ cup (100 g) granulated sugar
- 2 tablespoons lemon juice
- 2 tablespoons cornstarch
- ¼ teaspoon kosher salt
Instructions
Crust
- Preheat oven to 350°F.
- Line a 9 x 9-inch baking dish with parchment paper, leaving an overhang on the sides for easy removal later.
- In a large bowl, combine melted butter, sugar, and vanilla. Whisk together until smooth.
- Add flour and salt to the bowl, stirring until a soft dough forms.
- Press the dough evenly into the bottom of the prepared baking dish using your hands or the bottom of a measuring cup.
- Bake the crust for 18 to 22 minutes, or until lightly golden around the edges.
- Remove from the oven and set aside to cool slightly while you prepare the filling.
Kiwi Filling
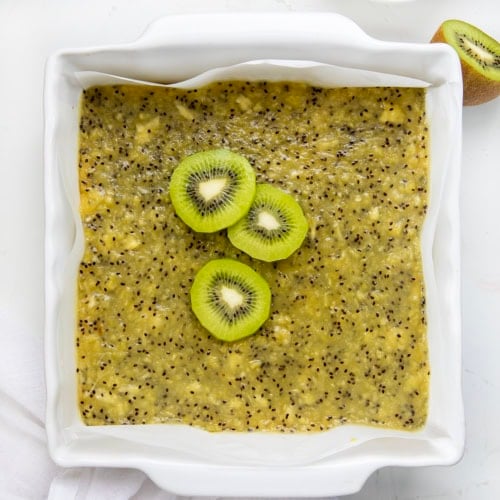
- Place the peeled and chopped kiwis into a food processor. Blend until completely smooth (do not strain the puree). Measure out 1 ¼ cups of the kiwi puree to use.
- In a medium saucepan, whisk together granulated sugar, cornstarch, and kosher salt.
- Stir in lemon juice and the kiwi puree.
- Place the saucepan over medium heat and cook, stirring constantly with a silicone spatula or wooden spoon, until the mixture thickens and becomes glossy and pudding-like, about 5–7 minutes.
- Remove from heat.
- Pour the hot kiwi mixture over the slightly cooled crust and gently spread it into an even layer with an offset spatula or the back of a spoon.
- Let the bars cool at room temperature for about 30 minutes. Then transfer to the refrigerator to chill until fully set, at least 3 hours or overnight.
- Once chilled and firm, lift the bars out of the pan using the parchment paper.
- Cut into squares and serve chilled.
Video
Did you make this recipe?
Thank you for making my recipe! You took pictures, right? Well go ahead and post them on Instagram! Be sure to mention me @iambaker and use the hashtag #YouAreBaker.
What the Test Kitchen had to say about this recipe:
Wow, these are perfect! I loved each and every bite!

Elizabeth
I think I am used to 'too gooey' kiwi bars, but these are fantastic, especially chilled ! I love the thick crust!

Bella
I’m not usually a fan of kiwi, but these bars totally changed my mind. The texture was smooth and creamy, much better than I expected.

Stephanie
These bars are really easy to make and a delicious treat, especially in the summer. I love them chilled.
Recipe updated 7/19/25.


I should have rated it when I wrote my rave review!
This was a disaster for me. 😭 The bars never set, even after baking for 110min! And by that time the crust was totally burned on the bottom
Made a half recipe in a 4×4 dish because I only had 3 kiwis on hand but it was absolutely delicious (especially with a scoop of vanilla ice cream).
I am gluten free so I used an XO baking mix I had on hand for the shortbread, but the filling wsd MAGNIFIQUE! fantastic!!! i totally forgot to measure my kiwi puree and thus put all 5 kiwis in it and it turned out great anyways. thank you!!!!
Amazing!