This Simple Sourdough Bread is just that…simple! It is made using my homemade sourdough starter that is just as easy! So, after your sourdough starter is ready to go, be sure to make this crusty and chewy (in the best way) bread. This bread is certainly delicious on its own, but use it for my Crispy Cheese Sandwich or Apple Gouda Grilled Cheese next time to really make the sandwiches stand out!

Simple Sourdough Bread
Sourdough bread is one of those loaves of bread I always get from the bakery or in the bakery department at my local grocery store. It’s also my bread of choice (when it’s an option) at my favorite restaurants. There is just something special about the somewhat fermented taste of it. So, once I figured out the sourdough starter, I knew I had to use it for this simple sourdough bread!
Plus, there are never too many bread recipes to have at your fingertips, especially when we may be home more than normal!
Simple Sourdough Bread Recipe
This Simple Sourdough Bread recipe takes a little patience to let the dough rise a couple of times before baking it. But, if you were patient enough to get your sourdough starter ready to go, then a few hours is nothing! Plus, it is SO worth it to have freshly baked bread! There are only five ingredients to this recipe, so you more than likely have everything you need on hand.

How to Make Simple Sourdough Bread
Get out your stand mixer (or get your muscles ready) to mix the ingredients for the dough.
- Combine all the ingredients together in the bowl from your stand mixer. (Learn how to make a Sourdough Starter here)
- Use the dough hook attachment and mix the ingredients together on medium-low speed (or no higher than a ‘2’ setting). If you are mixing by hand, knead everything together for about ten minutes.
- After you have mixed the dough (it will be sticky), place it in a lightly oiled bowl.
- Cover the dough with plastic and let it sit for about 3 hours to let it rise.

After the dough has had time to rise, gently fold up the sides of the dough, rotate the bowl, and fold again. Continue to do this until you have folded and rotated the dough a few times.
Did you know that using your hands this way and baking bread, in general, is very therapeutic? It involves patience and it can be very calming. Speaking of patience, after folding and rotating the dough, you need to cover it again to let it rise. It may not take the full 3 hours this time; it depends on how warm your kitchen is. Check it after a couple of hours.
After a couple of hours, sprinkle some flour onto your work surface and place the dough on the flour. Pull up the sides of the dough, pressing them into the center. You may need more flour, so keep that nearby! Continue to pull and press for a while. Finally, flip over the dough. The top should be smooth. Sprinkle some flour on it, and place it on a piece of parchment paper.
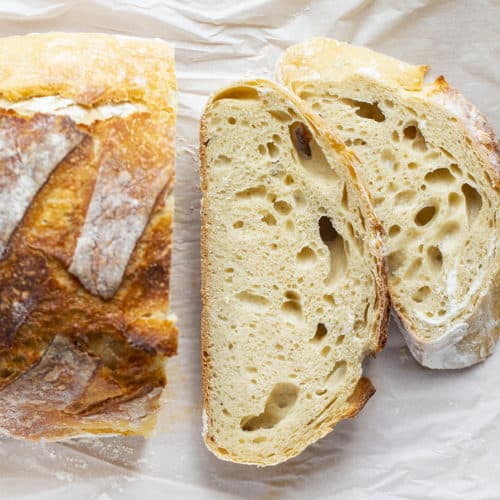
Once the dough is on the parchment paper, score the dough or make a few cuts on the top of the dough a few times with a knife.

How to Bake Simple Sourdough Bread
Once the dough is on the parchment paper (or you could do this before you pull and press the dough the final time), put a Dutch oven–lid ON–into a cold oven. Set the oven to 450°F to heat up the Dutch oven. Once the oven has reached the temperature of 450°F, carefully remove the hot Dutch oven and take off the lid (setting the lid on the stovetop).
Grab the parchment paper that is holding the dough and place it (again, carefully) into the hot Dutch oven. Cover it, and bake the bread for 15 minutes, with the oven still set at 450°F. After fifteen minutes, remove the lid of the Dutch oven and bake for an additional 10-15 minutes, or until the top is a nice golden brown.
When you tap on the top of the bread, you should hear a hollow sound. Then, you know it is ready to be taken out of the oven. Let it sit for about 20 minutes on the counter or stovetop before taking it out of the Dutch oven and sliced. Enjoy!

How to Store Simple Sourdough Bread
Sourdough bread usually lasts for 4-5 days at room temperature. Do not store it in the refrigerator. Instead, keep it covered with a towel or in a zipped plastic bag someplace that is relatively cool. A bread box also works well. If you want to freeze the bread, be sure to let the bread cool completely before freezing!
The same advice goes for when you are going to cut into the bread–wait until it has cooled. Anyway, to freeze the bread, seal the loaf into a zipped plastic freezer bag, making sure to let all the air out. You can store bread for up to 6 months in the freezer, but the longer you keep it in there, the less fresh tasting it will be. (And be sure to label it with the date!)
Simple Sourdough Bread
Ingredients
- 4-5 cups (500-625g) all-purpose flour, I prefer unbleached
- 1 ½ cups (355g) warm water
- ¾ cup (170g) active sourdough starter
- 1 tablespoon honey
- 1 teaspoon salt
Instructions
- Add all ingredients together in the bowl of a stand mixer with dough hook.
- Turn the mixer on 1-2 (never higher than 2 or medium-low) and let the mixer knead the dough for about 5 minutes. The dough will be sticky and doesn’t quite form a ball. (If making by hand, knead for about 10 minutes.)
- Turn off the mixer and scrape the dough into a medium bowl that has been lightly coated with oil. Cover with plastic and set aside for about 3 hours while the dough rises.
- After 3 hours, turn the dough and gently start folding up the sides. Grab the dough at the side of the bowl and lift up and towards the center of the bowl. Press down, turn the bowl 90 degrees and repeat this several times.
- Cover again and let it rise for an additional 2-3 hours. (This will depend on the temperature of your home. A warmer kitchen will need less time.)
- After the 2 hours, lightly dust your countertop with flour. Press the dough down with your fingers then start pulling up the sides and pressing into the center. You may need to add more flour as this can be a loose dough. Keep pulling up the sides and pressing into the center then flip the dough over. The top should be smooth. Dust with more flour and set the dough onto a piece of parchment paper. Score the dough with a knife.
- Place a Dutch oven (make sure you have a lid) into a cold oven and heat to 450°F. Once heated, carefully remove the hot Dutch oven from the oven. Remove the lid and set it somewhere heat resistant. (I set the lid on my stove.) Pick up the parchment paper with both hands and place inside the Dutch oven. Carefully replace the lid.
- Place into 450°F oven and bake for 15 minutes.
- After 15 minutes, carefully remove the lid and bake an additional 10-15 minutes, or until the top is nicely golden brown (don’t worry if it is darker brown, you just don’t want it burnt) and when you tap on the top the bread sounds hollow.
- Remove from oven and set Dutch oven to the side and leave the bread alone for about 15-20 minutes.
Notes
Did you make this recipe?
Thank you for making my recipe! You took pictures, right? Well go ahead and post them on Instagram! Be sure to mention me @iambaker and use the hashtag #YouAreBaker.


Hi, really enjoyed making this bread and it has turned out really well. My one issue is that the parchment paper has completely stuck to the loaf? How do I stop this happening? Thanks
Hi, Jon! I work with iambaker and am happy to help with questions. That didn’t happen to me, but you could always spray the paper with nonstick spray when you bake the bread again. I am glad you enjoyed making it. Have a great day!
Do you have to bake it in a Dutch oven? I don’t have one. ☹️ Would another type dish work?
Hi! I work with iambaker and am happy to help with questions.
Hi, Kim! A heavy, oven-safe stockpot would also work; just make sure you have a cover for it! Have a great day!
My dough is ever so sticky and I didn’t use all the water I can’t rotate it to lift the side should I start again or can it be saved
Hi! I work with iambaker and am happy to help with questions.
Hi, Katie! You could add a little more flour, but not too much. The dough should be loose, but not runny. I hope this helps. Have a great day!
I really feel like it should have been given a chance to rise again before baking because it had risen wonderfully the 1st 2 times. But,after pulling and adding flour it did not set very long before it went into the oven so looked small. Did I miss something? Please advise.
Hi, Bonnie! I work with iambaker and am happy to help with questions. It sounds like you did everything right. This recipe produces a small to medium-sized loaf. Hopefully it tasted great! Have a great day!
Hi…I have tried this recipe a number of times. Love the flavour/taste. I find that it is fairly dense…any idea why or is that just the nature of the recipe.
Hi, Peter! I work with iambaker and am happy to help with questions. This is a dense bread, but there are a couple of things you could keep in mind next time. Place the dough in the oven at just the right time (which could take practice). The dough is ready to be baked if you can press on it and it slowly comes back up. It’s better to get the dough in the oven earlier, rather than wait until the dough has proofed too long. In addition, be sure to bake the bread in a Dutch oven and try using strong white bread flour and a little more water next time. I hope this helps, and have a great day!
This recipe was an epic fail. 3 cups of flour, 1 1/2 cups of water? It made soup! Wasted a day, wasted ingredients.
After mixing and waiting for the 3 hours I went to stretch the dough and it was like thick pancake batter. Thinking the recipe would be fine I mustered thorough and let it sit 2 hours. After that I added a bunch of flour to hoping to remedy the situation and form a loaf.
I dumped it out onto a floured board and added at least a cup more of flour trying to form a loaf. Finally baked off what I had and it looks awful.
This recipe cannot be correct.
Hi Amanda and Elizabeth! What size dutch oven would you recommend for baking the bread?
I have been reading sourdough starter recipes for almost a year now, but felt intimidated by the process—-until I saw yours—Thank you for this simple recipe and tutorial. I have just finished baking my 10th loaf in the past two weeks, and I am obsessed! I am making this bread and some homemade jam for my mom and sisters for Mother’s Day! I love your blog and your recipes. So delicious and of course you’re hilarious.
Thrilled to hear that Tiffani! And sounds like you are blessing others with your baking gifts! <3
I have been making this for the last 6 weeks, and I feel like the recipe called for 3 cups of flour. Today it says 4-5? Did it change? By adding in extra flour during kneading,it has always worked out; but today, I’m not so sure.
Yup, it changed. I got 4 separate emails telling me that they dough was so liquidy it was inefficient and unusable. I had tested the method thoroughly with 3 cups and had no issues, so thought they were experiencing user error. I tested several more times and found that 4 cups produced a more consistent result and a higher rise. I was hesitant to change the recipe, as 3 cups also works for me (in my kitchen, in my circumstances, and seemed to work with others as well) but 4 cups of flour was more consistent. I had a foodie friend in Seattle (different climate) test the recipe with 4 vs. 5 cups of flour and she found 5 cups worked best for her. So! I made the recipe with 4 cups one more time, determined that it worked, and changed the recipe.
HOWEVER, if 3 cups works for you (as it did me) don’t change. My goal is for EVERYONE to be able to produce high-quality bread in their own home so this is the recipe that seems to work best for the majority. You and I may be the exceptions that got really good bread with 3 cups…
I will continue to test this recipe with other flours, waters, starters, and try to make sure I always have the best (most accurate) information moving forward. Apologies for any confusion!
If I dont have a dutch oven will this be an issue?
Hi, Julie! I work with iambaker and am happy to help with questions. If you don’t have a Dutch oven, you can use an oven-safe large stockpot or oven-safe soup pot. Just make sure you have a cover for the pot. I hope this helps, and have a great day!