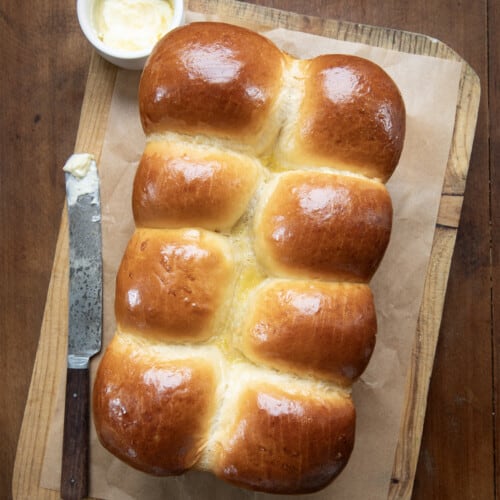
Brioche Bread is a rich and tender loaf with a subtle sweetness that is a little bit pastry-like, a little bit cake-like, and a whole lot of deliciousness! It’s a versatile bread that can be enjoyed on its own, used in French toast, for sandwiches and burgers, and more. For more homemade bread, check out my Simple White Bread, too!

Ingredients & Substitutions
Milk: Whole milk adds moisture and richness to the dough. If using lower-fat milk or water, it may affect the flavor and texture of the bread.
Sugar: Granulated sugar helps sweeten the bread as well as helps feed the yeast.
Yeast: Look for a packet (or about 2 1/4 teaspoons) of active dry yeast. It is the leavening agent in the bread.
Eggs: You will need 3 large eggs, two for the bread and one for the egg wash. Be sure the eggs are at room temperature before using.
Flour: All-purpose flour is the best choice for brioche bread, giving it a fluffier texture (not too heavy and dense).
Butter: Butter is a key ingredient in brioche, and I prefer unsalted butter for the best results. Unsalted butter gives you more control over the salt in a recipe. If using salted butter, you may want to lessen the amount of salt added. Cut the butter into 1-inch pieces and let it come to room temperature before adding it one piece at a time.

When Is Dough Done Rising?
It is important to get the correct rise of the dough for the best results in baking this brioche. The first and last rises should double the dough size, each taking an hour up to a couple of hours. Over-risen dough can collapse during baking, or give the bread an odd shape. So, when is it done rising? Here are some ways to check:
- Check the size. It should have doubled, which can take about an hour or two.
- Do the ‘poke test’. Gently press the top of the dough with your finger. If the dough springs back slowly and stays, it is ready for the next step! (However, if it springs back super quickly, it may need more time to rise.)
- Look at the dough; the surface will be smooth and rounded with an airy, puffy appearance.
- Take in the yeasty aroma, which becomes more pronounced as the dough rises.

Why Refrigerate The Dough?
After the initial rise of the dough, you will transfer it to the refrigerator for at least 8 hours (up to overnight). Do not skip this step! Letting the dough continue to slowly ferment in the refrigerator for an extended period lets the yeast develop slowly, which results in a tender crumb. Refrigerating the dough also keeps the butter from getting too warm and melting, again, affecting the texture. It will also give you a more flavorful loaf.
How To Use Brioche Bread
Brioche is a versatile loaf that can be enjoyed in both sweet and savory ways. Here are some delicious options to try:
- French Toast (like my Blueberry French Toast)
- Sandwiches
- Bread Pudding
- Burgers
- Toast (add some butter and your favorite jam…yum!)
- Desserts (like a base for strawberry shortcake or in my fried s’mores sandwich)
- Dip a toasted slice into coffee or hot cocoa.

How To Store Brioche Bread
Although best served fresh, you can store brioche for a few (2-3) days at room temperature. Once baked and cooled, store it in an airtight container or wrap it in plastic wrap or aluminum foil. For longer storage, freeze the brioche for up to 3 months or so.
Brioche Bread
Ingredients
- 1 cup (245 g) whole milk, room temperature
- ½ cup (100 g) granulated sugar
- 1 packet (about 2 ¼ teaspoons) active dry yeast
- 2 large eggs, room temperature
- 4 cups (500 g) all-purpose flour, plus up to ½ cup extra as needed
- ½ cup (1 stick / 113 g) unsalted butter, cut into 1-inch pieces, room temperature
- 1 teaspoon kosher salt
Egg Wash
- 1 large egg, room temperature
- 1 tablespoon whole milk
Instructions
- To the bowl of a stand mixer fitted with the dough hook attachment, add milk, sugar, and yeast. Mix on low speed to combine.
- With the mixer still on low, add eggs, mixing until combined.
- Turn off the mixer. Add flour. Then, continue mixing at low speed. Once the flour is incorporated, with the mixer still on low speed, add butter, 1 piece at a time, blending well between each addition.
- Once the butter is all incorporated, add the salt. Knead on medium speed until the dough that gathers on the hook is a soft smooth ball, about 5-6 minutes. At this point, you may need additional flour. I mixed in 1 tablespoon of flour at a time until the dough pulled away from the sides of the bowl, creating a smooth ball (a total of ¼ cup extra flour). The dough should be very soft and not sticky when handling it.
- Spray a medium bowl with nonstick cooking spray. Place the dough into the bowl. Then, turn the dough over so that the top of it gets coated with cooking spray as well. Cover. Let rise in a warm area until it is doubled in size, about an hour.
- With the cover still in place, place the bowl of dough in the refrigerator for 8 hours, up to overnight. This will slow the fermentation and chill the butter, making the dough easier to shape.
- After 8 hours, remove the dough from the refrigerator and let it sit out at room temperature for 30 minutes.
- When ready, place the dough on a lightly floured surface. Evenly divide it into 8 pieces. Shape each piece into a small ball.
- Spray a 9×5-inch loaf pan with cooking spray.
- Arrange the dough balls in a single layer, spacing them evenly to fill the loaf pan, with 2 rows of 4. Cover. Let it rise in a warm area for about 2-2 ½ hours, or until doubled in size.
- Preheat the oven to 350°F.
- In a small bowl, whisk the egg and milk together. Brush the top of the loaf with the egg and milk mixture.
- Bake for 35-40 minutes, or until the internal temperature reaches 190°F. If the top is getting too dark, cover it with aluminum foil.
- When done baking, let the brioche rest in the pan for 5-10 minutes. Then, remove from the pan and let cool completely on a wire rack.
Video
Did you make this recipe?
Thank you for making my recipe! You took pictures, right? Well go ahead and post them on Instagram! Be sure to mention me @iambaker and use the hashtag #YouAreBaker.
What the Test Kitchen had to say about this recipe:
This bread is amazing. Just the perfect amount of sweetness, you don't even need butter!

Elizabeth
This bread is so good, I even enjoyed it plain! I love the density of it and can't wait to make some French toast with it!

Rachael
Beautiful loaf! Brioche has such a gorgeous rich brown top and the dough is dense, but ever so sweet. This is great on its own or would make a fantastic Brioche French toast.

Bella
This has such a lovely brown and shiny crust! The interior is pillowy soft, buttery, and absolutely tasty!

Annabelle
This bread is so tasty! It's subtly sweet and has a lovely texture that is soft but slightly dense and perfectly moist!


Can you use honey over the suger?
I didn’t do the 8-hour proofing, just the normal, room-temp rise and second proof, and made 2 plaitedloaves instead of yours, but the result is great. I will do an overnight proofing the next time.
Wondering if the dough can be made ahead and frozen? Thaw at room temp and bake?
Doesn’t yeast need to be activated?
In this recipe the yeast is mixed right in with the warm milk, which activates it. Proofing first isn’t always required, especially if your yeast is fresh. If you ever wonder if your yeast is still good, you can proof it first to be sure, it’ll get bubbly and foamy if it’s alive.
I want to say that the taste of this bread is absolutely spot on. The only issue I found was that the loaf was raw in the middle by the time the top was a deep golden brown. I don’t think it was the recipe but my own oven. I’ve had other baked goods come out not quite right. The point is, I’m doing this recipe again, tenting the top and double checking to see if my oven is at temp. If it’s not, its a call to my landlord and the Dept of Buildings for my city. I bake bread all the time and this isn’t the first time that my bread has had to bake longer than normal. I’ll make an update if it works out this time. Other than the fubar with my oven, the fully baked parts were amazing.
I want to make it too.
Doesn’t the milk need to be warm to activate the yeast if we are using the dry active yeast? Can we use the instant yeast also?
Hi Reva
This Brioche recipe calls for the milk to be added at room temperature, which is not cold, and it rises just fine that way because the dough is already enriched and will sit out long enough for the yeast to activate.
You can use instant yeast instead of active dry yeast.
Instant yeast will most likely work in this dough, and you won’t need to proof it first, you can sprinkle it right into the flour with the other dry ingredients. It can even shorten the first rise a little. Just keep an eye on your rise times!
Could this be made with bread flour?
Hi David! Yes, you can use bread flour 😊 Just keep in mind that bread flour has a higher protein content, so the brioche may be a bit chewier and slightly less tender than when made with all-purpose flour. It will still turn out delicious!