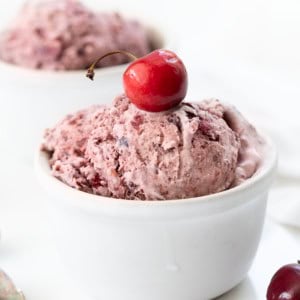
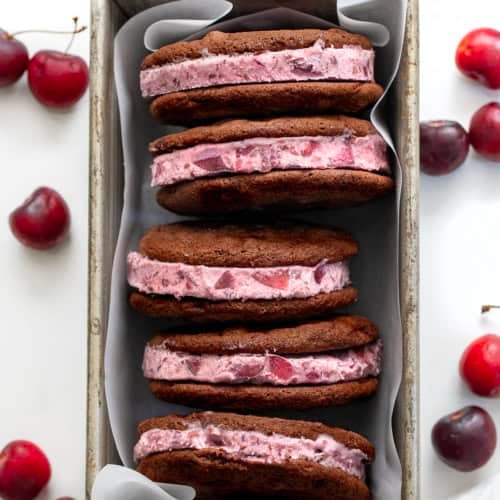
These Chocolate Cherry Ice Cream Sandwiches are the kind of dessert that disappears fast. We’re talking fudgy homemade chocolate cookies from my Chocolate Mint Cookies recipe, stuffed with creamy cherry ice cream, then frozen until a little bit messy in the best way. The filling starts with my Cherry No-Churn Ice Cream, which is one of my favorite easy desserts to keep in the freezer. (Good luck not eating it all before making these sandwich cookies!) If you’ve made my Homemade Ice Cream Sandwiches before, this cherry version is the same idea, just with a fun, fruity spin.

Ingredients & Substitutions
- Unsalted butter: Adds richness and helps create a soft, fudgy cookie texture. You can use salted butter if needed; just reduce the added kosher salt slightly.
- Granulated sugar: Sweetens the cookies and helps create structure.
- Light brown sugar: Adds moisture and a deeper, slightly caramel flavor.
- Eggs: Help bind the dough and create a soft, chewy texture. Room temperature eggs mix in more easily.
- Vanilla extract: Enhances the chocolate flavor.
- All-purpose flour: Provides structure. No substitutions recommended for best texture.
- Unsweetened cocoa powder: Gives the cookies their rich chocolate flavor. Dutch-process cocoa will create a deeper, smoother chocolate taste.
- Baking soda & baking powder: Work together to give the cookies lift while keeping them soft and fudgy.
- Mini chocolate chips: Adds extra pockets of melted chocolate for a fudgier cookie.
- Cherry No-Churn Ice Cream: The star filling! Use ice cream that has softened slightly for easier scooping. Store-bought cherry ice cream can be used in a pinch, but homemade gives the best flavor and texture.
- Optional Toppings: Melted chocolate, cherry sauce, mini chocolate chips, or chopped cherries can be used for dipping, drizzling, or rolling the edges to add extra texture and flavor.

Tips for Success
- Don’t over-soften the ice cream. Let it sit just until scoopable, not melty. This makes assembly much easier and helps the sandwiches hold their shape.
- Work quickly when assembling. Once the ice cream is out, things move fast. Scoop, sandwich, and freeze as you go so everything stays firm.
- Fully cool the cookies. Warm cookies will melt the ice cream and make the sandwiches messy to assemble.
- Freeze before serving. After assembling, give the sandwiches at least 2 hours in the freezer so they set up properly and are easy to bite into.
- Wrap individually. Wrapping each sandwich helps prevent freezer burn and keeps them ready to grab straight from the freezer.

FAQs
Can I use store-bought ice cream instead of homemade?
Yes. While the Cherry No-Churn Ice Cream gives the best flavor and texture, you can use store-bought cherry ice cream in a pinch. Just let it soften slightly so it’s easier to scoop and sandwich.
Do I have to freeze the sandwiches after assembling?
Yes. Freezing helps the ice cream firm back up so the sandwiches hold their shape. At least 2 hours is best, but overnight gives the cleanest, most solid texture.
Can I make the cookies ahead of time?
Absolutely. The chocolate cookies can be baked 1 to 2 days in advance and stored in an airtight container at room temperature, or frozen for longer storage.
How do I keep ice cream sandwiches from getting messy?
Work quickly during assembly and make sure the cookies and ice cream are properly chilled. Wrapping each sandwich individually and freezing each before serving also helps the sandwich cookies stay firm.
Can I customize the filling?
Yes. You can swap the cherry ice cream for my other no-churn ice cream recipes (check them all out!), like chocolate, vanilla, or strawberry, or even add mix-ins like chocolate chips or fudge swirls.

How to Store Chocolate Cherry Ice Cream Sandwiches
Wrap each ice cream sandwich individually in parchment paper or plastic wrap, then place them in an airtight container or freezer bag. Store in the freezer for up to 2 weeks for the best texture and flavor. Let the sandwiches sit at room temperature for 5 to 10 minutes before serving so the ice cream softens slightly and the cookies are easier to bite into.
Chocolate Cherry Ice Cream Sandwiches
Ingredients
Fudgy Chocolate Cookies
- 1 cup (2 sticks / 227 g) unsalted butter, softened
- 1 cup (200 g) granulated sugar
- ½ cup (100 g) light brown sugar, packed
- 2 large eggs, room temperature
- 1 teaspoon vanilla extract
- 2 cups (250 g) all-purpose flour
- ¾ cup (90 g) unsweetened cocoa powder
- 1 teaspoon baking soda
- ½ teaspoon baking powder
- ½ teaspoon kosher salt
- ½ cup (85 g) mini chocolate chips
Filling
- 1 recipe (full batch / 3 cups) Cherry No-Churn Ice Cream, fully frozen and slightly softened for assembling
Optional Toppings
- Melted chocolate or cherry sauce, for dipping or drizzling
- Mini chocolate chips or chopped cherries, for rolling edges
Instructions
Prepare the Ice Cream
- Prepare the Cherry No-Churn Ice Cream according to the recipe and freeze for at least 4 to 6 hours, or overnight, until completely firm.
Make the Cookies
- Preheat oven to 350°F (175°C). Line baking sheets with parchment paper.
- In the bowl of a stand mixer with the paddle attachment, cream together butter, granulated sugar, and brown sugar until light and fluffy.
- Beat in eggs and vanilla until fully combined.
- In a separate bowl, whisk together flour, cocoa powder, baking soda, baking powder, and salt.
- Gradually add dry ingredients to wet ingredients and mix until just combined.
- Fold in mini chocolate chips.
- Scoop 2-tablespoon portions of dough, roll into balls, and place onto the lined baking sheet, spacing each about 2 to 3 inches apart. Using the bottom of a glass or your hand, gently flatten each ball slightly.
- Bake for 10 to 12 minutes, until edges are set, but centers still look slightly soft.
- Let the cookies cool on the pan for 5 minutes, then transfer to a wire rack to cool completely.
Assemble the Sandwiches
- Let ice cream sit at room temperature for 5 to 10 minutes to soften slightly.
- Scoop about ¼ cup of ice cream onto the flat side of one cookie. Top with a second cookie and gently press together.
- Roll edges in toppings if desired.
- Wrap individually and freeze for at least 2 hours before serving.
Did you make this recipe?
Thank you for making my recipe! You took pictures, right? Well go ahead and post them on Instagram! Be sure to mention me @iambaker and use the hashtag #YouAreBaker.