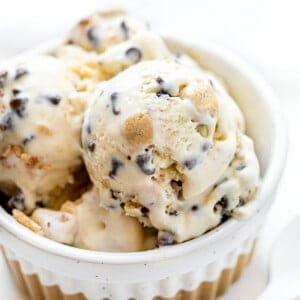
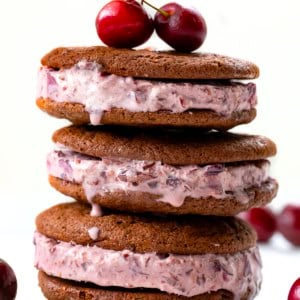
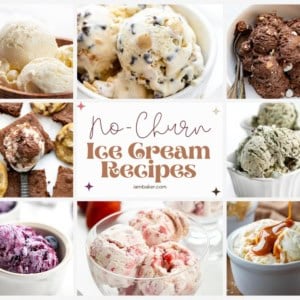
If you’ve never made ice cream at home before, this Cherry No-Churn Ice Cream is a great place to start. It’s creamy, sweet, and full of cherry flavor, and you don’t need an ice cream machine to pull it off! Just a few simple ingredients and a little mixing, and you’ve got a homemade dessert that feels way more impressive than it is. If you’ve been working your way through my no-churn ice cream recipes (perfect for summer, and they are so creamy and good!), this one fits right in with the rest. It’s simple, fun, and honestly hard to mess up.

Ingredients & Substitutions
- Frozen pitted cherries: The star of the recipe. Thaw before using so they blend smoothly. You can also use fresh cherries when in season, just pit them first. Sweet cherries work best, but tart cherries will give a brighter, tangier flavor.
- Heavy whipping cream: This is what gives the ice cream its light, creamy texture. Make sure it’s cold before whipping so it reaches soft, stable peaks. There isn’t a good substitute here if you want that classic no-churn texture.
- Sweetened condensed milk: Adds sweetness and helps create that smooth, scoopable ice cream base. This is essential for no-churn recipes and shouldn’t be swapped.

FAQs
Can I use fresh cherries instead of frozen?
Yes. Fresh cherries work great, just pit them first. If they’re very juicy, let them sit for a few minutes after chopping so excess liquid doesn’t thin the ice cream base.
Is no-churn ice cream actually creamy?
Yes! When the cream is whipped properly and gently folded into the sweetened condensed milk base, it freezes into a smooth, creamy texture. It won’t be the same as machine-churned ice cream, but it’s rich, scoopable, and surprisingly close, especially after it softens for a few minutes at room temperature.
Do I have to whip the cream to stiff peaks?
Yes, whipping the cream is what gives no-churn ice cream its light, creamy texture. Aim for medium-firm peaks so it’s stable but still easy to fold.
Can I use tart cherries instead of sweet cherries?
You can. Tart cherries will give the ice cream a brighter, more tangy flavor, while sweet cherries keep it more classic and dessert-like.
How long does no-churn ice cream need to freeze?
It needs at least 4 hours to set properly, but overnight is best for a firmer, scoopable texture.
Can I add mix-ins or variations?
Yes. You can stir in chocolate chips, white chocolate chunks, or a swirl of fudge or cherry sauce right before freezing for extra flavor.

How Long Does Cherry No-Churn Ice Cream Last?
Store the ice cream in a freezer-safe, airtight container in the back of the freezer for the best texture. It will keep well for about a couple of months. If you notice any freezer burn or ice crystals forming, it’s usually a sign it’s past its best texture-wise, but honestly, this rarely lasts long enough for that to happen. In my house, it’s usually gone within a few days.
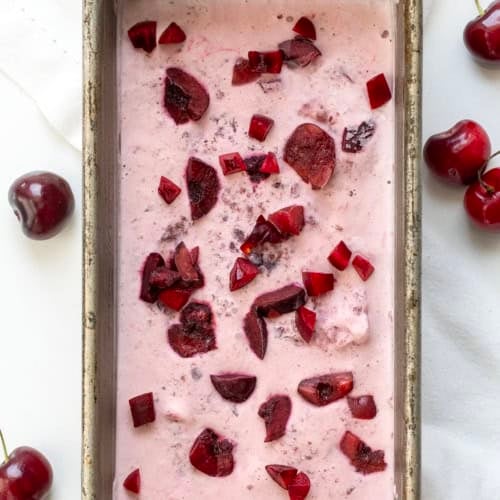
Cherry No Churn Ice Cream
Ingredients
- 14 ounces pitted cherries*, frozen (thawed), divided
- ⅔ cup (160 ml) heavy whipping cream, cold
- ½ cup sweetened condensed milk
Instructions
- Place a 9×5-inch loaf pan in the freezer to chill.
- If needed, pit the cherries. Divide them into two portions: 8 ounces and 6 ounces.
- Add the 8 ounces of cherries to a blender or food processor. Blend until mostly smooth, leaving a few small chunks for texture if desired.
- Roughly chop the remaining 6 ounces into bite-sized pieces. Set aside.
- In a large mixing bowl, whip the cold heavy cream to medium-firm peaks. The cream should be thick and fluffy but not overwhipped.
- In a separate bowl, stir together the sweetened condensed milk and the blended cherry mixture until fully combined.
- Gently fold the cherry mixture into the whipped cream until just combined and no large white streaks remain. Be careful not to deflate the mixture.
- Fold in the chopped cherries until evenly distributed.
- Pour the mixture into the chilled loaf pan or freezer-safe container. Cover tightly and freeze for 1 hour.
- After 2 hours, gently stir with a fork to redistribute the cherries. Cover again and freeze for at least 3 more hours (or overnight) until firm.
- To serve, let sit at room temperature for 5 to 10 minutes before scooping.
Notes
Did you make this recipe?
Thank you for making my recipe! You took pictures, right? Well go ahead and post them on Instagram! Be sure to mention me @iambaker and use the hashtag #YouAreBaker.


Has anyone used coconut milk based ingredients instead of dairy for allergies?