Mason Jar Peppermint Chocolate Treats are a layered dessert that you will want to layer as many times as you can! The homemade peppermint whipped cream is the icing, I mean, layering on this chocolate cake that you can also use for my Peppermint Cream Pie.

Mason Jar Peppermint Chocolate Treats
Mason jars are not just for canning anymore. Since John Landis Mason patented his invention in 1858, the uses of this sealed jar have definitely evolved. I have seen them used for storage, salt shakers, little herb gardens, toothbrush holders, and they are a popular glass jar for decorating. With all that being said, I think using them for my Mason Jar Peppermint Chocolate Treats has to be near the top of the list. This layered treat will be a big hit for the entire family!

How to Make Mason Jar Peppermint Chocolate Treats
This is one of my favorite ways to enjoy my homemade peppermint whipped cream! I love any desserts in jars but especially love colorful and seasonal jar desserts! This one definitely fits the bill.
Start by making a chocolate cake and baking in a sheet pan. (I used a 10×15 pan) This is a fantastic chocolate cake recipe, be sure to bookmark it! After the chocolate cake is cooled, use a sharp knife to cube the cake. I made mine about 1 inch by 1 inch.
Get out your clean jar. You can use any size jar you have available, but we loved the half-pint (8 ounce) jar. It just seemed to be the perfect amount to eat! I think kids would especially love the shorter quarter-pint (4 ounce) jar.
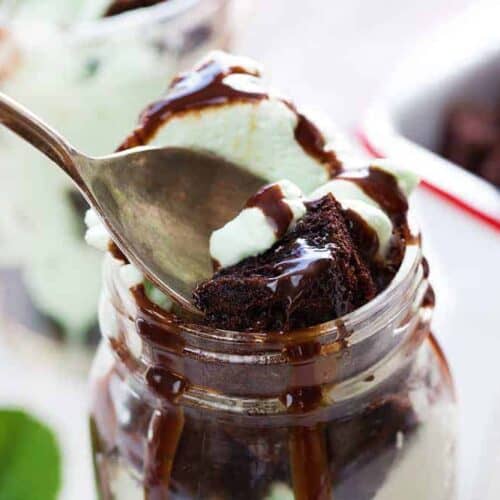
Start by placing a few cubes of cake in the bottom of the jar. Add a dollop of the Peppermint Whipped Cream and then another layer of cake. Repeat until you reach the top. Drizzle with chocolate syrup and add a sprig of mint for garnish.
If you want to make these ahead I recommend not letting them sit for more than 12 hours. Simply fill the jar to just under the rim, cover with a lid, and refrigerate until ready to serve. I would wait until serving to add the chocolate sauce. However, these are so easy and fun to assemble, why not let guests join in and let them keep their own? I loved helping my kids assemble theirs and seeing their eyes light up!

Other Ways to Serve Mason Jar Peppermint Chocolate Treats
- Try tinting the whipped cream red with McCormick Red Food Color. Add crushed candy canes on top for a garnish. Same amazing flavor, different presentation!
- Add a teaspoon of peppermint extract to the chocolate cake.
- Instead of cubing the chocolate cake, use a tall kitchen glass or cookie cutter to cut round discs out of the cake. Just make sure that the disc fits snuggly into the jar before cutting them all out. Use the chocolate cake discs as the layers in your mason jar dessert!
- Tint half of your peppermint whipped cream red and leave the other half white. Carefully add the red to one side of a pastry bag fitted with a 1M tip and then add in the white to the other side. Pipe the duo-toned whipped cream into the jar right on top of the chocolate. (Especially beautifully if you make the chocolate cake discs!)

Looking for Other Minty Desserts?
Chocolate Peppermint Cheesecake Cake
Oreo Stuffed Peppermint Cookies
Mason Jar Peppermint Chocolate Treats
Ingredients
CHOCOLATE CAKE
Part One
- ⅓ cup light brown sugar
- ⅓ cup strong coffee
- ½ cup Dutch process cocoa
- 1 tablespoon butter
- 1 teaspoon vanilla
Part Two
- 1 ½ cups (192 g) all-purpose flour
- ½ teaspoon baking powder
- 1 teaspoon baking soda
- ½ cup (1 stick / 113 g) salted butter, warm but not melted
- ½ cup (100 g) granulated sugar
- ½ cup (100 g) packed brown sugar
- 2 large eggs, room temperature
- ½ cup cold coffee
- 1 teaspoon vanilla
PEPPERMINT WHIPPED CREAM
- 1 pint heavy whipping cream
- ½ cup (64 g) confectioners' sugar
- 1 teaspoon McCormick Pure Peppermint Extract
- 6-8 drops McCormick Green Food Color
Instructions
Chocolate Cake
Part One
- Place all ingredients in the first part into a saucepan over low heat. Stir until they are fully incorporated, 5-7 minutes. Remove from heat and allow to cool a bit. It should be a little thick and similar to custard.
Part Two
- In a medium bowl, sift flour, baking soda, and baking powder together.
- Add ½ cup warm butter, sugars, eggs, cooled coffee, and vanilla to the flour mixture and mix with a hand-held mixer until fully combined. (You could also stir by hand.)
- Add the chocolate mixture from the FIRST PART to the ingredients from the SECOND PART. Stir by hand until all ingredients are well combined.
- Pour onto a prepared (sprayed or lined with parchment baking sheet (I used a 10×15-inch baking sheet). Smooth out the batter and gently tap on the counter.
- Bake in a 350°F oven for 16-22 minutes, or until the center no longer appears wet and an inserted toothpick is removed with a few crumbs.
Peppermint Whipped Cream
- Add heavy cream to mixing bowl, mix starting with low speed, then gradually increase to medium speed until the cream starts getting thicker (the gradual speed progression prevents you from spraying yourself with cream).
- When the cream starts to thicken stop the mixer, add in the confectioners' sugar. Then resume mixing again starting with low speed and increase to medium speed up to high speed.
- The cream will thicken and start to peak. Stop the mixer and add in the peppermint extract. Mix on high speed until the cream is thick and stiff.
Layering in the Mason Jar
- Start by placing a few cubes of cake in the bottom of the jar. Add a dollop of the Peppermint Whipped Cream and then another layer of cake. Repeat until you reach the top. Drizzle with chocolate syrup and add a sprig of mint for garnish.
Did you make this recipe?
Thank you for making my recipe! You took pictures, right? Well go ahead and post them on Instagram! Be sure to mention me @iambaker and use the hashtag #YouAreBaker.