A few simple tips and tricks will help you make this Harlequin Cake in just a few minutes!

To make this cake you will need:
Cake recipe: I used Chocolate Cake and baked it in three 6-inch cake pans.
Buttercream recipe (I used this Whipped Vanilla Buttercream)
food color (I used 5 drops of McCormick red in 2 cups of buttercream)
bench scraper or a flat edge of some kind
disposable pastry bags
#32 tip (I had 2 tips on hand to save time- see how I store my tips here)
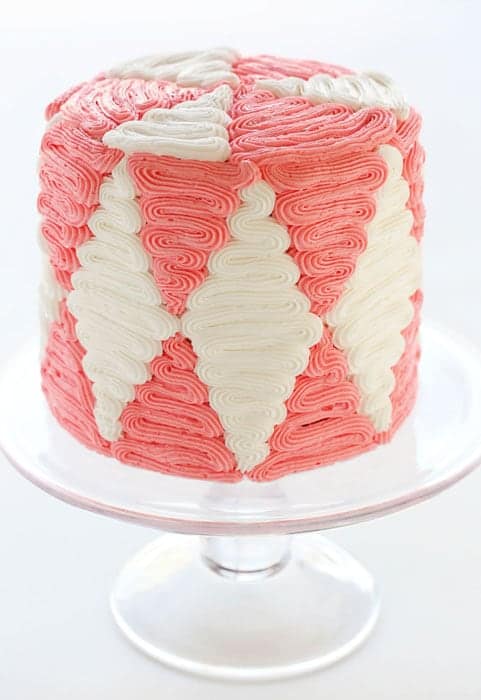
I baked my cake then stacked it on my cake stand. Make sure your cakes are level! (If you want to know how to stack a layer cake I have some great info here.)
Cover cake in a thin crumb coat then place the cake in fridge or freezer to chill and set.
Divide remaining buttercream into 2 bowls. Tint one bowl pink (a few drops of red food color) and leave the other bowl white.
Place all buttercream into pastry bags. (I utilize double bagging when I am piping cakes. I talk about that in detail here– it’s a big time saver!)
When you are ready to decorate the cake, remove from fridge.
Using the bench scraper, make marks around the cake. I did not measure, but you certainly can if you want to achieve a perfect final product.
(there is a video on this below, just in case it sounds confusing!) I started with the top and make three lines. This divided up the top into six sections. I then moved to the side of the cake. Hold the bench scraper vertical next to the cake and make a mark at the top and bottom. The mark should match where the line is at the top of the cake. Now hold the bench scraper at a diagonal and make a mark between a bottom dash and a top dash… but make sure the top dash is the next line over.
Finally made a line horizontally through the center of the cake.
You are creating the diamond shape that will be the guideline for when you pipe.

Place #32 tip into an empty pastry bag and drop in the a bag of pink frosting.
Starting at the bottom of one of the diamond shapes, apply pressure to the bag of pink frosting and move from one edge to the other. Without releasing pressure, move up to the next row and go back. You will be zig-zagging up the side of the cake, trying to stay within the guidelines.
Here is a video on how I did that:
Once you have the bottom diamonds filled in with pink, start piping the white diamond in the same fashion. Be sure to go slow and steady. Make sure you are getting the white frosting right up next to the pink to make sure there are no gaps.
When done with the white, go back and fill in the top half-diamonds with pink.
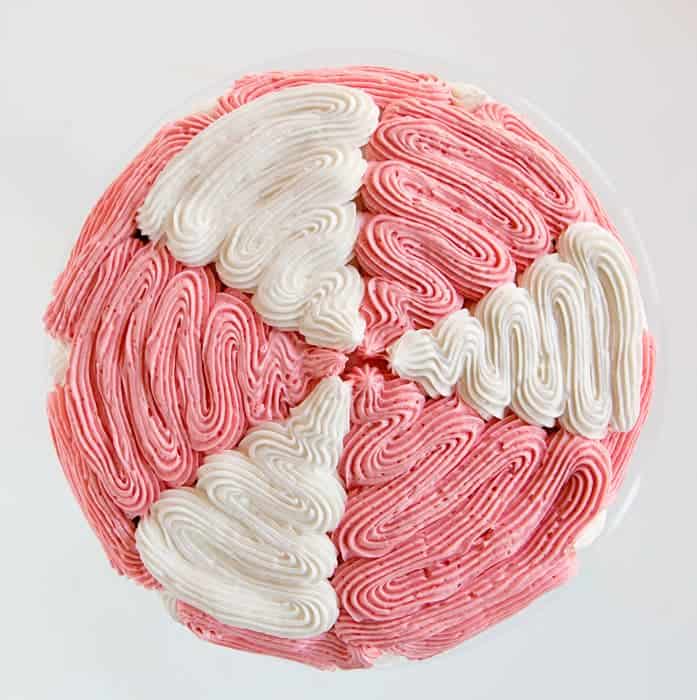
For the tip I used the guidelines that were in place and did the exact same technique, just ending in the center of the cake.
As you can imagine, this cake would be fun in any color combination!


You always give such helpful tips! The cake is beautiful. I bet it would be fun in any color.
Thank you sweet Roxana!
Love your site. It’s encouraging to know my possibilities seeing how I’m just learning how to decorate. I’m tired of store bought cakes and wanted something fun and more delicious to bring to a parties.
I just started a cake decorating class. Your tips are extremely helpful. Thank you so much.