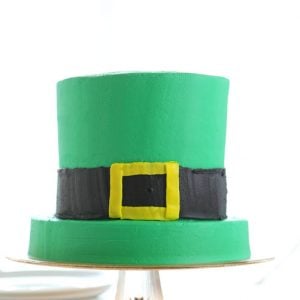
Back in 2010, I made a green ombre cake (although I called it a graduated layer cake because I didn’t know the word ‘ombre’ existed and it was before the trend started). I happen to think this version is perfect for St. Patrick’s Day or for anyone who loves the color green!

Ombre Cake
Wouldn’t you know, it’s one of my post popular posts to this day. So today I am offering up a new and improved model. The same general idea, but slightly better photography.
I also switched things up and used McCormick Green Food Coloring.

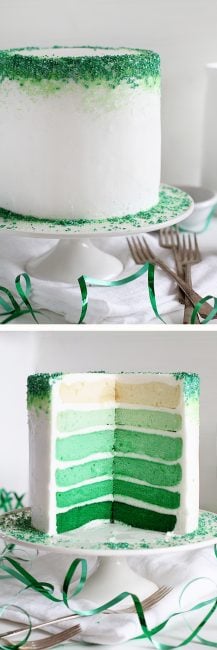
How to Make a Green Ombre Cake
I made one white cake recipe (you can certainly use a box mix here!) and divided it into six bowls.
The first bowl I left plain, the second I used 2-3 drops, the third was 4-5 drops, the fourth was 1/4 teaspoon, the fifth was 1/2 teaspoon, and the sixth was about 1 teaspoon. (I just poured out the rest of the bottle.) However, McCormick has this amazing Green Tinting Guide that is the perfect way to know exactly what colors you are making!
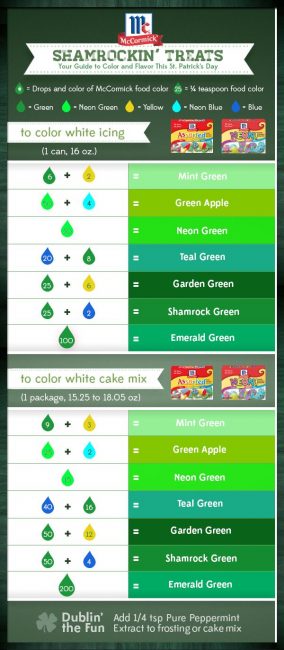
I love this great chart! You really can’t go wrong when it’s laid out so simply and beautifully.

It should look roughly like this after you have added food coloring and thoroughly mixed the coloring into the cake batter.
I then poured the batter into prepared 6-inch round cake pans. I only have three, so I baked the cakes three at a time for about 18 minutes at 350°F. Be sure to start checking your cakes at 15 minutes and remove when an inserted toothpick is removed mostly clean.

After the cakes have cooked and cooled, I stack them on my cake stand. Start with the darkest layer, and cover it in about 1/4 cup of white frosting. (This buttercream recipe works well because it is so white)
Place the next darkest layer on top and add more frosting. Repeat until you have stacked every layer and be sure to end with the white layer on top.
Cover the cake in a crumb coat of buttercream, chill for about 30 minutes in the fridge, and then cover in a final smooth coat of buttercream.

For the outside decoration, I pressed three different color green sprinkles into the upper edge of the cake. I tried to get the darkest color at the very edge, then the medium green in the middle, then a lightest green trickling down a bit.
A nod to the ombre interior.

PRO TIP:
Do you ever want to get really clean cuts when presenting a cake? Here is my trick.
VERY chilled cake. VERY hot knife.
I will freeze my cake for at least 2 hours before serving. I will then place a very sharp knife into a glass of boiling water. Remove the knife, wipe dry and make your first cut, then dip back into the boiling water to clean and re-heat.

When the cake is kept chilled it also decreases the chances of color bleeding.
Don’t you love fun tips that make our lives easier???

This cake is perfect for St. Patrick’s Day celebrations. Wouldn’t it be fun covered in rainbow sprinkles??
It was an absolute delight to create this Green Ombre Cake with McCormick. Thank you so, so much for supporting the brands that support this blog. I only work with the best, and am thankful that McCormick is willing to partner with me! <3


That is so beautiful!
Thanks Chloe!
What a beautiful looking cake!
Thank you so much Laura!
This so cool. I never would have thought about this until I saw this.
Thanks Maggie!
Oh heck yes! Going to try and attempt to whip this up! well done this looks so yummy!:) What a great site!
Simply Amazing! I LOVE it! The colors are so bright and cheerful looking! I had this on my list of cakes to do this weekend, but it sure wasn’t going to be 6 layers high! Maybe I can tackle it now that I’ve seen yours!
You totally can. I used a 6inch pan, so this cake is really only about 8inch tall. TOTALLY do-able!
This is a stunning cake. I made a red one for Christmas but my “frosting” was actually whipped cream. It was totally white on the outside & every one was surprised to see the graduated colors. I am going to save this blog for this cake though because it’s so gorgeous!
Sounds lovely Lenita!
Beautiful gorgeous cake !! Looks delish too!
One question though.. you mentioned you freeze the cake for 2 hours prior to serving? Do you put it in the freezer with the ice cream etc?? Or just the normal fridge to chill it for 2 hours?
Thank you!
Hi Kaye… yes, I put it right into the freezer. Your cake will not become frozen in 2 hours. It will just be very chilled. 🙂
I love this cake, I just wish there was a cake pan out there for this type of baking we could put in the oven at once! I think I going to try the mini shamrock cake you made for our St.Pat?
Wouldnt that be neat?!? 🙂
Wilton now makes a 5 layer 6 inch cake pan set. Sold through Sur La Table for $16. You use one cake mix for the whole cake.
Tupperware has a stacked cooker that does three layers at a time in microwave!
I LOVE this cake. How do you do get the beautiful sprinkles to stick on the sides without them spilling all over everything?
You are such an inspiration. I am putting your book on my wish list and hoping someone will buy it for me Mother’s Day!
Hi Lois! I hope someone not only buys you the book, but makes you a cake! I was pretty careful when adding the sprinkles… they can get away from ya pretty fast right? 🙂
I always admire how perfectly sliced your cakes appear in the photos you post. What type of knife do you use specifically? Maybe you could post a photo? Thank you….