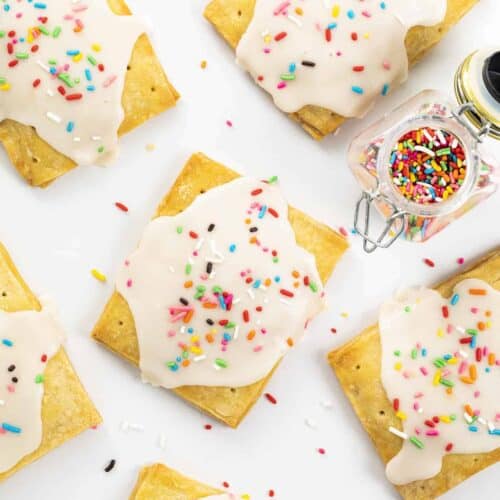
These Pop Tarts are the homemade version of the popular toaster pastries but made with a homemade pie crust filled with strawberry preserves and a homemade vanilla glaze with sprinkles on top. Use my no-fail pie crust to get started!

Pop Tarts
Kellogg’s company first introduced pop-tarts in 1964 with only four flavors and unfrosted. Well, we all know there are many more pop tart flavors with frosting on many of the varieties. It’s a quick way to eat breakfast, but I wanted to make my own so I know exactly what ingredients are in the treat. This recipe starts with my homemade pie crust. (You could use store-bought to save time!) And, of course, I couldn’t forget the glaze (with sprinkles) on top!

Pop Tarts Ingredients
There are four parts to this recipe: the crust, the strawberry filling, the vanilla glaze, and sprinkles!
Crust: To make these homemade pop-tarts, I started with my no-fail homemade pie crust. It makes two pie crusts, which is perfect for this recipe. If you buy pie crusts, you will need two 9-inch crusts that you will have to roll out into a rectangle shape.
Filling: I stuck with one of the original pop-tart flavors, strawberry. I used strawberry preserves as the filling, but you could also use strawberry jam or your favorite flavor of preserves.
Glaze: Homemade vanilla glaze was my choice for the ‘frosting’.
Sprinkles: Adding the rainbow sprinkles really made these look like storebought pop-tarts! Of course, you can leave the sprinkles off if you don’t have any hand, or just don’t want to add them.

Can I Freeze Homemade Pop Tarts?
Yes! In fact, you can freeze the pop tarts before they have been baked or after. To freeze them before baking, get them filled and sealed in the pie dough. Then, place them in the freezer for a couple of hours, or until frozen. Then, store the pop tarts in a labeled and dated freezer-safe container until ready to be baked (up to three months). You can bake them directly from the freezer; just add a few more minutes of baking time.
To freeze the pop tarts after they have been baked, let them cool completely before placing them in the freezer for a couple of hours. Once frozen, store in a labeled and dated freezer-safe container for up to three months.

Can I Make These in an Air Fryer?
Yes, this treat can be made in an air fryer! To make pop tarts in an air fryer, follow the same instructions as you would follow to bake them in the oven. Then, instead of using the oven, cook them in the air fryer for 12 minutes at 350°F. Again, let the pop tarts cool before adding the glaze and sprinkles.
I have tested 3 brands in my home and I recommend the Ninja Air Fryer. (affiliate link) You can go up a size if needed, but it is superior in achieving consistent results and also ease of use. I’ve been very happy with this Air Fryer!
More Breakfast Recipes


Pop Tart
Ingredients
Crust
- No-Fail Pie Crust, or 2, 9-inch storebought pie crusts
Filling
- ½ cup (160 g) strawberry preserves, or jam, divided
Vanilla Glaze
- 3 cups (375 g) confectioners' sugar
- ¾ teaspoon vanilla extract
- 3-4 teaspoons water, or enough to reach desired consistency
Topping
- rainbow sprinkles
Instructions
- Preheat oven to 350°F. Line a baking sheet with parchment paper and set aside.
- On a lightly floured surface, roll out half of the homemade pie crust dough into a 12×16-inch rectangle. Place the other half in the refrigerator. (Or, roll out one of the 9-inch storebought pie crusts.) It should be about ⅛-inch thick.
- Cut the large rectangle into 8 smaller (3×4-inch) rectangles. Transfer the rectangles to the lined baking sheet.
- Top each rectangle with about a tablespoon of strawberry preserves, spreading it evenly over the surface. Be sure to leave space around the edges of the dough.
- Roll out the other half of the pie crust dough into a 12×16-inch rectangle (⅛-inch thick). Before cutting, use the blunt end of a skewer to poke holes all over the surface of the dough.
- Cut the dough into 8 smaller rectangles (to fit over the filled rectangles).
- Use a pastry brush to wet the edges of the filled rectangles with water. Place a second rectangle of dough on top of the filling. Seal the edges together with the handle of a wooden spoon.
- Repeat with remaining pop tarts.
- Bake 25-30 minutes, or until golden brown. Remove from the oven and let the pop tarts cool for at least 30 minutes before adding the glaze and sprinkles.
Glaze
- When ready, in a medium bowl, combine the confectioners' sugar, vanilla, and a few teaspoons of water. Whisk to combine, adding water a teaspoon at a time, until you have reached your desired consistency.
- Working one at a time, drizzle and spread the glaze over the cooled pop tarts. Then, top with sprinkles. Enjoy!
Did you make this recipe?
Thank you for making my recipe! You took pictures, right? Well go ahead and post them on Instagram! Be sure to mention me @iambaker and use the hashtag #YouAreBaker.


how much fun to make these from scratch, the store brand crust for me is way too dense and tasteless, at least the last time I had them a long time ago, so really appreciate your no fail dough recipe too, and l also like just adding or even tweaking a simple vanilla glaze as you do instead of whatever tops the store brand, so thank you!
Love your recipes! How would you reheat the leftover pop tarts?
I LOVE ALL YOUR RECEIPTS THANK YOU
So cool and yummy! I used homemade strawberry lime and blueberry lime jam to fill them. I also used a heart shape cookie cutter and they baked perfectly at the 25 min mark. Thanks for the recipe!