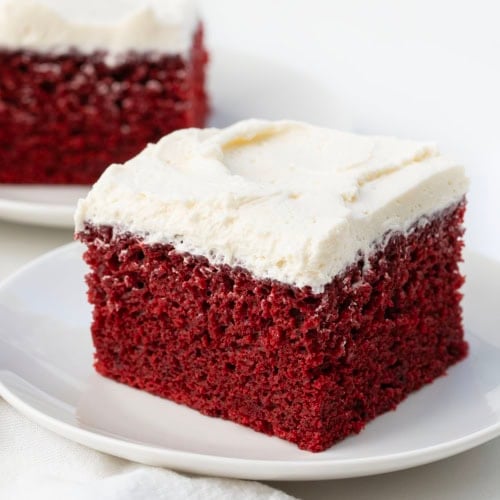
This Easy Red Velvet Sheet Cake takes all the classic flavors of a red velvet cake, like rich cocoa, a hint of tang, and that gorgeous red hue, and turns them into a simple, crowd-pleasing sheet cake. Moist, tender, and topped with a silky, light Ermine frosting, it’s perfect for birthdays, holidays, or just a sweet treat to share. If you love red velvet cake, this recipe is a quicker, easier way to enjoy it without losing any of the flavor or texture you expect from the classic version. I also have red velvet sugar cookies with cream cheese frosting that you will love!

Ingredients & Substitutions
- All-Purpose Flour: This provides the structure for your cake while keeping it tender and soft. Measuring carefully helps your cake stay light and fluffy.
- Granulated Sugar: Adds just the right amount of sweetness to complement the cocoa and tangy notes from the buttermilk.
- Unsweetened Cocoa Powder: Gives red velvet its signature subtle chocolate flavor. Mixing it with hot water helps bring out a deeper, richer taste. You can use natural or Dutch-processed cocoa.
- Mayonnaise (room temperature): Yes, mayonnaise! It keeps the cake incredibly moist and tender without adding any ‘mayo taste’. If you prefer, plain Greek yogurt can work, though the texture may be slightly different.
- Eggs (room temperature): Help bind the cake and give it a smooth, consistent crumb.
- Buttermilk (room temperature): Adds moisture and a subtle tang that brightens the cocoa flavor. If you don’t have buttermilk, you can make your own buttermilk to use!
- Vanilla Extract: Enhances the flavor of the cake and brings warmth to every bite.
- Red Food Coloring: Creates that classic red velvet appearance. Gel or liquid works, just adjust for your preferred intensity.
- Hot Water: Dissolves the cocoa and helps create a smooth, luscious batter. If you want extra depth, you can replace it with hot brewed coffee for a subtle chocolate boost.
- White Distilled Vinegar: Reacts with the baking soda to give the cake a light, airy texture and enhances the subtle tang that makes red velvet so special.
- Ermine Frosting: A classic, silky frosting made from a cooked flour-and-milk base mixed with butter and sugar. It’s creamy, light, and slightly sweet, perfect for topping a moist red velvet sheet cake without being too heavy.

FAQs
Can I make this red velvet sheet cake in a different-sized pan?
Yes! You can use a slightly larger or smaller pan, but baking times may change. A 9×13 pan works best for even baking. If using glass, reduce the oven temperature by 25°F to prevent over-browning.
Can I use Dutch-processed cocoa instead of natural cocoa?
Absolutely! Dutch-processed cocoa gives a slightly richer, less acidic flavor. Keep in mind it may affect the cake’s lift a little, but your sheet cake will still be tender and moist.
Can I swap the hot water for something else?
Yes! You can use hot brewed coffee instead of water for a subtle chocolate boost. It enhances the cocoa flavor without making the cake taste like coffee.

Why is my red velvet cake turning brown on the edges?
This usually happens if the pan is dark or the oven runs hot. Using a light-colored aluminum pan and following the suggested temperature helps keep the edges evenly colored and the center moist.
Can I use a different frosting on this red velvet sheet cake?
Yes! While Ermine frosting is classic for red velvet, you can also use cream cheese frosting (from my homemade carrot cake recipe), buttercream, or even a light whipped cream cheese frosting.
Can I make this cake ahead of time?
Yes! Bake and let the cake cool completely before frosting. Once frosted, it can sit at room temperature for up to 2 days or be wrapped and frozen for longer storage.

What’s the Best Pan for Red Velvet Sheet Cake?
Choosing the best pan for red velvet sheet cake makes a big difference in even baking, a moist center, and a flat, beautiful top. Here’s a quick, easy guide to help you pick the right pan and get perfect results every time.
1. Light-Colored Aluminum Pan (Best Choice)
Why it works:
- Heats evenly to prevent over-browning
- Bakes center and edges at the same rate
- Produces an even crumb, flat top, and moist center
2. Aluminized Steel (Very Good)
Why it works:
- Very even baking
- Sturdy construction
- Slightly crisper edges, still perfect for sheet cakes
3. Glass Pan (Acceptable, Not Ideal)
What to know:
- Holds heat longer, so edges bake faster than the center
- Center may take longer and sometimes turn slightly gummy
- Tip: Reduce oven temperature by 25°F to prevent over-browning when using glass.
4. Dark Nonstick Metal (Least Ideal)
What happens:
- Dark edges and slightly drier perimeter
- Center can dome slightly
- Red velvet edges may look almost brown, which isn’t ideal for presentation
Pan Size & Depth
- Use a 9×13-inch pan that’s at least 2 inches deep
- Batter fills about half the pan; perfect for even baking
Quick Tip for a Flat Cake: After pouring batter into the pan, tap it 2 to 3 times on the counter. This releases air pockets and helps the cake bake evenly with a flat top.

How to Store Easy Red Velvet Sheet Cake
Room Temperature: After frosting, store your cake in an airtight container or cover tightly with plastic wrap. It will stay fresh for up to 2 days. Keep it in a cool, dry spot away from direct sunlight to maintain moisture and color.
Freezer: If you want to keep the cake longer, you can freeze unfrosted or frosted slices. Wrap them tightly in plastic wrap and place in a freezer-safe bag or container. Freeze for up to 2 months. To enjoy, thaw at room temperature for a few hours. (Tip: For frosted cake, you can lightly wrap the cake with parchment between layers of frosting if stacking slices in the freezer. This helps the frosting stay smooth and prevents sticking.)
Easy Red Velvet Sheet Cake
Ingredients
Cake
- 2 cups (250 g) all-purpose flour
- 2 cups (400 g) granulated sugar
- 1 teaspoon baking soda
- 1 teaspoon baking powder
- ⅓ cup (39 g) unsweetened cocoa powder
- 1 teaspoon kosher salt
- 1 cup (232 g) mayonnaise, room temperature
- 2 large eggs, room temperature
- 1 cup (245 g) buttermilk, room temperature
- 2 teaspoons vanilla extract
- 1 ounce red liquid food coloring, adjust as needed to reach your desired red
- ½ cup hot water
- 1 teaspoon white distilled vinegar
Ermine Frosting
- 1 cup (240 g) whole milk
- 5 tablespoons all-purpose flour
- 1 cup (2 sticks / 227 g) unsalted butter, room temperature
- 1 cup (200 g) granulated sugar
- 1 teaspoon vanilla extract
Instructions
- Preheat oven to 325°F. Spray a 9×13-inch baking dish with nonstick cooking spray. Line with parchment if desired.
- In a large bowl, whisk together the flour, sugar, baking soda, baking powder, cocoa powder, and salt.
- In a separate bowl, whisk together the mayonnaise, eggs, buttermilk, vanilla, red food coloring, hot water, and vinegar until smooth.
- Add the wet ingredients to the dry ingredients and mix until just combined.
- Pour the batter into the prepared pan and smooth the top. Tap the pan 2 to 3 times on the counter to release air bubbles.
- Bake for 38 to 43 minutes, or until a toothpick inserted in the center comes out with a few crumbs but no wet batter.
- Let the cake cool completely in the pan before frosting.
Ermine Frosting
- In a medium saucepan over medium heat, whisk together the milk and flour. Cook, whisking constantly, for 3 to 5 minutes, or until no lumps remain and the mixture thickens and resembles a very thick pudding. It should coat the back of a spoon.
- Remove the pan from the heat and let the mixture cool to room temperature.
- In the bowl of a stand mixer fitted with the paddle attachment, cream together the butter and sugar on medium speed until light and fluffy (2 to 3 minutes). Stop the mixer and use a rubber spatula to scrape down the sides of the bowl.
- Add the cooled milk mixture to the bowl of the stand mixer. Beat on medium-high speed until the frosting is light and fluffy (2 to 3 minutes), pausing to scrape down the sides of the bowl as needed.
- Switch to the whisk attachment. Add vanilla and mix on high for 7 to 8 minutes, or until the frosting is smooth and creamy.
- Spread the frosting evenly over the cooled cake.
Did you make this recipe?
Thank you for making my recipe! You took pictures, right? Well go ahead and post them on Instagram! Be sure to mention me @iambaker and use the hashtag #YouAreBaker.


Can you make the Red Velvet Cake
Gluten Free