This Simple Sourdough Bread is just that…simple! It is made using my homemade sourdough starter that is just as easy! So, after your sourdough starter is ready to go, be sure to make this crusty and chewy (in the best way) bread. This bread is certainly delicious on its own, but use it for my Crispy Cheese Sandwich or Apple Gouda Grilled Cheese next time to really make the sandwiches stand out!

Simple Sourdough Bread
Sourdough bread is one of those loaves of bread I always get from the bakery or in the bakery department at my local grocery store. It’s also my bread of choice (when it’s an option) at my favorite restaurants. There is just something special about the somewhat fermented taste of it. So, once I figured out the sourdough starter, I knew I had to use it for this simple sourdough bread!
Plus, there are never too many bread recipes to have at your fingertips, especially when we may be home more than normal!
Simple Sourdough Bread Recipe
This Simple Sourdough Bread recipe takes a little patience to let the dough rise a couple of times before baking it. But, if you were patient enough to get your sourdough starter ready to go, then a few hours is nothing! Plus, it is SO worth it to have freshly baked bread! There are only five ingredients to this recipe, so you more than likely have everything you need on hand.

How to Make Simple Sourdough Bread
Get out your stand mixer (or get your muscles ready) to mix the ingredients for the dough.
- Combine all the ingredients together in the bowl from your stand mixer. (Learn how to make a Sourdough Starter here)
- Use the dough hook attachment and mix the ingredients together on medium-low speed (or no higher than a ‘2’ setting). If you are mixing by hand, knead everything together for about ten minutes.
- After you have mixed the dough (it will be sticky), place it in a lightly oiled bowl.
- Cover the dough with plastic and let it sit for about 3 hours to let it rise.

After the dough has had time to rise, gently fold up the sides of the dough, rotate the bowl, and fold again. Continue to do this until you have folded and rotated the dough a few times.
Did you know that using your hands this way and baking bread, in general, is very therapeutic? It involves patience and it can be very calming. Speaking of patience, after folding and rotating the dough, you need to cover it again to let it rise. It may not take the full 3 hours this time; it depends on how warm your kitchen is. Check it after a couple of hours.
After a couple of hours, sprinkle some flour onto your work surface and place the dough on the flour. Pull up the sides of the dough, pressing them into the center. You may need more flour, so keep that nearby! Continue to pull and press for a while. Finally, flip over the dough. The top should be smooth. Sprinkle some flour on it, and place it on a piece of parchment paper.
Once the dough is on the parchment paper, score the dough or make a few cuts on the top of the dough a few times with a knife.

How to Bake Simple Sourdough Bread
Once the dough is on the parchment paper (or you could do this before you pull and press the dough the final time), put a Dutch oven–lid ON–into a cold oven. Set the oven to 450°F to heat up the Dutch oven. Once the oven has reached the temperature of 450°F, carefully remove the hot Dutch oven and take off the lid (setting the lid on the stovetop).
Grab the parchment paper that is holding the dough and place it (again, carefully) into the hot Dutch oven. Cover it, and bake the bread for 15 minutes, with the oven still set at 450°F. After fifteen minutes, remove the lid of the Dutch oven and bake for an additional 10-15 minutes, or until the top is a nice golden brown.
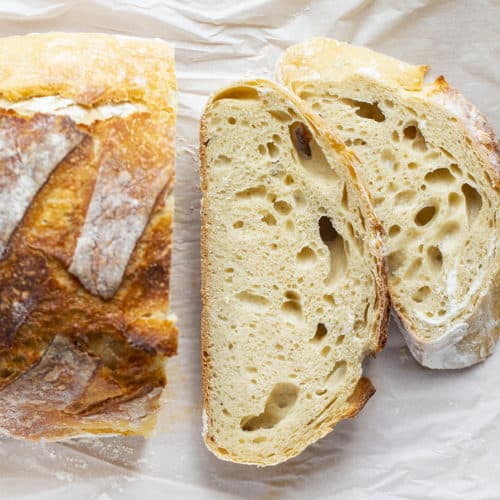
When you tap on the top of the bread, you should hear a hollow sound. Then, you know it is ready to be taken out of the oven. Let it sit for about 20 minutes on the counter or stovetop before taking it out of the Dutch oven and sliced. Enjoy!

How to Store Simple Sourdough Bread
Sourdough bread usually lasts for 4-5 days at room temperature. Do not store it in the refrigerator. Instead, keep it covered with a towel or in a zipped plastic bag someplace that is relatively cool. A bread box also works well. If you want to freeze the bread, be sure to let the bread cool completely before freezing!
The same advice goes for when you are going to cut into the bread–wait until it has cooled. Anyway, to freeze the bread, seal the loaf into a zipped plastic freezer bag, making sure to let all the air out. You can store bread for up to 6 months in the freezer, but the longer you keep it in there, the less fresh tasting it will be. (And be sure to label it with the date!)
Simple Sourdough Bread
Ingredients
- 4-5 cups (500-625g) all-purpose flour, I prefer unbleached
- 1 ½ cups (355g) warm water
- ¾ cup (170g) active sourdough starter
- 1 tablespoon honey
- 1 teaspoon salt
Instructions
- Add all ingredients together in the bowl of a stand mixer with dough hook.
- Turn the mixer on 1-2 (never higher than 2 or medium-low) and let the mixer knead the dough for about 5 minutes. The dough will be sticky and doesn’t quite form a ball. (If making by hand, knead for about 10 minutes.)
- Turn off the mixer and scrape the dough into a medium bowl that has been lightly coated with oil. Cover with plastic and set aside for about 3 hours while the dough rises.
- After 3 hours, turn the dough and gently start folding up the sides. Grab the dough at the side of the bowl and lift up and towards the center of the bowl. Press down, turn the bowl 90 degrees and repeat this several times.
- Cover again and let it rise for an additional 2-3 hours. (This will depend on the temperature of your home. A warmer kitchen will need less time.)
- After the 2 hours, lightly dust your countertop with flour. Press the dough down with your fingers then start pulling up the sides and pressing into the center. You may need to add more flour as this can be a loose dough. Keep pulling up the sides and pressing into the center then flip the dough over. The top should be smooth. Dust with more flour and set the dough onto a piece of parchment paper. Score the dough with a knife.
- Place a Dutch oven (make sure you have a lid) into a cold oven and heat to 450°F. Once heated, carefully remove the hot Dutch oven from the oven. Remove the lid and set it somewhere heat resistant. (I set the lid on my stove.) Pick up the parchment paper with both hands and place inside the Dutch oven. Carefully replace the lid.
- Place into 450°F oven and bake for 15 minutes.
- After 15 minutes, carefully remove the lid and bake an additional 10-15 minutes, or until the top is nicely golden brown (don’t worry if it is darker brown, you just don’t want it burnt) and when you tap on the top the bread sounds hollow.
- Remove from oven and set Dutch oven to the side and leave the bread alone for about 15-20 minutes.
Notes
Did you make this recipe?
Thank you for making my recipe! You took pictures, right? Well go ahead and post them on Instagram! Be sure to mention me @iambaker and use the hashtag #YouAreBaker.


I never leave comments but this turned out so wonderful I had to! This was my very first time making bread from starter. I followed the recipe exactly and used 4 cups flour (WA state). I did have to watch a YouTube video on how to properly fold and was worried this wouldn’t turn out because it was so much simpler than what they did on the video. Needless to say it was perfect as is! Thank you!
Great job, Carolyn!
Do you have a recipe for raisin cinnamon bread with starter?
This is such a great recipe! I was finally able to make a sour dough loaf that was chewy, had just the right amount of tang and did not take 12+ hours of planning/waiting. My kids said it was even better than the commercial sour dough we buy and we live in San Fran!! My search for the perfect sour dough loaf ends here 🙂
What does “active starter” mean?
Hi, Mary! I work with iambaker and am happy to help with questions. An active sourdough starter is a sourdough starter that has been fed and the flour and water have had some time to ferment. An active starter should have lots of bubbles present when at its peak. Here is some more information about a sourdough starter. I hope this helps, and have a great day!
Love this recipe, I’ve made it a couple of times now, and always got a lovely loaf. The last one i subbed in 100gr of wholemeal flour and oats, for a really tasty farmhouse style wholemeal sourdough.
I’ve made this bread weekly and it’s outstanding. Can’t NOT have it in the house.
This recipe is fabulous! I used 4 coups of flour, added a bunch of fresh rosemary and it came out perfect. I’m so happy the weather is cooler so I can bake this easy bread twice a week now. I live on Long Island in New York and it was rainy, cool weather when the dough was proofing. I kept it in a glass bowl near my oven and I needed the full six hours to get it to rise.
You didn’t say when to score it but your bread was scored
Hi, Betty! I work with iambaker and am happy to help with questions. Score the bread after the second rise and after you have placed the dough onto parchment paper. Have a great day!
My dough was very wet after allowing to rise the first time—- my hands were loaded with it—- I used 4 cups of flour and seemed right consistency but became very wet after sitting???
Easy directions! Makes a great loaf of sourdough bread. My first time using my starter to make bread and I made four loaves!
I do have a question though… I followed your recipe using 600 g of flour and I increased my starter in the recipe by maybe two extra tablespoons. The Joe is a little wet but everything worked out great but the Joe seemed very big and my question is, what size cast-iron pot do you use? I have multiple sizes and since I made so many loaves I used all of them so I had to increase my baking time. Otherwise they’re delicious! Thank you 🥖