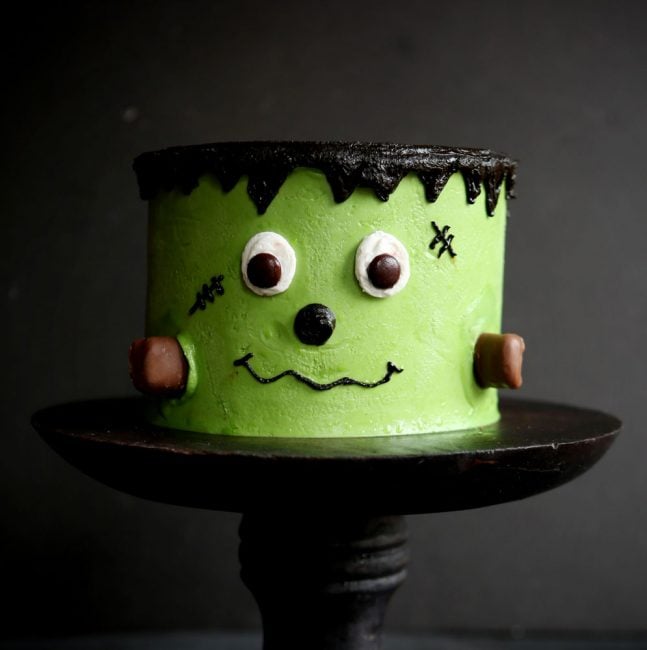
Fun and playful Frankenstein Layer Cake! This delicious cake is pretty darn easy… just some food color and some decorating tips (and of course lots of candy) and you are all set! And yes, if you follow my LIVE facebook video’s, you will remember when I made this on Oct. 4th!
To make this cake you will need:
chocolate cake recipe (or flavor of your choice)
small offset spatula
cake stand (see my cake stands here)
rotating cake stand
green, black food color
#2, #10 decorating tips (see how I take care of my tips here)
pastry bags
M&M candy, Twix candy bar
Here is a video on how I made this cake:
Begin by baking cake in three 6-inch round cake pans. Once cakes are cool, level and refrigerate until ready to use.
Prepare buttercream. Remove 1/4 cup to stay white. Remove 1 cup from the bowl and tint black. (Alternatively, you can prepare chocolate buttercream and tint black. This will allow you to use less back food color.) Tint the remaining buttercream green.
Once you have tinted the buttercream place it in disposable pastry bags to store.
Stack layer cake. Place one layer on cake stand, cover with about 1/2 cup buttercream. Place next layer on and cover with about 1/2 cup buttercream. Place final layer on top. Cover cake with buttercream. To get a smooth layer, use a bench scraper.
Using a pastry bag fitted with a #2 tip, pipe out a jagged edge of “hair” along the edge of the cake. Change tip to #10 and then pipe frosting out on the top of the cake. Use an offset spatula and smooth out the frosting allowing it to spill over the sides. Go back in with the #2 tip and fill in the spots of the “hair” that need to be filled.
Put a #10 tip in a new bag and use the white buttercream. Pipe out two eyes. Place a chocolate M&M on each eye.
Pick up black frosting with #2 tip again and pipe out a nose, a wiggle line for a mouth, and a couple scars.
Finally, cut off a 1-inch section of the end of a Twix and place into the cake at the bottom. This is the “bolts”.
All done!
A few things to note:
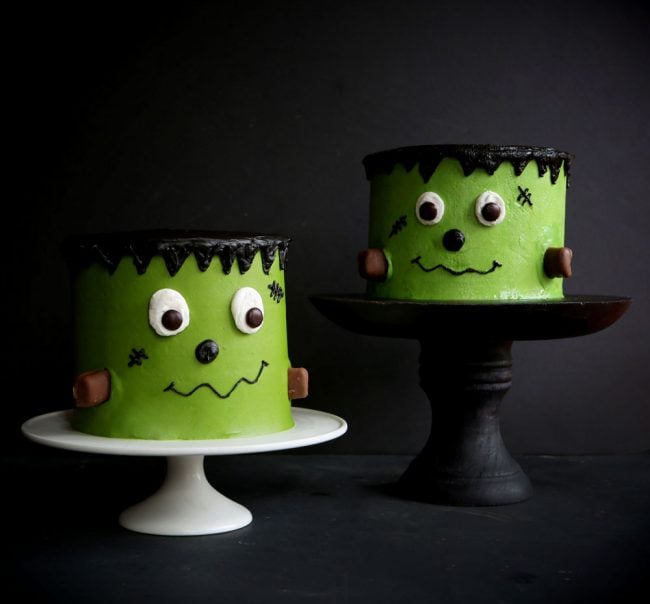
In the video, at the end, my cake is “sweating” or covered in water droplets. This was totally my error as I had wanted to chill the cake so I put it in the freezer. But then I FORGOT that I had put it in there. When I removed the cake and allowed it to come to room temperature (you should allow a cake to warm up in the fridge, not in the kitchen!) it started to sweat.

I was a bit upset about this but then decided to work with it. So I took a paper towel and started dabbing it around the cake. What happened was I was added texture to Frankenstein! I LOVED THIS. If you like the texture to, feel free to try this BEFORE adding all of the hair and face details. You can see the difference in the picture of the 2 cakes above…one is smooth and one is textured.
I will be posted the BRIDE of Frankenstein later this week! <3


Cute! Cute! Cute!!! I loved watching the videos for both Frank and Mrs. Frank. My birthday is the day before Halloween. I think I’ll be making my own cake(s) this year! Thanks for the tutorials!
Which green food colouring did you use?
McCormick
So very cute loved every minute of the making of the cake. I love the posts you put on Facebook and Twitter and I look forward to seeing you every Tuesday for more fun and laughter and baking. I have learned a lot from you thank you for being there for us.
<3 Thank you!!
This is so cute for halloween!
Today’s Halloween! Thank God I found this blog. Cant wait to try this.
I would like to get recipes from you and I want to try to make franksteen cake for Halloween
Do you need to refrigerate the cake if making a day ahead?