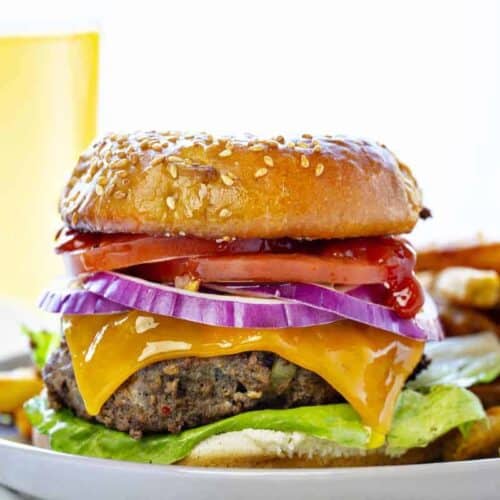
Sink your teeth into this Classic Cheeseburger, filled with all of your favorites, and allow the bliss of spring to take over! This burger starts with a toasted sesame seed bun, wrapped around a perfectly seasoned, mouth-watering hamburger, topped with your favorite cheese, crisp onion, lettuce, juicy tomato, pickles, ketchup, and mustard! If your mouth is watering (mine is!), you will also want to try my Cheeseburger Twice-Baked Potatoes, too! Or, if you are craving something a little lighter, make sure to check out my air fryer cheeseburger hand pies or bacon cheeseburger meatballs, which both make great appetizers for any occasion!

Classic Cheeseburger
Cheeseburgers and hamburgers are one of the most commonly consumed meals in the US. Did you know that we eat on average 50 billion a year!? It makes sense because when they are cooked right, they are hard to pass up.
So what is a classic cheeseburger? Believe it or not, depending on where you are in the world your take on the question “what is a cheeseburger?” might be a little bit different. Most of us here in the central midwest grew up on farms, or have family that grew on farms. We tend to hold tight to the traditional version, which is grilled or pan-fried ground beef formed into a signature patty shape, with a slice of cheese on top, served inside of a bun.
The cheese is typically added to the cooking hamburger patty shortly before serving, which allows the cheese to melt. As with other hamburgers, a cheeseburger may include toppings, such as lettuce, tomato, onion, pickles, ketchup, mustard or other toppings. For the same great flavors in a bowl, check out my Cheeseburger Bowl!

Hamburger Recipe
The weather around here is getting nice. If you are not familiar with Minnesota seasons, we typically hibernate for a few months out of the year due to extremely cold temperatures. That means when the snow melts, and the sun starts to shine, the entire state runs out of the kitchen and dust off their grills. In those cold months though, the cheeseburgers and hamburgers are made indoors. This cheeseburger recipe is proof that pan-fried burgers are just as good as grilled. The primary difference between an average burger and this one is what is actually inside of the hamburger patty. This recipe can be used both in a pan on the grill. No matter how you heat it up, you will need to start with these ingredients.
- 80/20 ground beef
- diced yellow onion
- garlic
- garlic powder
- seasoned salt (we use Lawry’s Seasoned Salt)
- hamburger seasoning
- egg
- Worcestershire sauce
- salt
- pepper
All of these ingredients get combined in a bowl and formed into patties. To do that, I like to mix it all up and then divide the meat into four equal portions. Each portion is then made into a ball and flattened into a hamburger patty. This process makes sure that the burgers cook evenly in the pan.

How to Make the Perfect Hamburger
Nothing is worse than a dry dull hamburger. While it may not seem like rocket science to cook a hamburger, reaching perfection is a bit of an art. Here are a few tips to get you off on the right foot!
Preparing the Hamburgers
First off, you need to start off by buying the right meat. Not all ground beef is made the same. We always like to buy grass-fed beef, and while, for the most part, I would recommend using a lower content fat, this is the exception. We want our burgers to be extra juicy, so when I am making hamburgers, I get the higher fat content (80/20). Don’t be afraid of fat when you are making a burger. Once you have the right hamburger, the rest is pretty simple but there are still a few pointers I can give you:
- Make a well in the center of the burger patty. Proteins in meat will shrink as they cook, creating a well in the center will prevent your burger from pulling upwards. It doesn’t impact the taste but it will make piling all of the extras on top a little difficult. You can use your thumb or the bottom of a drinking glass, but either way, you will be happy you did it!
- Your burger should be about 1/2 inch in thickness. This allows it to retain moisture but still cook through without drying out. You can make your burger wider but not higher. If you are looking to add more meat, make another patty and stack them up!
- Let the burgers sit out for 10 minutes before frying to prevent the burger patty from shrinking smaller in the heat.

Cooking the Hamburgers
Again, the process of cooking a hamburger is pretty straight forward, but there are a few mistakes people commonly make. Once corrected, these can simple changes make a huge difference!
- Space the burgers out in the pan so there is a little room between them. This will help the burgers brown around the edges. If you’re making a lot of burgers, cook them in batches rather than overcrowding the pan.
- Only flip the burger once. I know it’s tempting to flip multiple times, but just don’t do it. Moving the burger around, or flipping it too often means that the burger never gets the time it needs to create that perfect caramelized crust. Let the burgers cook for about 3-5 minutes on one side and flip them once. Repeat and remove from the pan.
- Pressing down on the meat is a bad idea. You might think you are getting the insides to cook quicker, but in reality, all you are doing is letting out all of the glorious juices that you will certainly miss when you take that first bite.
- Add cheese in the very last minute of cooking, allowing it time to melt. I will put mine on and then remove the pan from heat and allow the natural heat of the burger to heat up and melt the cheese. If you add the cheese to soon it will cook off or burn in the pan.
Serving the Hamburgers
Throw it on a bun and run, right? Wrong! Good food takes time to perfect, there are a few things you can do to take your meal to next-level greatness.
- Don’t get too fancy with your bun. Some hamburgers buns are tough. Biting through them means you have to squeeze the burger to get through to the meat. Not only does this let out all of the juices of the burger, but your ingredients will also go toppling over the side.
- Toasting the bun isn’t required but, man, is it worth it! Just that little extra something special can take a burger from ok to WOW. I like to spray a little cooking spray on the bun and toast it in the oven. You can also remove the burgers and cook it right in the pan juices for some extra flavor!

Did you all know that Septemeber 18th is National Cheeseburger Day? Well, in honor of that glorious day, you should try my Classic Cheeseburgers! You won’t be sorry, I promise! Just use all of the tips I gave you and enjoy all of your hard work. You earned it!

BONUS: How to Grill a Cheeseburger
Yes, you can still cook these amazing Classic Cheeseburgers on a grill. If you are using a gas grill, heat to high heat. If you are using a charcoal grill, heat until the charcoals glow bright orange and ash over. Brush the burgers with the oil or butter for extra juices. Grill the burgers until golden brown and slightly charred on the first side, about 3 minutes and then flip. Make sure to use the tips listed above, they all still apply even if you are grilling!
How Can You Enjoy a Medium Burger?
The answer is simple, kinda. It’s grinding your own beef. It is perfectly safe to eat a medium-rare steak, but why not a burger? It is the commercial grinding process which can allow bacteria to grow and therefore must be cooked to 160°F. If you buy a piece of good, well-marbled beef and grind it fresh, right before grilling, there is less risk. You can cook a burger to a juicy medium-rare (130–135°F ). Once you grind your own and taste the difference, buying store-bought ground beef will become a thing of the past.
Looking for more Burger Recipes?
Bacon Cheeseburger Meatball Appetizer
Double Decker French Onion Patty Melt
Classic Cheeseburger
Ingredients
Hamburger
- 1 tablespoon canola oil
- 1 ½ pounds ground beef
- ½ cup yellow onion, minced
- 1 teaspoon worchestershire sauce
- 1 large egg
- 1 teaspoon garlic, minced
- 1 teaspoon garlic powder
- 1 teaspoon seasoned salt
- 1 tablespoon hamburger seasoning
- salt and pepper, to taste
- 4 slices cheddar cheese
Toppings
- 4 hamburger buns
- 1 medium tomato, sliced, (optional)
- 4 large lettuce leaves (optional)
- 1 medium red onion, sliced thin (optional)
- pickles slices, (optional)
- ketchup, to taste (optional)
- mustard, to taste (optional)
Instructions
Hamburger
- Set your oven rack position to the highest level and preheat the oven to 350°F. (This is for toasting the buns, hamburgers are cooked in a pan.)
- In a large bowl, mix together the ground beef, onion, Worcestershire sauce, egg, garlic, garlic powder, seasoned salt, hamburger seasoning, salt, and pepper. Divide the meat into equal portions and flatten each portion into a round burger.
- Add oil to a non-stick pan and allow the pan to warm up over medium heat for about 5 minutes.
- Let the burgers cook for 5 minutes on one side before turning them. Flip the burgers only once and repeat on the opposite side, remove from heat.
- Top with cheese and cover the pan. Let the burgers set for 5 minutes, allowing the cheese to melt.
- Lightly spray or butter both sides of the hamburger buns bun. Place the buns in the oven gently toast until buns are warmed through and lightly crispy, about 5 minutes.
- Remove buns from oven and top with the cheeseburger, lettuce, tomato, onions, pickles, ketchup, and mustard.
Did you make this recipe?
Thank you for making my recipe! You took pictures, right? Well go ahead and post them on Instagram! Be sure to mention me @iambaker and use the hashtag #YouAreBaker.


I’m totally going to do this — my husband thinks he can grill but Lord bless him… he just can’t. They’re ALWAYS dry….the man DRIED OUT RIBEYE STEAKS! It’s sad becuase my boys love cheeseburgers but they’re so awful, we just never have them. I typically don’t make anything like this in a pan cause — geez the mess… but it looks like I Just need to bite the bullet and invest in the mess. Do you think a cast iron double grill pan would be okay for this?
Do it!!! 🙂 I think cast iron would work great!
Never ever use an egg in the meat mixture! That turns it into meatloaf. And all those other seasonings are so unnecessary. Why hide the flavor of the meat? If you insist on using a bbq pit, you don’t need to cook the burgers but like 3-4 minutes on each side.
There is nothing factual about your comment, that is simply your opinion. 🙂 And I prefer to not eat raw burgers, 3-4 minutes per side with a burger that size will equal raw.
Tried several hamburger recipes I’ve gotten from different sites but this is the tastiest, juiciest burger I’ve found. Will be using it exclusively! Thank you!!!