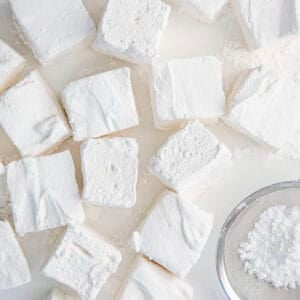
Homemade Marshmallows are better than any you can buy at the store, and they can be made as big or as small, or in any shape, you want! Try my Homemade Marshmallows Dipped in Chocolate for another treat that is as fun to make as to eat!

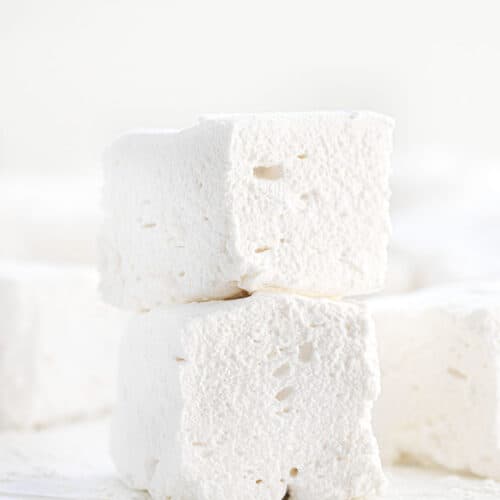
Homemade Marshmallows
Not only do homemade marshmallows taste 100% better than store-bought, but they have a couple of other amazing qualities. They melt beautifully into hot chocolate. And, you can make them any size you want, like personalizing them with letter cookie-cutters! And if you store them correctly, they last a long time. For a gourmet marshmallow treat, check out my Blueberry Marshmallows!

Ingredients & Substitutions
The hardest part about this recipe is waiting for the marshmallows to set. But, it’s worth it!
Gelatin is a must in this recipe. I have heard that arrowroot and Xanthan Gum can be substituted, but if you are looking for a vegan recipe I would highly recommend googling that specifically. For best results, allow the gelatin to soak in cold water for a few minutes until it is fully hydrated before using it. This step will guarantee that the marshmallows are silky smooth and free of any clumps.
Corn Syrup – Yes, it is important. However, if you prefer a recipe that doesn’t use corn syrup, try this homemade marshmallow recipe. It used maple syrup!
Be sure to have lots of confectioners sugar and cornstarch on hand, it comes in handy!

Why Does the Syrup Need to Cool to 212°F?
After the syrup mixture has reached 252°F (also known as the ‘hardball stage’) as indicated in the recipe, it should be taken off the heat and allowed to cool down to 212°F (the boiling point of water). This cooling process plays a critical role in making marshmallows for a couple of reasons. First, if the syrup is too hot, it can cause the gelatin to break down, resulting in marshmallows that are flat and runny. A second reason is if the syrup is too cool, it won’t blend well with the gelatin, leading to a lumpy texture.

The Best Hot Cocoa with Homemade Marshmallows
Can I Make Marshmallows without a Candy Thermometer?
Yes, but it can be tricky and take a few tries to master the timing. But, here are a few tips you can use if you are trying to make homemade marshmallows without a candy thermometer:
- Heat the syrup mixture as directed. Once the sugar has dissolved, dip a spoon into the mixture and hold it up to let the syrup drip back into the pot. Watch the consistency of the syrup as it falls off the spoon.
- At 252°F, the syrup will form a thin, hard thread that is brittle and breaks easily. If the syrup forms a ball or a thick thread, it needs to be cooked for a bit longer.
- Once the syrup reaches the hardball stage, take the pot off the heat and let it cool down to 212°F (about 15-20 minutes) before proceeding with the rest of the recipe. You should see the mixture is starting to thicken as it cools. Again, this cooling to the correct temperature can be difficult without a thermometer, but it can also be fun!
- This process will take a few tries at least, but you can see it moving through the stages to give you an indicator of how close you are. This is just a really fun science experiment in your kitchen!

How to Store Marshmallows
Once the marshmallows are all cut, place them in a clean strainer in the sink. Pick up your foil lining and dump the marshmallows into the strainer. Pick up the strainer and toss it softly so that all of the marshmallow’s exposed edges will get some of the confectioners’ sugar on them. This prevents them from sticking together!
You could also use this recipe to cut out any desired shapes for the marshmallows. Just remember to coat the shapes you cut out with the sugar and cornstarch mixture.
Store the marshmallows in an airtight container for up to 3 weeks at room temperature.
More Marshmallows
Homemade Marshmallows
Homemade Marshmallows are better than any you can buy at the store, and they can be made as big or as small, or in any shape, you want! Try my Homemade Marshmallows Dipped in Chocolate for another treat that is as fun to make as to eat! Homemade Marshmallows Not only do homemade marshmallows taste…

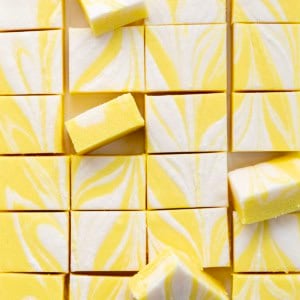
Blueberry Marshmallows
Blueberry Marshmallows are super fluffy homemade marshmallows marbled with blueberry syrup and topped with crushed graham crackers. I was going for a “Blueberry Cheesecake Marshmallow” and I think the addition of the graham crackers really works! The unique combination of flavors and textures elevates them (literally) to the level of gourmet marshmallows, making them a must-try for anyone who loves a sweet treat. I will show you step-by-step how easy it is!
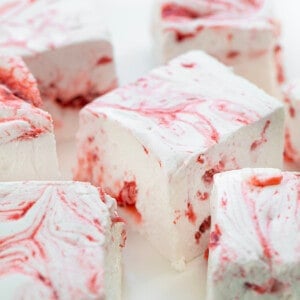
Strawberry Marshmallows
Strawberry Marshmallows are super fluffy homemade marshmallows marbled with strawberry jam made with fresh strawberries. They are light and airy with a fruity sweetness in every bite! And they really are as lovely to look at as they are to eat!
Homemade Marshmallows
Ingredients
- 5 packages (about ¼ ounces each) gelatin, unflavored
- 1 ¾ cups ice-cold water, divided
- 3 ½ cups (700 g) granulated sugar
- 1 ⅔ cups (568 g) light corn syrup
- 1 teaspoon vanilla extract
Dusting Powder
- ¼ cup (31 g) confectioners' sugar
- ¼ cup (32 g) cornstarch
Instructions
- In the bowl of a stand mixer, add the gelatin. Pour 1 cup of cold water over the gelatin and whisk it together. Place the bowl on the mixer with the whisk attachment. Let it rest for a few minutes to allow the gelatin to hydrate and bloom.
- Meanwhile, in a large, heavy bottom pot over high heat, pour in the remaining cold water, sugar, and corn syrup. Cook, stirring constantly until all of the sugar has dissolved. Once the sugar has dissolved, stop stirring and cook until the mixture reaches a temperature of 252°F on a candy thermometer.
- Remove the pot from the heat. Let the mixture cool to 212°F.
- Once cooled to 212°F, carefully pour the sugar mixture into the gelatin mixture, whisking on low speed for about 30 seconds, or until combined. When combined, increase the speed to high. Continue to whisk on high for 11-13 minutes, or until the mixture is very thick (doubled in size).
- Mix in the vanilla.
Regular Marshmallows
- Line a 9×13-inch baking dish with parchment paper and spray with nonstick cooking spray.
- In a small bowl, combine the confectioners' sugar and cornstarch.
- Dust the sugar and cornstarch mixture over the bottom and sides of the pan, reserving the remaining mixture.
- When ready, pour the marshmallow mixture into the prepared dish, spreading it out evenly. Make sure your tools are sprayed with non-stick spray as well! Sprinkle a little sugar and cornstarch mixture over the top of the marshmallows, reserving the rest. If you want a very flat surface, place parchment paper over top and press down slightly with your hands.
- Let the marshmallows sit out for at least 4 hours, up to overnight.
- After the marshmallows are ready, turn them out onto a cutting board. Cut the set marshmallow slab into your preferred sizes with a pizza cutter that has been dusted with the confectioners' sugar and cornstarch mixture.
- Once cut, dredge each cut marshmallow in the confectioners' sugar, making sure to coat all sides. Store in an airtight container at room temperature for up to 3 weeks.
Miniature Marshmallows
- While the marshmallow mixture is being whisked, combine the confectioners' sugar and cornstarch in a small bowl.
- Line large baking sheets with parchment paper and spray paper with nonstick cooking spray.
- Dust the sprayed paper with the confectioners' sugar and cornstarch mixture.
- Fill a piping bag fitted with a ½-inch round piping tip with the marshmallow mixture. Pipe the mixture into long strips onto prepared baking sheets, leaving space between each strip.
- Sprinkle the tops of the strips with the confectioners' sugar and cornstarch mixture. Let them sit out for at least 4 hours, up to overnight.
- After the marshmallows are ready, use a pizza cutter or knife dusted with confectioners' sugar and cornstarch mixture to cut each strip into small pieces.
- Once cut, dredge each cut marshmallow into the sugar and cornstarch mixture, making sure to coat all sides.
Did you make this recipe?
Thank you for making my recipe! You took pictures, right? Well go ahead and post them on Instagram! Be sure to mention me @iambaker and use the hashtag #YouAreBaker.
This recipe was inspired by Alton Brown’s Homemade Marshmallow recipe.


I do not have a whisk attachment for my mixer. Will it turn out ok using the regular attachment beaters?
I think the whisk attachment is important, but it could work! Please do let me know what you think if you try.
Have made Alton’s recipe before. I love these marshmallows. Sticky yes but well worth it.
hello, amanda
l would really like to try out these marshmallows recipe,
but here there is no corn syrup available.
can l use maple syrup instead?
thank you very much for your response, will be witing for it
renata
sorry, l just so the other recipe with maple syrup. thank you
renata
Any chance I can make them peanut butter or caramel flavored by just swirling in some peanut butter or caramel or will that change their ability to stabilize?