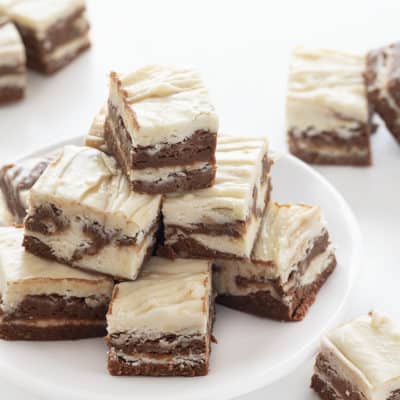
With a beautiful marble design and loaded with both white and chocolate morsels, Chocolate Vanilla Marble Fudge tastes as good as it looks! If you love fudge, try my Original Fantasy Fudge and Butter Pecan Fudge.
Chocolate Vanilla Marble Fudge
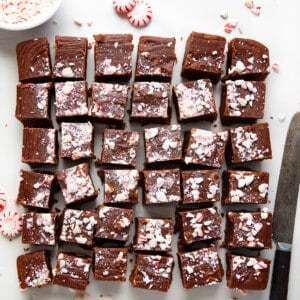
There is just something so pretty about marbling. Marbling was first known as Suminagashi, or “ink floating”. Colors of ink were floated on the surface of water. Since then, marbling is found in everything from floors to countertops to cuts of meat. And, of course, this Chocolate Vanilla Marble Fudge has the same beautiful marbling design. Not only is it delightful in design, but the taste is just as delightful!

With the perfect blend of white and chocolate chips, Chocolate Vanilla Marble Fudge is a beautiful and tasty marbled treat.

How to Make Chocolate Vanilla Marble Fudge
I am going to get right to the point and say that making this fudge takes some elbow grease. If today was an ‘arm day’ for your workout, you may want to wait a day or two to make this recipe. Of course, I am exaggerating slightly, but it can get tough to mix the sugar mixture in with the bowls of the white and chocolate chips. So, get out your large Dutch oven, a couple of large bowls, and your muscles!
- Line a sheet pan with parchment paper. If you don’t have parchment paper, aluminum foil will also work. Lightly spray the parchment paper or foil with a non-stick spray. This will make it a whole lot easier to remove your fudge from the pan when it’s ready to be cut.
- In a large Dutch oven, mix together the sugar, evaporated milk, butter, and cream cheese over high heat until a candy thermometer reaches 234°F. Stir often, and then remove the sugar mixture from the heat.
- After removing the sugar mixture from the heat, stir in the marshmallow creme and vanilla. Set aside while you put the white chips and chocolate chips into two separate large bowls.
- Okay, here is the part where you need to use some muscle! Pour half of the sugar mixture into the bowl with the white chips. Pour the other half of the sugar mixture into the bowl with the chocolate chips.
- Use your strength to mix both bowls of the chips with the sugar mixture. The bowls may feel warm since you just took the sugar mixture off the heat. Keep stirring until the chips have melted.
- Pour half the white mixture into the parchment-lined pan, spreading it out smoothly. Then, pour half the chocolate mixture on top of that. Repeat with the second half of the white and chocolate mixtures.
- Using a buttered spoon, make swirling motions to get that marbled look in the fudge.
- Let it sit for about 2 hours before cutting.

What is a Candy Thermometer?
A candy thermometer, also known as a deep-fry thermometer or sugar thermometer, is used to measure the temperature of a sugar solution. It is definitely an important tool to have when making candy. Just like using a meat thermometer is important for the perfectly cooked meat and measuring cups and spoons are important for measuring ingredients, a candy thermometer has its place in the baking world, for sure! You can find them in most grocery stores and houseware stores. When you use it, just make sure you don’t immerse the thermometer directly into boiling water or let the bulb hit the bottom of the pan. It really is a game-changer, or should I say candy-changer, for your future sugary recipes.

How long does Fudge last?
Well, around here, not very long, but I know what you mean with this question. If you keep the fudge in an airtight container at room temperature, it is good for a couple of weeks!
How do you harden Fudge?
Allowing fudge to come to room temperature will solidify it and make it easy to handle. You can also pop it into the refrigerator for a couple of hours or even the freezer for about 30 minutes. Fudge is best consumed at room temperature though, so be sure to take it out a few minutes before you want to eat it.
How do you store Fudge?
If you are planning on eating it within 2 weeks, you can store the fudge in an airtight container. I like to separate the layers with parchment or wax paper. You can also store fudge in the refrigerator for a few weeks. Again, an airtight container with separated layers is best. If you need longer storage, like months, the freezer is the best option. I like to tightly wrap the fudge with plastic wrap and then place it in an airtight container or freezer-safe plastic bag. Be sure to write the date on it!
Looking for More Fudge Recipes?
White Chocolate Cranberry Fudge
Chocolate Vanilla Marble Fudge
Ingredients
- 6 cups granulated sugar
- 1 can (12 ounces) evaporated milk
- 1 cup butter
- 1 package (8 ounces) cream cheese, softened
- 2 jars (7 ounces each) marshmallow creme
- 1 tablespoon vanilla
- 1 package (12 ounces or 2 cups) white baking chips
- 1 cup milk chocolate chips
- 1 package (6 ounces or 1 cup) semisweet chocolate chips
- 2 tablespoons cocoa powder
Instructions
- Line a 9x13 inch pan with parchment paper.
- In a 6-quart Dutch oven, over high heat, mix sugar, evaporated milk, butter, and cream cheese together, cooking until the candy thermometer reads 234°F, stirring often. Remove from heat.
- Stir in the marshmallow creme and vanilla.
- In a large bowl, pour in the white baking chips.
- In a second large bowl, pour in the milk chocolate, semi-sweet chocolate chips, and cocoa powder.
- Pour half of the sugar mixture into the bowl with white chips and the other half into the bowl with the chocolate chips. Use some elbow grease and stir to get the chips melted in both bowls.
- Pour half of the white mixture into the pan, spreading evenly. Add half the chocolate mixture over top. Repeat with the other halves of the white and chocolate mixtures.
- Swirl a buttered knife through the layers, creating the marbled design.
- Let the fudge cool about 2 hours before cutting.
Did you make this recipe?
Thank you for making my recipe! You took pictures, right? Well go ahead and post them on Instagram! Be sure to mention me @iambaker and use the hashtag #YouAreBaker.


H-mmm !!! The fudge recipe sounds yummy! Will have to try it.
Best
I am Baker-Tried your Great Recipe Marble Funge,making batches of this to use at my Halloween Festival, putting in cute little Halloween individual bags, along with Candy Apples in Cute Halloween bags, Popcorn Balls,and your Peanut Butter Cookies, as their Treats to take back home, remember when growing up, neighbors would give you homemade Treats, I am having at the house (just our family children makes 12), since Alabama don’t want you going Trick or zTreating this year. I am also making each one their own Halloween Mask, a year to remember of the Mask.
How to make chocolate fudge and make it hard? Thank you for your hel
Hi, Bob! I work with iambaker and am happy to help with questions. You could try this Original Fantasy Fudge recipe without the walnuts. Have a great day!
This fudge is so delicious! I followed the recipe exactly and the results were amazing!
I didn’t have great luck with this recipe, unfortunately. I followed the instructions exactly, but the sugar mixture was lumpy – I don’t think the cream cheese ever incorporated completely. So the end result is a lumpy looking fudge. 🙁 It tastes great, so my family will enjoy this one, but I will not be gifting this fudge.