Did you know that the Rose is the National Flower?
“The rose was designated the official flower and floral emblem of the United States of America in 1986”


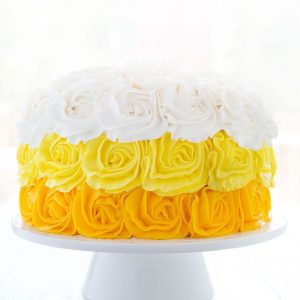
People have been asking for over a year now for a video tutorial for the Rose Cake. After posting the Neapolitan Rose Cake a week ago and getting a few more requests, I finally did it!
While I will probably still refer folks to my original tutorial, this little video shows you a couple fun things:
1. How to make it with different colors. (So this will apply to the Neapolitan Cake as well as any Ombre effect you might desire)
2. Just how quick and easy it is.
This video is mostly in real time. You really truly can frost a cake like this in less than 10 minutes. And if you are making all one color it is even quicker.
As you can tell, I made this cake in honor of patriotism… Memorial Day, the Fourth of July, Veterans Day, Flag Day, an Inauguration, basically any occasion that red white and blue is appropriate!

How I prepare to frost a Rose Cake:
I get all my frosting’s ready and place in plastic disposable pastry bags.
I then prepare a bag with a 1M tip in it for every color I am using. Here I used three colors, so I had three bags ready. You can go through a lot of frosting making those roses, and its good to have an extra bag ready to switch out.
Also, I really didn’t do a crumb coat. I have done it with and without a crumb coat and find they both work. The reason I can get away with not doing a crumb coat is because I tend to squish my roses together to avoid any dead space.
When making the bottom layer of blue roses around the cake, I tried to stop applying pressure at the top of my rose, where the next layer would be covering. Then simply go right over that edge on your next row. Overlapping is a very good thing with this cake!
As you can see in the video, I went fast and didn’t worry about perfection with each individual rosette.
If you didn’t like how one of your roses looked, simply wipe it off the cake and re-pipe it. Easy peasy! 🙂
There is no editing (other than exposure/color) done to the pictures I have posted. (The pictures were actually taken with my phone.) It’s the same cake in the pictures and video.
The ending cake is still pretty good, even though you saw many errors throughout the video. That is just a testimony to how forgiving the Rose Technique is!
A few have asked, so here is a link to the gel food coloring I use to achieve such deep colors!


can you tell me where I can find that rotating stand that you use in this video
Just made my first rose cake. I made a white cake with a lemon curd filling and did yellow roses. It was beuatiful and I got tons of compliments on it. People actually thought it took me hours to decorate when it really only took a few minutes. Thanks for the idea
Thats fantastic!!
I love your cake! Took my first Wilton class last month. I keep trying to make my roses and they break. Is my icing too stiff? Thanks for sharing, love, love it! My next try will be the neopolitan cake 😀
Could be… you can always add a bit more liquid! Happy Baking! 🙂
Thanks so much for the tutorial! I have been looking all over the internet for a tutorial on the tip and techniques to make this cake, and came across your video on YouTube, which led me here. I want to do this in pink for my daughter’s first birthday.
Thanks again!
What a blast! Thanks for a great blog!
Inspiring! My cakes are historically boring looking, but I’m going to give this a shot! Thanks for the video.
How much frosting to you use for three layers like this?
Love it!
Thank you for sharing with us , wish me luck I am doing it for a shower tommorow.
you make it look so easy. Melody
GRACIAS QUE HERMOSO TRABAJO MIL GRACIAS ESTE VIDEO ME AYUDO MUCHISIMO SALUDOS DESDE VENEZUELA!