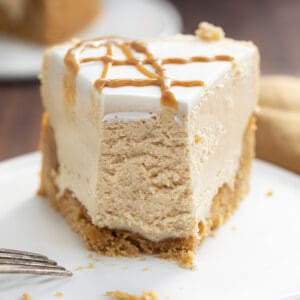
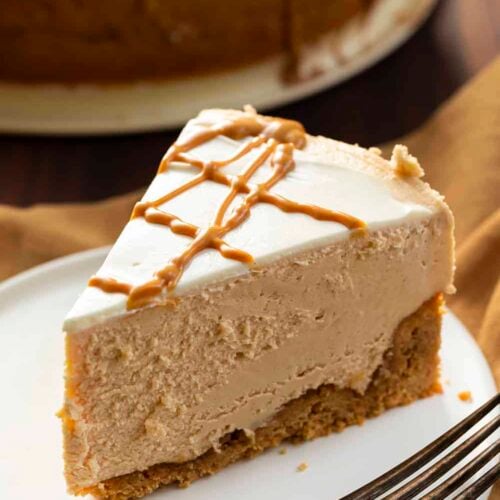
Peanut Butter Cheesecake is a smooth and creamy cheesecake made with peanut butter and a homemade peanut butter cookie crust. Try my Reese’s Cheesecake Pie for another rich, peanut buttery dessert.

Peanut Butter Cheesecake
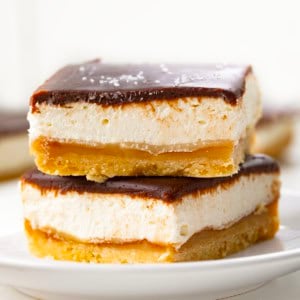
If you love peanut butter, you will love this cheesecake! It starts with a homemade cookie crust that is only three ingredients. Then, it’s topped with creamy, peanut butter cheesecake, a layer of sour cream, and more peanut butter that is melted and drizzled over the top.

Peanut Butter Cheesecake Ingredients
Peanut Butter: For the cookie crust, you could use crunchy or creamy peanut butter. For the cheesecake and melted drizzle, I would recommend creamy peanut butter.
Sour Cream: If you look at the recipe, you will know that sour cream is both in the cheesecake filling and on top. The amount of sour cream used in the filling is just enough to give the cheesecake a creamier texture, but not too much to be noticeable. The topping will add just a hint of tartness.
Heavy Cream: The cream is used to make whipping cream that you will add to the cheesecake filling. Just like the sour cream, this will also help the dessert have a more luxurious feel. If no additional dairy is used in a cheesecake, you will have a cheesecake that has the same texture as eating cream cheese right out of the wrapper. Look for a cream that contains 36% or more milk fat.

How to Store Cheesecake
Cheesecakes are rich and filling, so even though you may want to eat the entire cheesecake in one sitting, it’s not always (if ever) possible. So, how do you store it to eat when you are craving a bite later? One easy way is to cover the cheesecake and store it in the refrigerator for one or two days. If you tightly wrap the cheesecake in plastic wrap or store it in an airtight container, it will last up to 3 days in the fridge.

How to Freeze a Cheesecake
To freeze a cheesecake:
- Let the cheesecake cool completely.
- Place the cheesecake (uncovered) in the freezer for about an hour. I suggest that if you are keeping the cheesecake pie in the springform pan, remove the sides of the pan.
- After the hour in the freezer, take the cheesecake off the pan (you may have to pry it off with a knife), and wrap it tightly in plastic wrap.
- Place the wrapped cheesecake into a zipped freezer bag or wrap it in aluminum foil. Be sure to label and date the cheesecake. It will last up to 2 months (at the most) in the freezer.

More Cheesecake Recipes
Peanut Butter Cheesecake
Ingredients
Peanut Butter Cookie Crust
- 1 cup (258 g) peanut butter, creamy or crunchy
- 1 cup (200 g) granulated sugar
- 1 large egg, room temperature
Cheesecake Filling
- 3 packages (8 ounces each) cream cheese, room temperature
- ½ cup (100 g) granulated sugar
- 1¼ cups (322.5 g) creamy peanut butter
- 1 teaspoon vanilla extract
- ¼ cup (57.5 g) sour cream
- 1¼ cups (297.5 g) heavy cream, cold
- ¾ cup (94 g) confectioners' sugar
Sour Cream Topping
- ½ cup (115 g) sour cream, room temperature
- 2 teaspoons confectioners' sugar
Topping
- ¼ cup (60 g) creamy peanut butter, melted
Instructions
Peanut Butter Cookie Crust
- Preheat oven to 350°F.
- In a mixing bowl, stir together the peanut butter, sugar, and egg until combined.
- Press the cookie batter into the bottom and halfway up the sides of a 9-inch springform pan.
- Bake for 11-13 minutes or until slightly crisp and no longer shiny. Allow the crust to cool completely before continuing with the recipe.
Cheesecake Filling
- Use an electric mixer or stand mixer fitted with the whisk attachment to mix cream cheese and sugar until smooth. Scrape down the sides of the bowl.
- Add the peanut butter and vanilla extract. Blend until smooth and creamy. Again, scrape down the sides of the bowl.
- Beat in sour cream on low speed. Set this cheesecake mixture aside as you prepare the whipped cream that you will add to it.
- To make the whipped cream, in a separate bowl, add heavy cream. Start mixing at the lowest speed, and then gradually increase speed to medium until the cream starts to get thicker. (The gradual progression prevents you from spraying yourself with cream.)
- When the cream starts to thicken, stop the mixer. Slowly add in the confectioners' sugar and then resume mixing again, starting with low speed and increasing to medium speed and eventually moving to a high speed. The cream will thicken and start to peak. Mix on high until the cream is thick and stiff.
- Gently fold the whipped cream into the cream cheese mixture until completely combined.
- Pour the filling into the cooled peanut butter cookie crust and spread into an even layer.
Sour Cream Topping
- Combine sour cream and confectioners' sugar; spread in a thin layer over cheesecake.
- Refrigerate for at least 6 hours. I recommend letting it chill overnight.
- After the cheesecake has set, drizzle with melted peanut butter and serve.
Notes
Did you make this recipe?
Thank you for making my recipe! You took pictures, right? Well go ahead and post them on Instagram! Be sure to mention me @iambaker and use the hashtag #YouAreBaker.


Can I use a 9 inch pie dish for this recipe!!!
Hi, Barbara! I work with iambaker and am happy to help with questions. We used a 9-inch springform pan, which has a volume of about 10 cups. So, you could get by with a 10-inch round cake pan or even a 9×13-inch baking dish (but the cheesecake might be a little thinner). I hope this helps, and have a great day!
Hello, I forgot to make the whip cream and just added the heavy cream.. will it still work out?
This sounds so good! The best part it is gluten free. I have celiac disease. Love seeing gluten free recipes!
Made it for my husbands birthday! He loved it!
I have made this recipe twice. It’s delicious.
1st time i made it as per the recipe but the baking paper stuck to the cooled base & was difficult to remove. Also the filling did not adhere to the filling and was a little difficult to cut.
2nd time i made the recipe, i removed baking paper from base whilst still hot – very easy, waited till the base cooled then blended it in a food processor, reducing it to crumbs then mixed in 100g of melted butter and used that as the base (patted down firmly in the base on a baking-paper-lined springform pan. Placed in refrigerator to set until filling was ready to pour on top.
Result was amazing.
I made the peanut butter cheesecake for a birthday dessert and it was delicious! An easy recipe to follow and definitely did not disappoint. I doubled the sour cream topping in order to make sure that I did not get streaks of the peanut butter cheesecake filling layer and it was just right! The topping was perfect and the drizzle was a beautiful touch. We loved every bite! I have sliced it and frozen in two portions each for the perfect amount of dessert for us. Thank you for this wonderful recipes and if you have any that are gluten-free, pass them on! I consider the peanut butter cheesecake gluten-free because there was no flour or other additives that are concerning to me. What a spectacular bonus for me! ☺️
This is so yummy! I made one for a family gathering and everyone raved over it. The next time I made 3 6″ cakes to give away. It is always requested when I ask “What to bring?”.
My next one will be with a ganache layer next to the crust. Thanks for the recipe.
How long should the cheesecake filling bake? Should springform pan be placed in a water bath?
The filling is not baked.
This is so good. It’s a hit with my family. It’s creamy and flavorful. I recommend this highly.
The recipe was confusing when it said meanwhile add heavy cream I put it all together then realized it was supposed to be mixed separately…I also looked and looked where to bake it again it should read no bake cheese cake. I hope it comes out a lot of ingredients to waste. I gave 4 stars but it needs to be clearer.
Hi, Diane! I work with iambaker and am happy to help with questions. The heavy cream is mixed with confectioners’ sugar in a separate bowl to be added to the cheesecake filling. In the post, it does state, ‘get out a separate bowl to combine the heavy cream and confectioners’ sugar’. I will try to clarify that in the instructions. As for this being a no-bake cheesecake, the crust does have to be baked first, so the oven does need to be turned on and used in this recipe. I hope this clears up the recipe a bit. Have a wonderful day!