This delicious Sprinkles Cake is always a crowd-pleaser. It is the perfect birthday cake or just a colorful cake for any happy occasion! If you love celebration cakes, don’t miss my Best Chocolate Cake Recipe or these Cake Decorating Ideas.
Sprinkles Cake
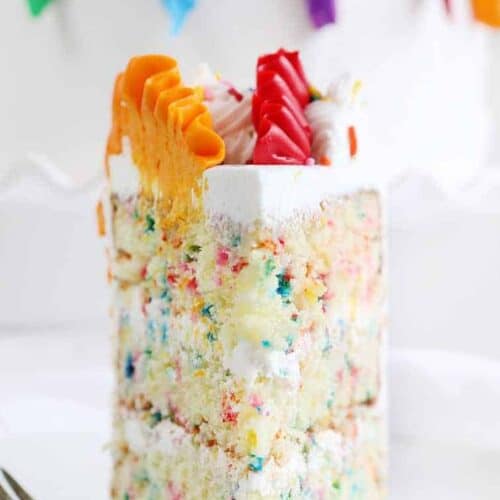
If you are looking for a delicious and FUN cake to make this is it! This sprinkles cake recipe is a big cake, 3 full layers, that packs a big flavor punch! I love to pair it with vanilla buttercream and add a few rainbow frosting ribbons. I happen to think this decorating technique is perfect for a birthday cake! Top with a few more rainbow jimmies and you have the happiest cake on earth.

Sprinkles Cake Recipe
It starts with a cake full of colorful sprinkles and then is topped off with more colorful decorations for that ‘icing’ on the cake. I will explain how to get your cake frosted and decorated later.

How to Make Sprinkles Cake
With this cake all about fun, it’s perfect for any celebratory occasion! To make the cake, start by preparing two 8-inch round cake pans. Line each with parchment paper. This is important, so don’t skip this step.
- In the bowl of a stand mixer with a paddle attachment, cream together the butter and shortening until light and fluffy.
- Next, add the sugar and mix until it is fully incorporated.
- Add eggs, one at a time, followed by the vanilla.
- Meanwhile, in a separate bowl, sift together the flour, baking powder, and salt.
- Alternate adding the flour mixture and the milk, beginning and ending with the flour mixture.
- Remove from the stand mixer and stir in the rainbow jimmies (sprinkles) by hand.
- Evenly distribute cake batter between cake pans (roughly 2 1/4 cups per pan) and place pans into the oven. Bake for 25-30 minutes, or until a toothpick or cake tester inserted in the center comes out mostly clean.
- Let the cakes cool completely before decorating.

Sprinkles Cake Decorating
To decorate this cake I used my whipped vanilla buttercream. I tinted 1 cup of frosting red, 1 cup orange, 1/2 cup yellow, 1/2 cup green, 1/2 cup blue, and 1/2 cup purple. You will most likely have frosting remaining, and that frosting can be stored in the refrigerator for 2 weeks or freezer for 3 months. (Be sure to label and date the storage container, and bring the frosting back to room temperature before using again.)
Start by covering the cake in a crumb coat of frosting. Allow cake to set for at least 15 minutes, then apply a smooth coat of frosting over top. Smooth it out with a small offset spatula or bench scraper. Now add some frosting to a bag fitted with a 9FT tip. Make pipe swirls around the edge of the cake.
To make the “ribbons” of frosting over the sides I used a #126 tip which is a large teardrop tip. (You can also use a #104 tip, which is just a smaller version.) Starting at the top of the cake at the inside edge of the dollops, apply pressure and move up and over and in between the dollops.
Move your top over and down the top side of the cake then release pressure at about halfway down the side of the cake. If you happen to only have one #126 tip as I did, you may want to plan ahead. I piped my first ribbon in red then counted out to where the next red ribbon would be and piped another. Then I washed the tip and repeated with orange. Then washed the tip and repeated with the remaining colors.

Tips for Homemade Sprinkles Cake
Making a cake from scratch can definitely be daunting, but this is a perfect recipe to start with. A few things that can make the process easier for you are:
- Preparing the pans ahead of time. Make sure you line them with parchment paper as the sprinkles can stick to the bottom and make the cake hard to remove.
- Use room temperature ingredients. When the butter, eggs, and milk are room temperature they incorporate better into the batter and help to create the most perfect texture & crumb.
- Make sure your layers are leveled and chilled before decorating the cake. If your layers are very chilled you may even be able to skip the crumb coat! (My cake is VERY chilled in the video tutorial.)
- If you live at a higher altitude, check out my High Altitude Baking Tips.
Sprinkles Cupcakes
To make this recipe into cupcakes you will follow the recipe as written, but add the batter to a cupcake pan filled with liners. Fill each liner 3/4 full with the sprinkles cake batter and bake 16-22 minutes. You want the tops to rise and dome nicely.
To test and see if they are done, insert a toothpick into the center of the cupcake. If it is removed mostly clean, they are done. You do not want the wet batter to cling to the cupcake but a completely clean toothpick could mean the cupcakes are too done. You should have 24 cups or as many as 36 if you don’t fill them 3/4 full.
Can I Freeze the Sprinkles Cake?
You can certainly freeze the cake, but I do recommend waiting until it thaws to add the vanilla buttercream. This cake will freeze well if it placed in the freezer the same day you make it. Make sure that it is completely cool before preparing it for the freezer.
Here’s what I do:
Allow the cake to cool in the pan fully. Place a layer of plastic on top of the cake and then place a cutting board or cooling rack on top. Flip the cake over. Wrap the plastic up over the edges of the cake and then add another large piece and wrap it again as tightly as possible without crushing the cake. Make sure that none of the cake is exposed in the freezer as this can cause freezer burn. Now wrap it in a layer of foil. Label and date the cake. The cake will freeze well for 1 month and should be fine for up to 3 months.
To thaw the cake, remove from the freezer and set it on the counter. After about 30 minutes, remove the foil and remove the bottom piece of plastic wrap. Place on a serving platter and flip the cake over so that it is now right-side up. It should thaw completely after 2-3 hours at room temperature. Prepare your Vanilla Buttercream, decorate, and serve!

Looking for More Birthday Cake Ideas?
Chocolate Cake with Chocolate Frosting
White Cake (easy boxed mix version)
Easy Cake Decorating Idea (Perfect for Birthdays!)
Sprinkles Cake
Ingredients
- 1 cup (2 sticks / 226 g) unsalted butter, room temperature
- ½ cup shortening
- 3 cups (600 g) granulated sugar
- 5 large eggs, room temperature
- 2 teaspoons vanilla
- 3 cups (375 g) all-purpose flour
- 2 teaspoons baking powder
- ¼ teaspoon kosher salt
- 1 cup (245 g) whole milk
- 1 ½ cups rainbow jimmies (sprinkles)
Instructions
- Preheat oven to 350º F. Prepare three 8-inch round cake pans with nonstick baking spray and line the pan with a parchment paper round. (Don’t skip this step)
- In the bowl of a stand mixer fitted with the paddle attachment, cream together butter and shortening until light and fluffy, about 2 minutes. Stop and scrape sides as needed.
- Slowly add sugar and make sure ingredients are fully incorporated.
- Add eggs one at a time, making sure to fully incorporate each egg before adding another. Add in vanilla.
- In a medium bowl, sift together flour, baking powder, and salt.
- Add flour mixture to butter and shortening mixture alternately with milk mixture, beginning and ending with dry ingredients.
- Remove bowl from stand mixer and stir in the rainbow jimmies by hand.
- Evenly distribute cake batter between cake pans (roughly 2 1/4 cups per pan) and place pans into oven. Bake for 25-30 minutes, or until a toothpick or cake tester inserted in the center comes out mostly clean.
- Cool in cake pans for about 10 minutes, then invert and cool completely on a wire rack.
Video
Notes
Did you make this recipe?
Thank you for making my recipe! You took pictures, right? Well go ahead and post them on Instagram! Be sure to mention me @iambaker and use the hashtag #YouAreBaker.
Based on Add a Pinch’s Best White Cake.


dO YOU HAVE RECIPE FOR A ROSE GERANIEM CAKE . mY GRANDMOTHER MADE THIS CAKE FOR ALL OUR BIRTHDAYS ?
Love you site and everything looks so tasty .My happy is the cook in our house as I’m disabled . He is a great cook and he likes to try different meals and I like seeing recipes on line for him to try .
Looking at you chocolate cake can’t wait for him to make it .
Love your recipes. Love baking, it’s kind of a hobby and that’s what I do whenever I have some free time.
Hello wanted to know how you make whip butter cream icing. Thank you 😊
https://iambaker.net/whipped-vanilla-buttercream/
Will you be posting your Butter Cream Recipe?
Here you go: https://iambaker.net/whipped-vanilla-buttercream/
Excelent!!
Can you post the receipt for the vanilla buttercream icing you used for the ffunfetti cake? Thank you
I did love this cake ! But I do have a question . As you stated it does have a major crust on the cake . I made cupcakes with some left over batter and they stuck really bad , to the wrapper . And the crust on the cake was really hard … what can I do differently with my cupcakes ? And how can I achieve less of a crust ?
Did you ever get a response to this?
Easy wedding cake flavor icing. …..
Help! My cake totally deflated!!! Toothpick came out clean but doesn’t seem done?! What could have happened
I’ve made this cake twice and both times the cake deflated. Major disappointment! Such a shame since it’s very tasty but I won’t be making this cake again.