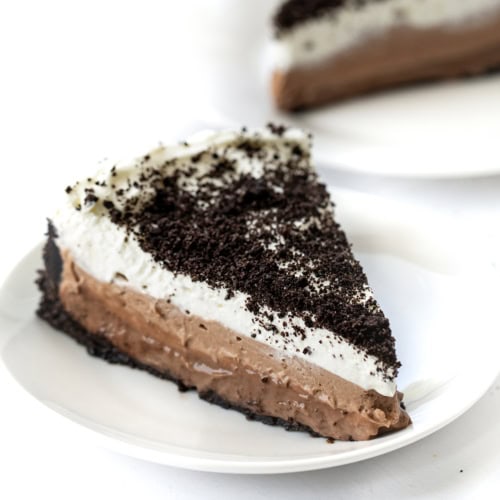
Triple Chocolate Mousse Pie is a decadent no-bake layered dessert with an Oreo crust topped with chocolate pudding, chocolate mousse, and whipped topping. It’s a treat that chocolate lovers will savor and enjoy! For another indulgent chocolate dessert, try my Death By Chocolate Pie, too!

Ingredients & Substitutions
Crust: For the finest crumb, use a food processor to crush the Oreo cookies. Or, you could place them in a sealable plastic bag and crush them with a rolling pin or wine bottle. Reserve 1/4 cup of crumbs to use as a topping. Be sure the rest of the crumbs are completely coated in the melted butter. You could also use a store-bought crust if that is what you have on hand. Or, switch it up and try the dessert with a graham cracker, shortbread, or chocolate wafer crust!
Filling: The filling is a modified recipe from my Chocolate Pudding, which you will want to make to enjoy on its own, too!
Chocolate Mousse: I added cream cheese to my Two Ingredient Chocolate Mousse to give the layer a bit more stability. It also adds a creaminess that I love.
Whipped Topping: If possible, make your own homemade whipped cream.

Can I Make This Dessert Ahead Of Time?
You can certainly get parts of the triple chocolate mousse pie made in advance. The chocolate pudding (filling) layer and mousse can both be made and stored in the refrigerator for up to 3 days. The whipped topping should be used within 10 hours of whipping it, but it could be frozen. To freeze whipped cream, add dollops of it on a parchment-lined baking sheet. Place the dollops in the freezer until they are completely frozen. After frozen, store them in zipped plastic freezer bags (remembering to label and date the bags) until you are ready to use them. Set them on a plate for 15-20 minutes to let thaw when ready to add them to the dessert.

How To Store Triple Chocolate Mousse Pie
Triple Chocolate Mousse Pie should be stored in the refrigerator, covered. It will last up to 2-3 days. If possible, wait to sprinkle the Oreo cookie crumbs over the top until ready to serve.
Triple Chocolate Mousse Pie
Ingredients
Crust
- 3 cups crushed Oreo cookies, about 40 cookies, divided
- 6 tablespoons unsalted butter, melted
Filling
- 2 tablespoons granulated sugar
- 2 tablespoons light brown sugar
- 2 tablespoons unsweetened cocoa powder
- 2 tablespoons cornstarch
- 1 pinch kosher salt
- 1 ⅔ cups (408 g) whole milk
- 1 tablespoon unsalted butter, room temperature
- 1 teaspoon vanilla extract
Mousse
- 1 ½ cups (357 g) heavy whipping cream, divided
- 1 cup (168 g) milk chocolate chips
- 4 ounces cream cheese, softened
Whipped Topping
- 1 cup (238 g) heavy cream
- ¼ cup (31 g) confectioners' sugar
Topping
- reserved Oreo cookie crumbs, for garnish
Instructions
Crust
- Spray a 9-inch springform pan with nonstick cooking spray and line it with parchment paper.
- In a medium bowl, combine 2 ¾ cups Oreo cookie crumbs with melted butter. (Reserve ¼ cup crumbs for the topping.) Make sure to get every crumb coated with butter.
- Press the coated Oreo crumbs into the prepared pan. Pat them flat with your hand and then use a kitchen glass to press flatter. Start at the center and work out halfway up the sides. Set aside.
Filling
- To a medium saucepan, add the granulated sugar, brown sugar, cocoa powder, cornstarch, and salt. Combine with a whisk.
- Place the saucepan over medium heat and gradually whisk in milk until smooth and combined. Cook, stirring constantly until the mixture comes to a boil and thickens enough to coat the back of a metal spoon.
- Remove from heat. Add butter and vanilla and stir to combine. Let it cool for 5 minutes before pouring it over the cookie crust. Place a piece of plastic over the filling. (The plastic should be touching the surface of the pudding; otherwise, a film will form.) Place in the refrigerator to chill for 45 minutes while you prepare the mousse.
Mousse
- In a medium microwave-safe bowl, heat ½ cup of the heavy cream for 50 seconds (depending on microwave strength).
- Add the milk chocolate chips to the heated cream and stir until the chocolate has melted. This should take about 1-2 minutes. Set aside to cool.
- To the bowl of a stand mixer with the paddle attachment, add cream cheese. Mix until smooth and creamy.
- Switch to the whisk attachment. Slowly pour in the remaining heavy cream, mixing until stiff peaks form, about 2-3 minutes.
- Using a large spatula, slowly fold half the whipped cream mixture into the chocolate mixture. Gently fold in the rest of the whipped cream mixture.
- Spoon the mousse onto the chilled pudding layer, carefully spreading it to the edges. Place back into the refrigerator to chill for at least 4 hours, up to overnight.
Whipped Topping
- After the mousse cake has chilled, make the whipped topping. To the bowl of a stand mixer with the whisk attachment, add heavy cream and confectioners' sugar. Start mixing at the lowest speed, and then gradually increase the speed to medium until the cream is thick and forms stiff peaks.
- Top the chilled cake with the whipped topping and reserved Oreo crumbs. Serve.
Did you make this recipe?
Thank you for making my recipe! You took pictures, right? Well go ahead and post them on Instagram! Be sure to mention me @iambaker and use the hashtag #YouAreBaker.
What the Test Kitchen had to say about this recipe:
So yummy! This recipe starts off with a buttery Oreo crust, followed by a chocolate pudding layer, a chocolate mousse layer, and a homemade whipped topping. So delicious!

Elizabeth
I love this dessert! The textures work really well together from the crunchy Oreo cookie crust to the pudding to the mousse to the whipped cream. All I can say is YUM, and that is hard enough with my mouthful of this perfect dessert.

Annabelle
This is definitely worth the time, it's so good! I get a similar vibe to the "dirt cups" dessert from elementary school!

Bella
I'm always a fan of Oreo crusts! Layers of creamy and chocolatey bliss. A beautiful and delicious treat to try.

Rachael
You get all the layers separately but they combine so perfectly in this together. Oreo, pudding layer, mousse layer, and whipped cream make a beautiful and delicious dessert!


Mine didn’t have thick layers either. I am perplexed after following the recipe exactly – but I also don’t have a standing mixer.
Hi
What size is the baking pan?
How would you suggest to alter the chocolate layer to be a little more chocolatety?
Cannot wait to make your chocolate pies . They all look fabulous. The black forest one will be my first one. Yum
My mousse did not turn out at all. I followed the recipe to a T and it just wouldn’t thicken enough to use. It also wasn’t very sweet. I ended up returning to a previous mousse recipe I tried and used that as a replacement, but wasted precious (and so expensive now) chocolate chips for this recipe. The filling was a little thin, but was usable and the crust turned out fine. I might try it again, but I’ll definitely have to make some adjustments.