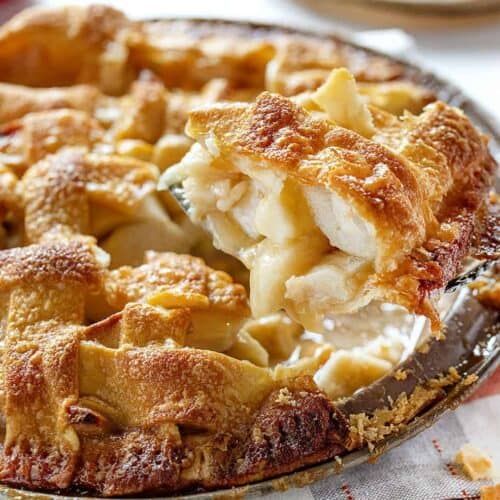
Life isn’t complete without an amazing recipe for Apple Pie. Even better if it has been handed down from generation to generation. This Homemade Caramel Apple Pie is filled to the brim with fresh apples and then coated with a from-scratch caramel sauce that will have everyone licking the plate and asking for a second slice. If you love apple, make sure to check out my apple bundt cake too!

Caramel Apple Pie
Hi iambaker readers! Autumn here, Amanda’s best friend and favorite employee! 😉 I wanted to share something special today.
This recipe is a little near and dear to my heart. My dad used to make this pie every single holiday and any day in between, as long as the family was getting together. Each year, as our family grew, my dad would have to add another pie to the mix. We used to joke that we needed to buy him more pie pans for each new family member we added, just to keep up with the demand. He never complained, it was his favorite contribution to any menu. He loved to watch the expression on everyone’s face when they took that very first delicious bite. We all loved dads pies because, like everything he did, he put his heart and soul into it. He took his time to perfect this recipe and I am happy to share it with you today!

What kind of Apple to use in a Caramel Apple Pie
The first and most important step to getting the perfect apple pie is buying the right apples. So how do you know which apple is the best? Typically, for pie baking, you want an apple that is a little tart. Dad went with granny smith apples. We had a grove of granny smith apple trees on our farm growing up, so there was always an ample supply. This type of apple is great for homemade applesauce but is also a classic choice for apple pie. Granny smith apples are firm and slightly sour, but don’t worry, that sour flavor will transform into the perfect sweetness as the pie bakes.
How to Keep Apples From Browning
One thing my dad did when he tested his recipes, was to come up with tips he could pass down. His most famous tip was how to prevent apples from turning brown. After some research, I found out what actually causes this to happen.
It turns out that apples contain an enzyme that reacts to oxygen in a bad way. This is what causes them to have that browning effect within minutes of being sliced or bitten into. It doesn’t matter how crisp the apple is, no one wants to eat a brown apple. In order to prevent that, my dad would give the apples a saltwater bath. Immediately after cutting them, he would submerge the apples in saltwater. The water and salt combination blocks the amount of oxygen available to the apple and slows down the browning process significantly, leaving you with the perfectly not-brown apple! And no, they don’t taste salty!

How to Make a Lattice Pie Crust
Making the lattice pie crust is a bit of an art, but once you get the basics down you will breeze right through it. Start by arranging half of the strips over the top of the apples, leaving a little space in between each one. It’s ok if the strips hang over the pie, you will cut them down to the right size at the end. Fold every other strip up to about the mid-line of the pie. Lay another strip over the middle of the pie, perpendicular to the others. Fold the parallel strips back down, then fold up all the other strips. Lay another perpendicular strip down, and repeat until all the strips have been used. Once you have everything in place, trim the ends of the latticework even with the edge of the pie pan.

Basic Crust Design
The latticework design is the one the dad used and is probably the most common pie crust design out there. He loved it because it was the perfect pie to crust ratio. There are plenty of other design options though. You can really flex those creative muscles and make your pie unique and fun for you. You can make the slices different sizes or place them in an asymmetrical manner if you want to try something new. You can use a cookie cutter to cut out specific shapes or even leave the top open. You can also use a different method for crimping. Dad liked to stick with the tried and true fork crimping method, but you could also pinch, fold, or roll the edges together to create a seam. The seam is important though, this is what holds in all of the yummy caramel apple mixture!

Homemade Caramel Mixture
Here is the best part of dad’s recipe. The caramel sauce gets drizzled ON TOP of the pie crust. Some apple pie recipes call for an egg wash to make the crust super crispy, but that isn’t the case with this one. The caramel sauce does all of the work! Dad would take his time with this step to make sure that the entire top of the pie was completely covered.
Another tip: Make sure you don’t lose any of the precious sauce by getting too close to the edge. Feel free to use a pastry brush to spread it gently over any spots that you missed (including the edge). The remaining sauce will sink into the pie and blend in with the apples and the bottom crust.

Cooking the Apple Pie
A couple of things worth mentioning when it comes to cooking apple pie. The caramel sauce does a good job of crisping the crust but it does a few other things that you should be watching for.
Watch For Dripping Caramel
The sauce gets bubbly hot and can drip out over the edge of the pan. Assuming that at some point in your life you have cleaned an oven, you probably try to avoid it at all costs. Not only can dripping caramel cause your fire alarms to go off, it is really hard to clean up. Avoid this by placing a cookie sheet on the bottom of the oven to catch any spillovers.
Watch For Burning Crust
Cooking times tend to vary from pie to pie, and sometimes you will find yourself in an awful predicament. Your pie hasn’t finished cooking but (gasp) your crust edges are starting to burn. A simple trick I have learned is to create a tin foil barrier around the edge of the crust. You don’t have to put it on right away, just when you notice the edges are starting to brown. Tear off a square of foil large enough to cover your pie and fold it twice to make a square. Using scissors, cut a pie-shaped circle out of the middle. When you unfold the foil, you should have a foil ring. Place this over the pie and crimp lightly to hold it in place before returning the pie to the oven.

How to Serve Apple Pie
Apple pie needs some time to cool down before serving or cutting into it. I know it will be difficult, but you will want to wait at least 30 torturous minutes before actually steal your first slice. Trust me, growing up with the pie king taught me some kitchen patience but that doesn’t mean it was ever easy. The wait is worth it. Dad would serve this up at room temperature and it never really had a chance to get cold, but you can serve it that way. Whatever you do, make sure to serve it up with a scoop of ice cream or a spoonful of whipped cream! I hope you enjoy this amazing recipe as much as we all did!

Apple Pie
Ingredients
Apples
- 8 Granny Smith apples, peeled, cored and sliced
- 6 cups water
- 1½ teaspoons salt
Caramel Sauce
- ½ cup unsalted butter
- 3 tablespoons all-purpose flour
- ½ cup white sugar
- ½ cup packed brown sugar
- ¼ cup water
Pie Assembly
- 2 unbaked pie dough crusts
Instructions
- Preheat oven to 425° F
Apples
- In a large bowl add sliced apples, water, and salt. Allow the apples to rest in the water for about 10 minutes.
Caramel Sauce
- While the apples are soaking, melt butter in a medium saucepan. Stir in flour to form a paste.
- Add sugar, brown sugar, and water and bring to a boil. Reduce the temperature to low, and simmer 5 minutes. Remove from heat and set aside.
Pie Assembly
- Set out an 18" piece of parchment and roll out one of the pie crusts to about 14". Using a pizza cutter, slice into 1-inch strips. Set aside.
- Place the second pie crust in the bottom of a 9-inch pie pan. Pressing the sides to fit the pan.
- Drain and rinse the sliced apples to wash off any remaining salt, and then pour them on top of the bottom crust.
- Cover with a latticework crust by arranging half the strips over the pie, in parallel lines, leaving space in between.
- Fold every other strip up to about the mid-line of the pie. Lay another strip over the middle of the pie, perpendicular to the others. Fold the parallel strips back down, then fold up all the other strips. Lay another perpendicular strip down, and repeat until all the strips have been used.
- Trim any excess dough and press to adhere to the bottom crust. Using a fork, crimp the edge of the pie to seal.
- Gently pour the sugar mixture over the latticework crust. Do your best to cover as much of the crust as you can, gently use a basting brush to cover any open spots.
- Bake on the lowest oven rack for 15 minutes at 425° and then reduce the temperature to 350° F, and bake for another 35 to 40 minutes.
Did you make this recipe?
Thank you for making my recipe! You took pictures, right? Well go ahead and post them on Instagram! Be sure to mention me @iambaker and use the hashtag #YouAreBaker.


Why do you soak apples in salt water?
Two people have asked a question why do you soak the apples in salt water and twice they have been ignored is there a reason why you do not want to answer the question
That is because the answer is written out IN DETAIL in the post. Literally right under “How to Keep the Apples From Browning”. Feel free to read for yourself and not accuse me of “ignoring” people.
I have this in the oven and it smells fantastic! I’m watching the crust carefully. I also made your pie crust recipe. Super excited to eat this later.
How thick do the apples get cut and in the pics I don’t see the sauce?
Made this today and we LOVE it!
I need to make this pie for Thanksgiving. How many days before, canI bake it?
1-2 days at most. The best way to make your apple pie in advance is to bake the pie completely, then chill it overnight. Allow the pie to sit at room temperature for at least an hour before serving.
🤔 so is the caramel sauce only for the top crust? I see no sugar/ spices to the actual apples when I read the recipe which I found odd
Looks Delicious! I’m nit fond of cream cheese ,but family is__ would love to try this out for Hoildays for sure . Thank you for sharing great recipes 😊 😇
Does this pie freeze well?