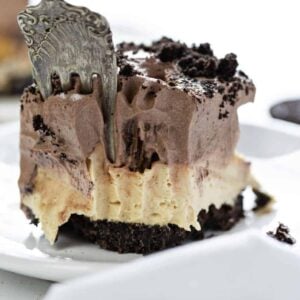
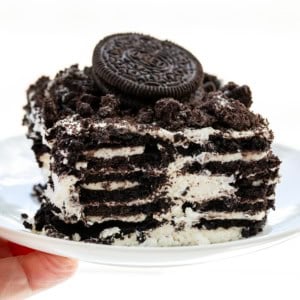
When it comes to peanut butter desserts, this Peanut Butter Oreo Dessert will top them all. This delectable treat has layers of velvety peanut butter filling, peanut butter-filled chocolate candy, and a rich hot fudge mousse piled on top of an Oreo cookie crust. To top it all off, there is no baking involved! If you love no-bake desserts, make sure to check out my piggy pie dessert and my no-bake cheesecake!

Peanut Butter Oreo Dessert
If you are a peanut butter dessert lover like me, this one is hands down one of my favorites. The thick Oreo crust is the perfect complement to peanut butter. And, we definitely introduce peanut butter in this dessert, and in a few different amazing ways! For another lavish, layered, and decadent Oreo crust dessert, be sure to try my Chocolate Mud Bars!

Ingredients & Substitutions
Crust: The crust is a simple mixture of crushed Oreo Cookies and butter. The consistency of the cookie crumbles is important, so I would recommend using a food processor to ensure that you can get the finest grain. For this dessert, I left the white cream filling in the Oreo during the food processing step. You could also use a store-bought cookie crust.
Peanut Butter Filling: For the peanut butter filling, start by creaming the cream cheese to make it light and fluffy, and then add in the peanut butter, whipped cream, and confectioners’ sugar. Pour that on top of the Oreo Crust. Next, chop up some peanut butter cups, or buy the mini peanut butter cups and just use those (which is what I did).
Chocolate Mousse: You will have some chocolate mousse leftover. Simply save it to serve as a dessert or enjoy the chocolate treat yourself!

Can I Use a Different Pan?
You can use a different-sized pan, but it will change the height of the layers. For instance, if you use an 8×8-inch pan, it will be very, very thick and will overflow. If you use a 9×13-inch pan the layers will be thinner.

How to Store Peanut Butter Oreo Dessert
This dessert should be kept covered and refrigerated. It should last 5-6 days in the refrigerator.
Creamy No Bake Desserts

Peanut Butter Oreo Dessert
Ingredients
Oreo Crust
- 30 Oreo cookies
- ½ cup (1 stick / 113 g) unsalted butter, melted
Cream Cheese Layer
- 8 ounces cream cheese, softened
- ½ cup (128 g) creamy peanut butter
- 1 cup (125 g) confectioners' sugar
- 8 ounces whipped topping
- 30 mini peanut butter cups, or 9 full-size, chopped
Chocolate Mousse Layer
- 1 package (3.9 ounces) dry instant chocolate fudge pudding mix
- 2 cups (490 g) whole milk
- 8 ounces whipped topping
- ½ cup (63 g) confectioners' sugar
Instructions
Oreo Crust
- Using a food processor, process 30 Oreo cookies until they are a fine crumb. (It's okay if there are a few cookie chunks.) Set aside ¼ cup crumbs for the topping.
- In a large bowl, combine remaining cookie crumbs with melted butter until fully incorporated.
- Press cookie mixture into an ungreased 9-inch square dish; set aside.
Cream Cheese Layer
- In a large bowl, beat the cream cheese with a hand mixer until light and fluffy.
- Add peanut butter and 1 cup of confectioners' sugar. Stir together until smooth.
- Fold in the whipped topping. Spread over crust.
- Sprinkle with chopped peanut butter cups.
Chocolate Mousse Layer
- In another large bowl, beat the milk, pudding mix, and confectioners' sugar until it begins to thicken (about 2 minutes).
- Fold in whipped topping and continue folding until fully combined. Spread over the chopped peanut butter cups.
- Sprinkle the reserved cookie crumbs over the top. Cover and chill for at least 2 hours.
Video
Did you make this recipe?
Thank you for making my recipe! You took pictures, right? Well go ahead and post them on Instagram! Be sure to mention me @iambaker and use the hashtag #YouAreBaker.


Why no receipt for peanut fudge??
Hi, Jacqueline! I work with iambaker and am happy to help with questions. Here is a recipe for peanut butter fudge, if that is what you are looking for. Have a great day!
Can this recipe be doubled and put into a 9 x 13″ pan?
I just made this and wish I had used a 9×13 dish. I used 8″ square pyrex and it is above the rim so I can’t put a lid on it. (I’m making it the night before, so we can enjoy tomorrow.) Also 15 minute prep time is absolutely a LIE. It took me an hour and a LOT of dishes and bowls.
I tasted every layer as I went along and it’s delicious, though. (I don’t even like cream cheese, but it was buried pretty deep in that layer. I’m not telling my kids it’s in there.) I’m sure it will be great together.
I wish I had waited to put the topping on though, since I’m sure it will be soggy tomorrow. Just didn’t think that one through enough until it was too late.
I made this and did 1 1/2 the recipe and it filled a 9×13 pan and there was enough for two mini ones. Great if you are taking to a dinner, you still have a sample for yourself!!! It is very rich but SO good. I did take one reviewers advice and didn’t use the full amount of cool whip on either layer. This was a hit for sure!
Can you use spring form pan making the Oreo peanut butter cheese cake?
Sure.
What do you do or how would you incorporate the oreo creme middles?
Can this recipe be frozen? I’m trying to make some stuff to freeze to have ready for post-baby!
One of my favorite things to make make it
Made this with Gluten-free Oreos since my love has an allergy to wheat. It was AMAZING and yes Very Rich, but I guarantee I’ll be making it again in the very near future!!
I made this and everyone raved about how good it is.
So glad!