
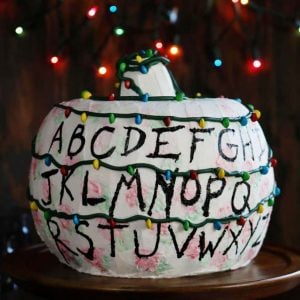
Halloween Pumpkin Cake
The reason I am telling you this… its because I had no energy to make it from scratch. Everything in this recipe is from a box or can.
If you want to duplicate this recipe with your favorite from scratch recipes please do!
You will need:
2 boxes Devils Food Cake (from scratch chocolate cake recipe)
1 box white cake (white cake recipe)
8 cups vanilla frosting
1 golf ball sized portion of fondant
Orange, Green, Yellow and Black food coloring
Small round cookie cutter
I started out by making the white cake mix. I am going to need only two cupcakes for this recipes, but I usually make four just in case I make a mistake along the way. I do that a lot. I used theremainingbatter and make little cuppies.
But! Before you use all that white batter, save about 1/2 cup. Add 1-2 drops yellow food coloring and then make two yellow cupcakes.
I then baked four 8in (you can do 9in as well) round devils food cakes. I stacked THREE of the layers, frosted between each layer and then frosted the outside.
You do NOT have to frost the outside. I do not know why I did. I was so, so foolish.

Put it in the freezer for 15-30 minutes or in the refrigerator for a couple hours, or up to overnight.
Then get out your handy dandy small round cookie cutter.

I think a good size would be just slightly smaller than the base of a cupcake.
Using your cookie cutter, find the center of your cake and press the cutter all the way to the bottom. You will need to remove the excess cake, and I usually just use a spoon.
I then take the fourth devils food layer and cut out a V-shaped potion out of the top. This will be the ‘flame’ to our candle.

Then take two white cupcakes, cut off any brown edges, and carefully insert them into the center of the devils food cake. This is going to be the candle.
Now, place the fourth devils food layer on top. Grab a yellow cupcake and shape the top in a V pattern. Then just plop it onto the top! The V part will be our ‘flame” and the base of the cupcake will be our pumpkin stem.

Now throw that in the freezer for a few minutes or in the fridge for an hour to get nice a firm. Your next step is to carve your pumpkin shape!
I have seen this cake baked with casserole dishes to get the perfect shape for the pumpkin, but I sorta enjoy the carving process.

Plus its super easy to do. You can’t screw it up!
You can either chill your cake again (I did) or start with your crumb coat. This is a layer of frosting that is used to help keep all the crumbs from showing on your final coat.
Take two or two and a half cans of frosting and place in a bowl. Add a few drops of orange food coloring until you get the desired color. You are now ready to frost!

Can you see all those black specks in there? We don’t want that on the final product. So now just chill this cake and take a break.
And here it is after I have added another layer of frosting.

I also grabbed about a 1/2 cup of frosting and added green food coloring. This is for the stem and all the swirly vines I love to add.
To get the perfect jack-o-lantern face, I have found that using fondant works really well. I just took a small amount, added black food coloring, then rolled it out on a non-stick surface. (you can always add some cornstarch below the fondant to ensure it doesn’t stick)
Now, find your ideal jack-o-lantern face! (you can do a search on google and find thousands or just wing it) Print one off the internet and just trace onto your fondant or freehand one. If you screw up, just re-roll your fondant and start over!

Place the fondant on the cake, no glue needed, and gently press in place.

I had so much fun creating a face I made one for the front and the back of my cake!

If I can find the energy (or if anyone is interested) I will do a mini tutorial on how to do these adorable pumpkin cuppies for my next post.
Click here for the Pumpkin Cupcake Tutorial!

And here is the inside of our candlelit jack-o-lantern cake! Fun huh? And pretty simple to do.

Hope you enjoyed seeing this cake made, and more importantly, I hope you will make one yourself!

Happy Halloween!


Thank you SO much for the tutorial! I have assignment for my English class to create a piece of art based on a soliloquy for Macbeth, and one of the lines is “out out, brief candle,” so this cake is perfect for it! It’s also a very tasty form of art. 🙂
this is awesome
ainslie johnson
age 12
I have Wilton’s Icing color, do you think I could use that for the yellow cupcake?
This is so pretty! I love it. The whole idea is really awesome. Happy Halloween.
WARNING: This cake does not travel well …. with the core filled with a different cake, the layers have been compromised and break apart easily.
My coworkers loved it …. but we had to call it a “smashing pumpkins” cake. I just had to laugh as I carried the wreckage into my office. 🙂
This is fabulous!!! Thanks for the tutorial!!!
Ooooooh…..I can’t wait to make this. Thank you so much for sharing this and your petit fours.
This cake is very cute and cleaver. But instead of making 4 round cakes how about making 2 bundt cakes? The hole is already there and can be made larger to fit the cupcake surprise in the middle. Insert the cupcakes in the hole. Frost one cake flat bottom then place the flat bottom of the 2nd cake on top to form a pumpkin. I am having a kid’s Halloween Party this Saturday and am going to try this out.
Amazing tutorials…how many get to genuinely share..keep going,u r a great inspiration to amateurs like me in india
oh wow, that is so clever!