UPDATED! Video Below. 🙂
Today I am sharing four easy and beautiful ways to frost a cupcake using any open star tip, or 1M tip. These techniques on how to frost cupcakes are perfect for any level baker and look like they are straight from the bakery!
! #chocolate #buttercream #cupcakedecorating")
I am a huge huge fan of the open star tip. I use it on 90% of my cake designs and 99.9% of my cupcakes.
Today I thought I would show you four really easy techniques to decorate a cupcake. There are, of course, unlimited possibilities as to how you can use an open star tip. I could probably do three more posts just like this one! But for now, I will just stick to the basics.
For these cupcakes, I recommend a great white cake recipe as well as an amazing chocolate buttercream recipe!
How to Frost Cupcakes
A few simple tools can make a world of difference when decorating cupcakes! The 1M tip, or open star tip, is readily available at most grocery stores today and are very inexpensive. (and often come with piping bags!) You will want to be properly prepared with all of your tools and cupcakes. Start by baking cupcakes and allowing them to cool before frosting. Prepare your buttercream and place it into pastry bags fitted with your tip. (Detailed information on how to use piping bags and how to double bag here) Practice on a piece of wax or parchment paper first to get a good grasp of the pressure needed and flow of frosting. Now you are ready to start piping on your cupcakes!
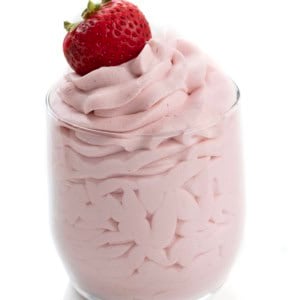
Rosette Technique
! #chocolate #buttercream #cupcakedecorating")
1. Apply slight pressure and make a dollop in the center (without releasing pressure).
2. Still applying pressure, slowly move tip out from the center and start to circle around center dollop.
3. Make sure tip remains at a 90-degree angle.
4. Complete one circle around the center and then release pressure.
Variation: Applying extra pressure will create a little “ruffle” along the edges of the rosette. You can see that here.
! #chocolate #buttercream #cupcakedecorating")
As you can imagine, this technique looks wonderful in pale pinks, yellows, and whites. Or covering an entire cake! (Rose Cake)
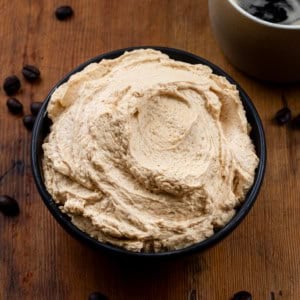
“Fluffy” Frosting
It’s a billowy cloud of buttercream deliciousness!
! #chocolate #buttercream #cupcakedecorating")
1. Start by applying pressure to the frosting bag in the center of the cupcake. The tip should be straight up and down.
2. Apply more pressure and raise tip just slightly.
3. Let frosting spill out and fill in by using pressure only, do not move tip around. (If you can see in the images above, my tip barely moves throughout the whole process.)
4. Release pressure and lift tip straight up.
Variation: Use two-tones of color in the frosting.
! #chocolate #buttercream #cupcakedecorating")
By far one of my favorite ways to decorate a cupcake, but be warned that it is a lot of frosting.
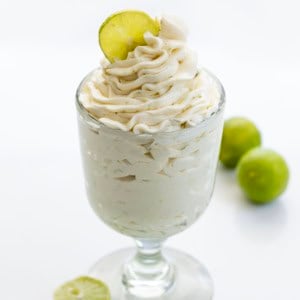
Mini Flower
! #chocolate #buttercream #cupcakedecorating")
1. Start at the outer edge of cupcake and hold bag at 90-degree angle. Apply slight pressure to frosting bag.
2. Moving tip upward quickly, release pressure on the bag.
3. Repeat that same motion around the entire cupcake, then place mini flower dollop in the middle.
Variation: Twist bag as you are applying pressure. This technique is extremely beautiful when using soft pastel colors.
! #chocolate #buttercream #cupcakedecorating")
I especially love this technique with cream cheese frosting on a red velvet cupcake. I am not sure why. 😉
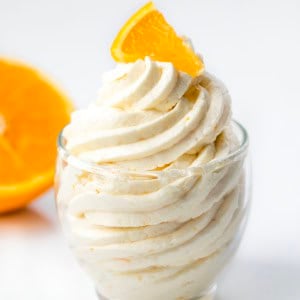
Tall Ruffle
This is my go-to method when I am making cupcakes for events. People never fail to oohh and aahh!
! #chocolate #buttercream #cupcakedecorating")
1. Apply slight pressure and make a dollop in the center (without releasing pressure).
2. Still applying pressure, slowly move tip out from the center and start to circle around center dollop.
3. Make one complete rotation around the center then start around again, only making your circle slightly smaller while you are moving up.
4. Move tip around in one final small rotation (three tiers in all), then quickly move tip up while releasing pressure on the bag.
Variation: Apply extra pressure to create a bit of a “ruffle” on the edges of the frosting.
! #chocolate #buttercream #cupcakedecorating")
I like this specific method because you can make a “clean” version and a really really ruffly (that’s totally a word) version. See here! And on a cake here!
So what is my favorite?
I think this one!
! #chocolate #buttercream #cupcakedecorating")
Which of the four is your favorite?
! #chocolate #buttercream #cupcakedecorating")
See more tips on How to Frost Cupcakes here:


This has got to be one of the coolest and most useful posts I’ve EVER SEEN on cupcake frosting! Thank you thank you a million times, i’ve totally pinned for later and bookmarked this page 🙂
Thank you! I just may have to do more! So appreciate the pins and have a blessed day! 🙂
Beautiful cupcakes, photos and tutorial! I love them all! Thanks so much for sharing and yes, please ~ more. 🙂 You are so talented and I must get your book.
xo
Pat
It’s a great tutorial and like with every you produce. Have a great weekend xoxo
You do such a good job of explaining and using pictures to demonstrate. Thank you.
How pretty! That chocolate frosting looks delish, but the presentation just makes it even more beautiful. Will try these techniques ASAP!
I’m all about the frosting so my fave is the fluff! Plus it looks like it’s maybe the least technical so even my shaky grandma hands could handle it 🙂
I love the one with the most frosting, of course! 🙂 Thanks for sharing these awesome tutorials. I pinned them and will definitely be coming back the next time I make cupcakes.
I like your ruffled squiggly technique a lot. I’ve seen other tutorials saying to wiggle the tip back and forth just left to right and not clockwise and counterclockwise, so I’ll have to try still and wiggling to see which gives the best result. I did want to point out, however, that the tip in the photos as well as the tip you linked to another commenter appear to be closed and not open star tips. Perhaps you could change the title or at least text of the post to reflect that or others may be confused? I think that’s why someone asked if it was 1M since 1M is essentially the open star version of the closed star 2D that you recommend as I understand it. Cheers!
Hi Xiaolu! I have so many 1M tips; and half of them are open, the other half are not. (I think Wilton has changed things up over the years.) However, since I no longer care to use Wilton products, I will be keeping the title as “open star” as it achieves similar, if not the same, results and encompasses all brands and styles. These techniques are really meant to be used with all tips similar to 1M and 2D. (I actually just did testing on this yesterday for a new blog post!!) Cheers back to you! 🙂
I like the rosette the best!
Thank you!
THANKS for this tutorial, I will share this with my baking group it will be of great help.